
Installation guide
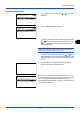
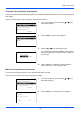
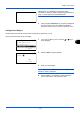
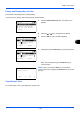
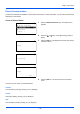
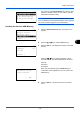


Table Of Contents
- Included Guides
- Safety Conventions in This Guide
- Contents
- Quick Guide
- To make copies
- To print
- To send documents
- To send a FAX(FAX functions available only on products with the FAX function installed.)
- Menu Map
- Environment
- Cautions when handling consumables
- Laser Safety (Europe)
- Legal Restriction on Copying/Scanning
- Legal and Safety Information
- 1 Part Names
- 2 Preparation before Use
- Check bundled items
- Determining the Connection Method and Preparing Cables
- Connecting Cables
- Power On/Off
- Energy Saver Function
- Switching the Language for Display [Language]
- Setting Date and Time
- Network Setup (LAN Cable Connection)
- Installing Software
- Command Center RX
- Preparation for sending a document to a PC
- Loading Paper
- Loading Originals
- 3 Basic Operation
- 4 Copying Functions
- 5 Sending Functions
- Original Size
- Sending Size
- Zoom
- Duplex Sending
- Original Orientation
- File Format
- Original Image
- Adjusting Density
- Scan Resolution
- Color Selection
- Continuous Scan
- File Name Entry
- Subject and Body Entry
- WSD Scan
- Job Finish Notice
- FTP Encrypted TX
- File Separation
- Sharpness
- Backgrnd Density
- Scanning Image using Application
- 6 Document Box
- 7 Status / Job Cancel
- Checking Job Status
- Available Status Screens
- When complete job name not displayed in detailed information
- When complete job name not displayed in detailed information
- When complete destination name not displayed in detailed information
- When complete job name not displayed in detailed information
- When complete destination information not displayed in detailed information
- Checking Job History
- Available Job History Screens
- Displaying Print Job Log
- When complete job name not displayed in detailed information
- When complete destination information not displayed in detailed information
- Displaying Send Job Log
- When complete job name not displayed in detailed information
- When complete destination name not displayed in detailed information
- Displaying Store Job Log
- When complete job name not displayed in detailed information
- When complete destination information not displayed in detailed information
- Sending the Job Log History
- Pause and Resumption of Jobs
- Canceling of Jobs
- Device/Communication
- Checking Job Status
- 8 Default Setting (System Menu)
- Common Settings
- Copy Settings
- Printer Settings
- Sending Settings
- Document Box Settings
- Printing Reports/Sending Notice
- Adjustment/Maintenance
- Editing Destination (Address Book/Adding One-Touch Keys)
- Restarting the System
- Network Setup
- Network Security
- Optional Network
- NW InterfaceSend
- Interface Block Setting
- Security Level (Security Level setting)
- Optional Functions
- 9 Maintenance
- 10 Troubleshooting
- 11 Management
- Appendix
- Index

7
7-19
Status / Job Cancel
Pause and Resumption of Jobs
Pause /resume all printing jobs in printing/waiting.
The procedure for pausing and resuming jobs is explained below.
1
Press the
Status
/
Job Cancel
key. The Status menu
appears.
2
Press the
or
key to select [Print Job Status].
3
Press the
OK
key. Print Job Status appears.
4
Press [Pause] (the
Left Select
key). Printing is paused.
When you press [Resume] (the
Left Select
key) to
resume printing.
NOTE:
When you press the
Back
key, a confirmation
screen appears. Press [Yes] (the
Left Select
key) to resume
printing.
Canceling of Jobs
For canceling jobs, refer to
Canceling Jobs on page 3-28
.
Status:
a
b
*********************
2
Send Job Status
3
Store Job Status
[ Pause ]
1
Print Job Status
Print Job Status:
a
b
*********************
0009 maury’s data
0010
y
aaaa
[ Pause ] [ Menu ]
0008 Copy
r
Pausing:
a
b
*********************
0009 maury’s data
s
0010
y
aaaa
s
[ Resume ] [ Menu ]
0008 Copy
s
Resume paused jobs.
Are you sure?
[ Yes ] [ No ]