
Installation guide
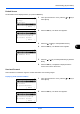
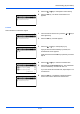
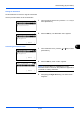
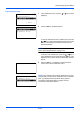
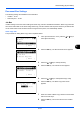
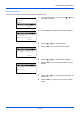

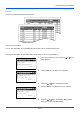
Table Of Contents
- Included Guides
- Safety Conventions in This Guide
- Contents
- Quick Guide
- To make copies
- To print
- To send documents
- To send a FAX(FAX functions available only on products with the FAX function installed.)
- Menu Map
- Environment
- Cautions when handling consumables
- Laser Safety (Europe)
- Legal Restriction on Copying/Scanning
- Legal and Safety Information
- 1 Part Names
- 2 Preparation before Use
- Check bundled items
- Determining the Connection Method and Preparing Cables
- Connecting Cables
- Power On/Off
- Energy Saver Function
- Switching the Language for Display [Language]
- Setting Date and Time
- Network Setup (LAN Cable Connection)
- Installing Software
- Command Center RX
- Preparation for sending a document to a PC
- Loading Paper
- Loading Originals
- 3 Basic Operation
- 4 Copying Functions
- 5 Sending Functions
- Original Size
- Sending Size
- Zoom
- Duplex Sending
- Original Orientation
- File Format
- Original Image
- Adjusting Density
- Scan Resolution
- Color Selection
- Continuous Scan
- File Name Entry
- Subject and Body Entry
- WSD Scan
- Job Finish Notice
- FTP Encrypted TX
- File Separation
- Sharpness
- Backgrnd Density
- Scanning Image using Application
- 6 Document Box
- 7 Status / Job Cancel
- Checking Job Status
- Available Status Screens
- When complete job name not displayed in detailed information
- When complete job name not displayed in detailed information
- When complete destination name not displayed in detailed information
- When complete job name not displayed in detailed information
- When complete destination information not displayed in detailed information
- Checking Job History
- Available Job History Screens
- Displaying Print Job Log
- When complete job name not displayed in detailed information
- When complete destination information not displayed in detailed information
- Displaying Send Job Log
- When complete job name not displayed in detailed information
- When complete destination name not displayed in detailed information
- Displaying Store Job Log
- When complete job name not displayed in detailed information
- When complete destination information not displayed in detailed information
- Sending the Job Log History
- Pause and Resumption of Jobs
- Canceling of Jobs
- Device/Communication
- Checking Job Status
- 8 Default Setting (System Menu)
- Common Settings
- Copy Settings
- Printer Settings
- Sending Settings
- Document Box Settings
- Printing Reports/Sending Notice
- Adjustment/Maintenance
- Editing Destination (Address Book/Adding One-Touch Keys)
- Restarting the System
- Network Setup
- Network Security
- Optional Network
- NW InterfaceSend
- Interface Block Setting
- Security Level (Security Level setting)
- Optional Functions
- 9 Maintenance
- 10 Troubleshooting
- 11 Management
- Appendix
- Index

8
8-103
Default Setting (System Menu)
Default Screen
Set the default screen displayed when you press the
Send
key.
1
In the Sys. Menu/Count. menu, press the
or
key to
select [Send].
2
Press the
OK
key. The Send menu appears.
3
Press the
or
key to select [Default Screen].
4
Press the
OK
key. The Default Screen appears.
5
Press the
or
key to select [Destination] or [Address
Book].
6
Press the
OK
key.
Completed.
is displayed and the
screen returns to the Send menu.
Send and Forward
Select whether to forward the original to another destination when sending images.
Displaying Send and Forward Menu
1
In the Sys. Menu/Count. menu, press the
or
key to
select [Send].
2
Press the
OK
key. The Send menu appears.
Sys. Menu/Count.:
a
b
6
Copy
7
Printer
*********************
[ Exit ]
8
Send
Send:
a
b
*********************
2
DestinationCheck
3
Default Screen
[ Exit ]
1
Select Key Set.
Default Screen:
a
b
*********************
2
Address Book
1
*Destination
Sys. Menu/Count.:
a
b
*********************
2
Counter
3
System/Network
[ Exit ]
1
Report
Send:
a
b
*********************
2
DestinationCheck
3
Default Screen
[ Exit ]
1
Select Key Set.