
Installation guide
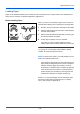
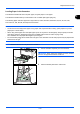
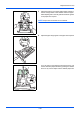
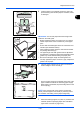
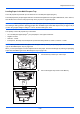

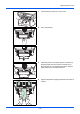
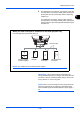
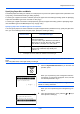
Table Of Contents
- Included Guides
- Safety Conventions in This Guide
- Contents
- Quick Guide
- To make copies
- To print
- To send documents
- To send a FAX(FAX functions available only on products with the FAX function installed.)
- Menu Map
- Environment
- Cautions when handling consumables
- Laser Safety (Europe)
- Legal Restriction on Copying/Scanning
- Legal and Safety Information
- 1 Part Names
- 2 Preparation before Use
- Check bundled items
- Determining the Connection Method and Preparing Cables
- Connecting Cables
- Power On/Off
- Energy Saver Function
- Switching the Language for Display [Language]
- Setting Date and Time
- Network Setup (LAN Cable Connection)
- Installing Software
- Command Center RX
- Preparation for sending a document to a PC
- Loading Paper
- Loading Originals
- 3 Basic Operation
- 4 Copying Functions
- 5 Sending Functions
- Original Size
- Sending Size
- Zoom
- Duplex Sending
- Original Orientation
- File Format
- Original Image
- Adjusting Density
- Scan Resolution
- Color Selection
- Continuous Scan
- File Name Entry
- Subject and Body Entry
- WSD Scan
- Job Finish Notice
- FTP Encrypted TX
- File Separation
- Sharpness
- Backgrnd Density
- Scanning Image using Application
- 6 Document Box
- 7 Status / Job Cancel
- Checking Job Status
- Available Status Screens
- When complete job name not displayed in detailed information
- When complete job name not displayed in detailed information
- When complete destination name not displayed in detailed information
- When complete job name not displayed in detailed information
- When complete destination information not displayed in detailed information
- Checking Job History
- Available Job History Screens
- Displaying Print Job Log
- When complete job name not displayed in detailed information
- When complete destination information not displayed in detailed information
- Displaying Send Job Log
- When complete job name not displayed in detailed information
- When complete destination name not displayed in detailed information
- Displaying Store Job Log
- When complete job name not displayed in detailed information
- When complete destination information not displayed in detailed information
- Sending the Job Log History
- Pause and Resumption of Jobs
- Canceling of Jobs
- Device/Communication
- Checking Job Status
- 8 Default Setting (System Menu)
- Common Settings
- Copy Settings
- Printer Settings
- Sending Settings
- Document Box Settings
- Printing Reports/Sending Notice
- Adjustment/Maintenance
- Editing Destination (Address Book/Adding One-Touch Keys)
- Restarting the System
- Network Setup
- Network Security
- Optional Network
- NW InterfaceSend
- Interface Block Setting
- Security Level (Security Level setting)
- Optional Functions
- 9 Maintenance
- 10 Troubleshooting
- 11 Management
- Appendix
- Index
Preparation before Use
2-46
Loading Paper
Paper can be loaded standardly in the cassette and the multi purpose tray. A paper feeder is also available as an
option (refer to
Overview of Optional Equipment on Appendix-2
).
Before Loading Paper
When you open a new package of paper, fan the sheets to
separate them slightly prior to loading in the following steps.
1
Bend the whole set of sheets to swell them in the middle.
2
Hold the stack at both ends and stretch it while keeping
the entire stack swelled.
3
Raise the right and left hands alternately to create a gap
and feed air between the papers.
4
Finally, align the papers on a level, flat table.
If the paper is curled or folded, straighten it before
loading. Paper that is curled or folded may cause a jam.
CAUTION:
If you copy onto used paper (paper already used
for copying), do not use paper that is stapled or clipped
together. This may damage the machine.
NOTE:
If printouts are curled or not neatly stapled, turn the
stack in the cassette upside down.
Avoid exposing opened paper to high temperatures and
high humidity as dampness can be a cause of problems.
Seal any remaining paper after loading in the multi
purpose tray or cassettes back in the paper storage bag.
If the machine will not be used for a prolonged period,
protect all paper from humidity by removing it from the
cassettes and sealing it in the paper storage bag.
NOTE:
If you use special paper such as letterhead, paper
with holes or paper with pre-prints like logo or company
name, refer to
Paper on Appendix-9
.