Instruction Manual
Manuals
Brands
KYORITSU Manuals
Tools
2417
1
2
3
4
5
6
7
8
9
10
̶
7
̶
4
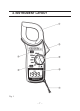
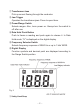
. INSTRUMENT LA
YOUT
Fig.
1
1
...
...
7
8
9
10
11
...
...
20