
Install Manual Part 2
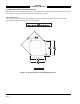
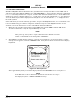
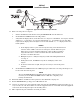
Table Of Contents

SKY497
Installation Manual
3-3
Rev. C
Figure 3-3. Standby Screen
3. Turn SKY497 OFF and then enter the Service Menu (see paragraph 4.4) by holding the left two
buttons (soft-keys 1 and 2) depressed as the system is turned ON.
4. From the Service Menu, calibrate the TRC to the directional antenna (see paragraph 4.4.1).
5. Return to the Service Menu and select System Data (see paragraph 4.4.3).
a. Verify status and save the configuration jumpers (see paragraph 4.4.3.2, Configuration).
WARNING
Verify displayed antenna position matches antenna location on the aircraft
(top or bottom). Failure to do so could give incorrect traffic bearing.
b. Verify that the system has recognized and is responding to installed sensors (see paragraph
4.4.3.3, Data Monitor).
1) Sequence through each Data Monitor display page.
2) Verify that the sensor information displayed is correct.
3) If the information is not correct, the sensor has failed to communicate with the TRC.
Check operation of the sensor and cables between the TRC and sensor.
4) Change the status of the landing gear, squat switch, altitude, and heading sensors. Verify
that the display shows the correct input (i.e., sensing of these signals).
6. Exit the service menu and do the SKYWATCH self-test (see para 3.4).
7. Turn SKY497 OFF, return to the Service Menu and select Ground Test (see paragraph 4.4.4).
8. Verify operation of range function. Soft-key (3) is labeled to indicate the current range. Press soft-key
(3) to toggle the display range between 2 and 6 nm.
9. Select the 6 nautical mile range.
10. Verify that the system toggles through the altitude display modes. Soft-key (2) is labeled to indicate
the current mode. Press Soft-key (2) to select normal (NRM), below (BLW), and above (ABV).
11. Select the NRM (normal) mode.