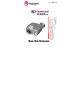
User Manual
This equipment has been tested and found to comply with the limits for a Class B digital device, pursuant to Part 15 of the FCC rules. These limits are designed to provide reasonable protection against harmful interference in a residential installation. This equipment generates, uses, and can radiate radio frequency energy and, if not installed and used in accordance with the instructions, may cause harmful interference to radio communications.
User Manual P/N 7070431 ©2005 L-3 Communications Infrared Products. All Rights Reserved Registered Trademarks of L-3 Communications Infrared Products Patents This product is covered by one or more of the following patents: U.S. Patent Nos.: 5,288,649; 5,367,167; 6,267,501; 6,586,831; 6,521,477; 6,690,014; 6,479,320 and under license to 5,196,703. Euro.Pat.Appln. 1159591. Additional Patents Pending.
1. Introduction .............................................................................. 6 • Welcome to Infrared.......................................................... 6 • Handling & Precautions..................................................... 8 • Contacting L-3 Communications Infrared Products .......... 8 2. Operation .................................................................................. 9 • The X200xp Thermal Imaging Camera ............................. 9 • Holding the Camera....
1. Introduction Thank you for choosing the X200xp Thermal Imaging Camera. With its small size, rugged design, and simplicity, you can now focus on the job at hand, rather than the camera in your hand. Before using this camera, please read these instructions carefully, and retain them for future reference. • Welcome to Infrared L-3 Infrared Products (IP) has long been a leader in the production and development of military products based on infrared thermal imaging.
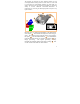
The X200xp was designed to sense differing amounts of long wavelength infrared coming from the various areas of a scene and to convert them to corresponding intensities of visible light on a display. This allows true see–in–the–dark capability, as well as the ability to discern additional information—differences in temperature—by observing the thermal properties of objects in any light condition. C D B A COLD E HOT WARM Infrared energy is emitted proportionally to the temperature of an object A .
• Handling & Precautions ⇒ All batteries can cause property damage or bodily injury if a conductive material such as jewelry or keys touch exposed terminals. Exercise care when placing batteries inside a pocket, case, or other container with metal objects. ⇒ Do not replace batteries in a potentially explosive atmosphere, such as a gas station or any place where you might normally be advised to turn off your vehicle engine. Contact sparking may occur and cause an explosion.
2. Operation • The X200xp Thermal Imaging Camera Rubber Armored construction Submersible to 3 meters Standard AA Batteries Floats in water Viewing Range – 15ft to Infinity Rotate Lens for close range (4ft -15ft) Long eye-relief – can be used w/glasses, face shields, etc. Connect External Power, or external Video.
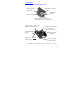
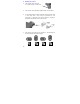
• ⇒ Holding the Camera The Camera can be mounted to a tripod using the 1/4-20 insert. ⇒ The Camera can be held either right-handed, or left-handed. ⇒ To avoid dropping the camera, attach the strap provided. Both a neck strap, and a wrist strap are provided for your convenience. Attach the strap to the camera by looping it through the attachment point as shown below. ⇒ The camera can be held in any orientation – and the image in the LCD Display will remain upright.
• Loading the Batteries Open the battery Door Unscrew Battery Door knob Counterclockwise Open the door to install batteries Install 2 AA Batteries “+” & “ – “ symbols inside the battery compartment indicate the direction to install batteries Notice the Raised Tab next to the (+) sign, and the Sunken Tab next to the (-) sign. These tabs allow the user to install the batteries in complete darkness by “feel” - without having to “see” the battery symbols. Sunken Tab Insert battery with Positive end down.
Close the battery Door Close the Battery Door Screw Battery Door Knob Clockwise Batteries ⇒ The camera will operate from several battery types – Alkaline, Nickel-Metal-Hydride (NiMh) rechargeable, or Lithium - as long as the Batteries are AA size. ⇒ The camera does not have an internal battery charger. If using rechargeable batteries, they must be charged with a separate external charger. Replacing Batteries ⇒ Before removing/replacing batteries, always ensure the camera is first turned off.
Batteries ⇒ ⇒ ⇒ ⇒ When replacing batteries, always replace BOTH batteries. Mixing a fresh battery with a partially discharged battery is potentially hazardous. Never mix battery types (Alkaline, rechargeable, Lithium, etc). Both batteries must be of the same type. Remove batteries if the camera is to be stored for extended periods (2 weeks or more). Always follow the battery manufacturers’ directions for proper disposal of batteries.
camera will shutter only if it’s internal temperature changes by 100c or more. Automatic Contrast Video contrast is constantly adjusted either higher or lower, based upon the informational content in the scene. When viewing people, automobiles, boats, and other warm objects at close range, the video gain will automatically be decreased to provide more detail on facial features and flat surfaces. When viewing a scene with low informational content, i.e.
• Adjusting the Display Brightness Turn the on/off knob past the on/off detent, continuing to increase the LCD display brightness. Bright Off Brighter LCD Display: Turn Clockwise Dimmer LCD Display: Turn Counterclockwise Dim On To maximize battery life, set the LCD Display to the minimum brightness setting practical.
• Focusing for Close-up Operation The X200xp has overall viewing range from 15ft to infinity. In the Far Focus position, objects from 15ft to infinity will be in focus. By rotating the Lens, objects as close as 4ft can be brought into focus. FAR Focus NEAR Focus The Lens may feel difficult to turn. This is normal, and is due to the tight seal required to make the camera waterproof. • Cleaning Do not apply any chemicals to the camera. ⇒ Clean the body of the camera using a water-moistened cloth.
3. Accessories Contact L-3 Communications Infrared Products, for accessories that are approved for use with your X200xp Camera. • Accessory Video & Power Cables Common accessories for the X200xp camera are: AC/DC Power Adapter Power Cable Video Cable These may appear the same as common power/video cables. However, they are actually unique for the X200xp Camera.
AC/DC Power Adapter Connect the AC/DC Power Adapter to the X200xp Connector labeled “Power”, and to AC power (wall outlet). Connecting the AC/DC Power Adapter will disable the batteries, and the X200xp will receive its power from this outlet. The AC/DC Power Adapter will provide power to the camera – however, it will not recharge batteries installed in the camera. When the AC/DC Power Adapter is connected, the Battery Gauge will indicate “Empty”.
4.
Physical 5 ¼ x 4 ½ x 2 (inches) Size 13.4 x 11.4 x 5.1 (cm) Weight 13oz.
• Frequently Asked Questions Q1 Can different battery types be used? A1 As long as the battery is an AA size, the user can install Alkaline, NiMh Rechargeable, or Lithium. Q2 Why does my camera sometimes behave erratically? A2 When batteries become very low, the camera may behave erratically (i.e. video flashing, power cycles on & off, etc). Replacing batteries is the most common cure to erratic operations.
• Trouble Shooting Guide Problem Possible Cause Possible Remedy After waiting the 3 seconds of warm up, the video does not appear, but the logo keeps flashing Low Battery Power Replace Batteries No Image in the LCD display (no logo, no battery icon, and no video) The LCD Display Brightness is too low Adjust the display brightness by turning the on/switch clockwise Batteries are completely discharged Replace Batteries The optional video cable is connected Disconnect the optional video cable The
Problem Possible Cause Possible Remedy The Battery Gauge shows empty External power is connected to the camera. When external power is connected, the battery gauge will indicate empty, regardless of the condition of the batteries installed The internal display is “flickering/ flashing”, has a “ghost-image”, or has horizontal lines. Batteries were replaced before first turning the camera off. Always turn off the camera before replacing batteries. Wait 5-10 minutes and the display will clear itself.
• L-3 Communications Infrared Products Warranty Product(s) will conform to L-3 IP’s current drawings and specifications at the time of delivery and be free from defects in material and workmanship under normal use and service for twelve (12) months, beginning on the date the product is delivered to the customer, or beginning on the date product is placed into service; collectively whichever is the shorter period of time, but in no event shall the period become greater than eighteen months (the “warranty”)
IN NO EVENT SHALL L-3 IP OR ITS LICENSORS BE LIABLE FOR INDIRECT, INCIDENTAL OR CONSEQUENTIAL DAMAGES, LOSS OF PROFITS, LOSS OF USE OR DATA OR INTERRUPTION OF BUSINESS, WHETHER UNDER THEORIES IN TORT, CONTRACT OR OTHERWISE, EVEN IF L-3 IP OR ITS LICENSORS HAVE BEEN ADVISED OF THE POSSIBILITY OF SUCH DAMAGES.
HOW TO RETURN PRODUCTS FOR WARRANTY REPAIR: 1. Return the product to your Authorized Dealer. The Dealer will notify the service department by telephone at 800–990–3275 (US) or 972-528-1528 (Int’l) before returning any product. 2. A Return Authorization (RA) number will be assigned by the service department. This number must be marked clearly on the outside of the package being returned. 3. Service department will provide a shipping address. 4.
L-3 Communications Infrared Products Customer Service Department 13532 North Central Expressway, MS 37 Dallas, Texas 75243 800-990-3275 (U.S.