
User's Manual


the Utility icon. Utility interface will then appear and configuration can be accomplished here.
IV. Using Utility to Set Up Ad-Hoc Network
If wireless LAN has already been set up, simply plug in XI-325. Otherwise, set up a wireless
network by taking the following steps:
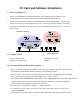
1. On the main utility interface, click on [Diagnostic tools], then click on [Site Survey].
This would disable wireless network links temporarily and display channel quality.
Please note that the blue bars indicate the best quality channels.
Note that amplified kits are shipped factory set to channel 6 and can not be changed.
2. Back on the main utility interface, click on [Network Configuration] and “Configure the
Adapter” window will appear. Setup procedures are as follows:
1) ESSID denotes the assigned name for the designated wireless LAN. If ESSID differs,
then wireless connection between wireless end devices will not be accomplished.
Please note that selecting [Use Non-Specified ESSID: ANY] will possibly be connected
to other wireless LAN. Therefore, ESSID setup is highly recommended.
Example: Specify ESSID as : TEST001.
Notice: Once the ESSID is set on the initial XI-325, and while the rest of the ESSID
remains as default value ANY, then the initial XI-325 with the ESSID must be started
first.
2) Select [Ad-Hoc] under ‘Network Type’, select the Channel in step 1 for [Ad-Hoc
Default Channel] (Note: Only channel 6 is selectable for amplified systems).
(Notice: Under Ad-Hoc, it would require a single uniform channel to enable a wireless
networking group).
3) Use WEP ** (will be available soon). The default is ‘Disable’. If you require high
security in transmission, please select the “Enable” item and select [Encryption].
When you enter encryption configuration, you can type keyword and press [Generate]
to create 4 new encryption keys and select one of them to scramble your transmission
data.
Notice: When your use WEP to communicate with the other wireless clients, all the
wireless devices in this network must have the same encryption key and keyword.
4) Upon completing steps 1~3, click on [Modify] to save altered values.
V. Using Utility to Connect to Access Points
1. On the main Utility interface, click on [Diagnostic Tools], then click on [Access Point
Browser]. This would disable wireless connection temporarily and the subsequent display