
Owner's manual


9
ArtNo.326-0005 - Pastry tray
General Oven Tips
IMPORTANT: Before using for the rst time, to dispel
manufacturing odors turn the ovens to 200 °C (395 °F) in
Convection Assisted mode and run for one hour. To clear
the smell, make sure the room is well ventilated to the
outside air, by opening windows for example.
CAUTION!
The inside door face is constructed with toughened
safety glass.
Take care NOT to scratch the surface when placing
cookware on the glass panel.
DO NOT close the door against the oven racks.
Accidental damage may cause the door glass panel
to fracture.
The wire racks should always be pushed rmly to the back of
the oven.
Bakeware and meat pans should be placed level centrally
on the oven’s wire racks. Keep all trays and containers away
from the sides of the oven, as over browning of the food may
occur.
Always place baking sheets with the widest part across the
oven.
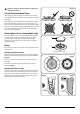
Cooking high moisture content foods can create a ‘steam
burst’, when the oven door is opened. When opening the
oven stand well back and allow any steam to disperse
(Fig.2-14).
When the oven is on, do not leave the door open for longer
than necessary, otherwise the knobs may get very hot.
Always leave a ‘ngers width’ between dishes on the same
rack. This allows the heat to circulate freely around them.
Cover meat when cooking to avoid fat splashes.
To reduce fat splashing when you add vegetables to hot fat
around a roast, dry them thoroughly or brush lightly with
cooking oil.
If you want to brown the base of a pastry dish, preheat the
baking sheet for 15 minutes before placing the dish in the
center of the sheet or use the base heat in the Multifunction
oven.
Where dishes may boil and spill over during cooking, place
them on a baking sheet.
Accessories
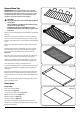
Oven racks
Each oven is supplied with:
1 full width rack (Fig.2-15)
1 telescopic rack with runners (Fig.2-16)
One broiler tray with grid (Fig.2-17)
One broiler tray rack (Fig 2-18)
And one pastry tray (Fig.2-19).
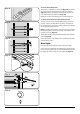
Any shelf can be tted in any of the positions. The oven
shelves are retained when pulled forward but can be easily
removed and retted.
Fig.2-15
Fig.2-17
Fig.2-18
Fig.2-19
Fig.2-16