
Owner's manual


INSTALLATION
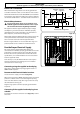
Check the appliance is electrically safe and gas sound when you have nished.
20
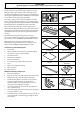
Checking the parts:
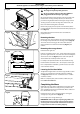
Location of the Range
Do not locate the range where it may be subject to strong
drafts. Any openings in the oor or wall behind the range
should be sealed. Make sure the openings around the base of
the range that supply fresh air for combustion and ventilation
are not obstructed by carpeting or woodwork.
Your range is heavy and can settle into soft oor coverings
such as cushioned vinyl or carpeting. Use care when moving
the range on this type of ooring. It is recommended that the
following instructions be followed to protect your oor.
The range should be installed on a sheet of plywood (or
similar material). When the oor covering ends at the front of
the range, the area that the range will rest on should be built
up with plywood to the same level or higher than the oor
covering.
This will allow the range to be moved for cleaning or
servicing. Also, make sure your oor covering will withstand
80 °C (180 °F); see the ‘Installation Safety Instructions’ section.
Make sure the wall coverings around your range can
withstand the heat generated, up to 90 °C (200 °F), by the
range; see the ‘Installation Safety Instructions’ section.
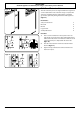
You will also need the following tools:
1.
Electric drill
2. Masonry drill bit & anchors (only r
equired if installing
the range on a stone or concrete oor)
3.
Steel tape measure
4. Phillips head screwdr
iver
5.
Flat head screw
driver
6.
2.5mm Allen key (supplied with the range)
7.
Level
8.
Open-end or adjustable wrench
9. Pencil and ruler
10.
Pipe wrenches
Additional ma
terials you may need:
• Gas line shut-off valve.
• Pipe joint sealant or UL-approved pipe thread tape with
Teflon* that resists action of natural and LP gases.
• Flexible metal appliance connector (½’’ I.D.). A 5foot
length is recommended for ease of installation
but other lengths are acceptable. Never use an old
connector when installing a new range.
• Flare union adapter for connection to gas supply line
(¾’’ or ½’’ NPT x ½’’ I.D.)
• Flare union adapter for connection to pressure regulator
on range (½’’ NPT x ½’’ I.D.)
• To protect any floor covering under the range a sheet of
¼’’ thick plywood or equivalent large enough to stand
the range on.
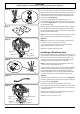
6 grates Allen key
ArtNo.311-0042 - Pan supports USA
2 full capacity racks Broiler tray and grid
Broiler tray rack Telescopic rack with runners
1 pastry tray Side extension kit
ArtNo.326-0005 - Pastry tray
ArtNo.351-0001 - Side extension
panel USA
Toe kick
Reducer plates for conduit
connection
ArtNo.350-0007 - Plinth USA
ArtNo.020-0012 Reducer Plates USA
Anti-tip device
Conversion kit from natural
gas to propane gas
ArtNo.020-0019
Conversion Kit USA