
FAQ


La Crosse Technology, Ltd. Page 6
WEATHER STATION
12-HOUR OR 24-HOUR TIME FORMAT
• Time display: 12-hour or 24-hour format.
• Default is 12-hour time.
• Use the Program Menu to switch time formats.
POWER REQUIREMENTS
2-AA Alkaline batteries power your station.
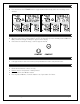
MANUALLY SET TIME: PROGRAM MENU
1. Hold the
SET
button 2 seconds to enter settings mode.
2. Press the
+/HI or -/LO button
to adjust the flashing values.
3. Hold the
+/HI or -/LO button
s to adjust quickly.
4. Press the
SET
button to confirm adjustments and move to the next item.
5. Press the
SEARCH
button at any time to exit.
Settings order:
• Atomic ON/OFF
• DST ON/OFF
• Time Zone
• 12H/24H
• Hour
• Minutes
• Year
• Month
• Date
• Temperature Fahrenheit/Celsius
To begin:
1. Hold the SET button 3 seconds to select atomic time ON/OFF.
ATOMIC ON
will show. ON flashes.
2. Press +/HI or -/LO button if you do not want Atomic Time signal (OFF).
Note:
if ATOMIC is set to OFF; Skip DST, and Time Zone settings and go directly to 12/24 hour Format.
3. Press SET to confirm and move to the Daylight Saving Indicator.
DST ON
will show. ON flashes.
4. Press +/HI or -/LO button to turn DST OFF if you do not observe Daylight Saving Time changes.
5. Press SET to confirm and move to the Time Zone.
EASTERN
will flash.
6. Press +/HI or -/LO button to select your time zone.
7. Press SET to confirm and move to 12/24 hour time format.
FORMAT
will show. 12Hr flashes.
8. Press +/HI or -/LO button to turn select 24 hour time format.
9. Press SET to confirm and move to the hour.
SET
HOUR
will show. The hour flashes.
10. Press +/HI or -/LO button to choose the hour.
11. Press SET to confirm and move to the minutes. The
MINUTES
will show. Minutes flash.
12. Press +/HI or -/LO button to choose the minutes.
13. Press SET to confirm and move to the year. The
SET YEAR
will show. 2017 will flash.
14. Press +/HI or -/LO button to change the year.