WEATHER STATION W IT H T HREE S EN S ORS IN ST RU C T I O N M A N UA L MODELS: 308-1412-3TXV2 DC: 112618 FI N D M A N UA LS , FAQ S, A N D MO R E U N DE R T HE S U P PORT TA B H E R E : bit.
TAB LE O F C O N TEN TS 3. Power Up 3. Custom Date Display 3. Settings Menu 5. Writable Display 5. WWVB Atomic Time Signal 5. Daylight Saving Time Indicator 5. Indoor Comfort Icon 6. HI/LO Temperature & Humidity Records 6. Temperature & Humidity Trend Arrows 6. Sensor Search 7. Change Batteries 7. Factory Restart 7. Sensor Weather Shield 8. Position Sensors 8. We’re Here to Help! 8. Join the Conversation 8. Care and Maintenance 9. Specifications 9. Warranty Info 10.
P OW ER U P 1. Remove the battery cover from all three Outdoor Sensors. Select a different Channel on each sensor. 2. Install 2-AA batteries (not included) into each Outdoor Sensor. Replace battery covers. 3. Insert 2-AA batteries (not included) into the back of your Weather Station. 4. Once each Outdoor Sensor is reading to your station, place it outside in a shaded location. Watch sensor mounting video: http://bit.
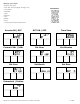
Settings menu order: • Atomic ON | OFF • DST ON | OFF (Daylight Saving Time) • Time Zone • 12H/24H • Hour • Minutes • Year • Month • Date • Temperature Fahrenheit/Celsius Time Zones Atomic ON | OFF DST ON | OFF Time Zone Format 12Hr | 24Hr Set Hour Set Minutes Set Year Set Month Set Date Fahrenheit | Celsius WIRELESS WEATHER STATION WITH THREE SENSORS 4 | PAGE
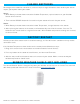
W RITA B L E D I S P L AY • Use a pencil to write the location of each sensor in the silver area above each sensor channel. COMFORT Garage Basement Outdoor W W VB ATO M I C TI M E S I G N A L • The station will automatically search for the atomic time signal at UTC 7:00, 8:00, 9:00, 10:00, and 11:00. • The Atomic Time Signal Icon will flash while searching, and be solid when connected. • Press the SEARCH button anytime, to manually search for the atomic time signal.
HI/LO T E MP E RAT U R E & H U M I D I TY R EC O R D S • All HI/LO temperature/humidity records reset automatically at 12:00 (midnight). • From normal display, press the +/HI button to view indoor and outdoor HI temperature/humidity records for all three sensors. • From normal display, press the -/LO button to view indoor and outdoor LO temperature/humidity records for all three sensors • HI/LO records reset automatically at midnight. No manual reset.
CHAN G E B ATTER I ES We designed this station for convenience, so that a simple change of batteries does not lose your data or require you to power down your station. Sensor: 1. When Battery Indicator shows next to the Outdoor Temperature, replace batteries in your Outdoor Sensor on that channel. 2. Then hold the SENSOR button for 3 seconds and your station will search for your sensor. Station: 1. When Battery Indicator shows next to the Indoor Temperature, change batteries in the station. 2.
P OSI TI O N S EN S O R S Sensors Outside: • Mount the TX141TH-BCHv3 sensors on a north-facing wall or in any well shaded area. Under an eave or deck rail is preferred. • The maximum wireless transmission range to the weather station is over 330 feet (100 meters) in open air, not including walls or floors. • Be sure the sensor is mounted vertically Option 1: • Install one mounting screw into a wall leaving some extended. • Place the transmitter onto the screw.
SP E C I F I CATI O N S INDOOR: Temperature Range: 32°F to 122°F (0°C to 50°C) • When above 122°F (50°C) temperature shows “HI”; • When below 32°F (0°C) temperature displays “LO”.
FCC STATEM EN T This equipment has been tested and found to comply with the limits for a Class B digital device, pursuant to part 15 of the FCC Rules. These limits are designed to provide reasonable protection against harmful interference in a residential installation. This equipment generates, uses and can radiate radio frequency energy and, if not installed and used in accordance with the instructions, may cause harmful interference to radio communications.