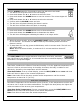
Model: 308-1414M Instruction Manual DC: 100814 WIRELESS COLOR WEATHER STATION Mold Risk for Weather Station & Indoor Remote Sensor Location Color Animated Forecast with Tendency (All icons shown here) Indoor Temperature + Trend & Temperature Alerts Remote Temperature + Trend & Temperature Alerts Remote Humidity & Trends Button Press for Mold Risk Indicator When Using Remote Sensor Indoors Indoor Humidity & Trend Button Press for Mold Risk Indicator for Weather Station Time, Calendar + Alarm Wall Hang
Quick Setup Step 1: Insert the 5 volt AC cord (included) into the wall outlet then into the weather station. Step 2: Insert the 3 new AAA Alkaline batteries (not included) into the weather station. Observe the correct polarity. Step 3: Insert the 2 new AA batteries (not included) into the TX141TH-BV2 remote sensor. Observe the correct polarity. The red LED will flash during transmission.
Adjust Backlight (HI-LOW-OFF) ......................................................................................................... 9 Time Alarm Set ........................................................................................................................................ 10 Deactivate Alarm ........................................................................................................................................ 10 Snooze .......................................................
Introduction La Crosse Technology® introduces a Wireless Color Weather Station with precise, realtime backyard weather. New – Monitor the mold risk for two separate areas using the indoor weather station and multi-use remote sensor. Place the remote sensor outdoors to monitor backyard weather conditions, or use it indoors to monitor high mold risk areas like in a crawl space or a basement. Animated color forecasts with trends react to changing barometric pressure.
STEP 2: (optional battery operation) Slide tab to down and pull out to remove the battery cover. Insert three new AAA Alkaline batteries into the back of the weather station. Observe the correct polarity (see marking inside the battery compartment). The weather station will light up and show indoor temperature, humidity and time.
SNOOZE/LIGHT (HI-LOW-OFF) Button Default Time Display Press to change the LCD backlight brightness. HI/LOW/OFF Press to activate backlight for 10 seconds.(without adaptor) Time Alarm Press to activate the snooze function when alarming HEAT/DEW/SENSOR SEARCH button Default Time Display Press once to view Heat Index. Press twice to view Dew Point. Press a third time to view Indicator for Indoor Mold Risk (weather station) and Remote Mold Risk (sensor). Hold to search for Remote sensor.
Set Time, Date, Temperature Unit Hold the TIME SET button to enter time set mode. 1. Press the ▼ or ▲ buttons to adjust the values. 2. Press the TIME SET button to confirm adjustments and move to the next item. Time Set Order: 1. WWVB time signal (On/Off) 2. Time Zone - 7 time zones 3. DST (Daylight Saving Time On/Off) 4. 12/24 hour time format 5. Hour 6. Minutes 7. Year 8. Month 9. Date 10.
Daylight Saving Time Indicator DST will default to the ON position as most of the country observes the DST change. If you live in an area does not observe the DST change, switch this to the OFF position. 1. DST and ON will flash above the date. 2. Press and release the ▼ or ▲ buttons to turn DST to OFF. 3. Confirm with the TIME SET button and move to 12/24 hour time format. ON DST 12-hour or 24-hour Time Format The Time may be displayed in 12-hour or 24-hour format. Default is 12-hour time.
Temperature Alerts The weather station offers individual, programmable high and low temperature alerts. Hold the ALERT button for five seconds, until the weather station beeps, to select and set temperature alert values. Each alert value will flash separately during alert set mode. REMOTE HIGH alert will flash. Press the ▼ or ▲ buttons to set the alert value, and press the ALERT button to confirm. Then press the ALERT button again switch to REMOTE LOW setting. REMOTE LOW alert will flash.
Time Alarm Set Hold the ALARM button for 5 seconds to enter the alarm time set mode. 1. The alarm hour digit will flash in the time display. 2. Press and release the ▼ or ▲ buttons to select the hour. 3. Press and release the ALARM button to set the minutes. The minute digits will flash. 4. Press and release the ▼ or ▲ buttons to select the minutes. 5. Confirm with the ALARM button and exit. 6. The bell icon will show indicating the alarm is active. 7. The bell icon will flash when the alarm is sounding.
Mold Risk Indicator Mold Risk is based on temperature and humidity. Monitor the mold risk for two separate areas using the indoor weather station and multi-use remote sensor. Place the remote sensor outdoors to monitor backyard weather conditions, or use it indoors to monitor high mold risk areas like in a crawl space or a basement. View Mold Risk Indoor and Remote locations: From a normal display, press the HEAT/DEW button three times and the Mold Risk will show next to the remote and indoor humidity.
View MIN data: Press and release the ▼ button to view the minimum Indoor and Remote Temperatures. Reset MIN data: Hold the ▼ button for five seconds and the Indoor and Remote Minimum Temperatures will be reset. View MAX data: Press and release the ▲button to view the maximum Indoor and Remote Temperatures. Reset MAX data: Hold the ▲ button for five seconds and the Indoor and all Remote Maximum Temperatures will be reset.
Forecast Tendency Indicators (Up, Right, Down Arrows) Working with the forecast icons, the tendency indicators let you know if the weather is improving, steady or worsening. Rising Pressure Weather is Expected to Improve Steady Pressure Weather is Expected to Stay the Same Falling Pressure Weather is Expected to Worsen Manual WWVB Time Signal Search Press the TIME SET button to start or stop a manual signal search. The WWVB Icon flashes during signal search. For information about WWVB visit: www.
The product is not to be used for medical purpose or for public information. It is intended for home use only. The specs of this product may change without prior notice. Improper use or unauthorized opening of housing voids warranty. If the product is not working properly, change the batteries and/or check the AC cord connection.
Warranty Information La Crosse Technology, Ltd. provides a 1-year limited time warranty (from date of purchase) on this product relating to manufacturing defects in materials & workmanship. Before returning a product, please contact our friendly customer support with questions or visit our online help (manuals and FAQS): Phone: 1-608-782-1610 Online Product Support: www.lacrossetechnology.com/support Product Registration: www.lacrossetechnology.com/support/register View full warranty details online at: www.