WT-5600 Radio Controlled Projection Alarm Instruction Manual PROJECTION
TABLE OF CONTENTS Topic Inventory of Contents About WWVB Quick Set-Up Guide Detailed Set-Up Guide Battery Installation Program Mode Programming Sequence Function Buttons Time Zone Setting Time Setting Date Setting 12/24-Hour Mode DST (Daylight Saving Time) Setting Features & Operations Features Radio-Controlled Time Projection LCD light Time Alarm Changing Display Mode Maintenance & Care Troubleshooting Specifications Warranty and Contact Information Page 3 3 4 5 6 6 6-7 7 8 8 8 8-9 9 10 10 10-11 12 12 13
INVENTORY OF CONTENTS 1) WT-5600 Alarm Clock 2) AC adapter/transformer 3) Instruction manual and warranty card. ADDITIONAL EQUIPMENT (not included) 1) Two fresh 1.5V AA batteries (optional for alarm clock) FEATURES OF PROJECTION ALARM 1. 2. 3. 4. 5. Radio-controlled time and date Projection of time LCD light Three modes of date/second display Alarm ABOUT WWVB (Radio Controlled Time) The NIST (National Institute of Standards and Technology—Time and Frequency Division) WWVB radio station is located in Ft.
QUICK SET-UP GUIDE 1) Insert two AA batteries into the Projection alarm and/or plug into wall 2) Wait 10 minutes for WWVB reception. 3) If there is no WWVB reception, manually set the time and date (instructions in the Program Mode). 4) Program the settings. 5) Mount the WT-5600 in a suitable location, where WWVB signal can be received. 6) The projector will activate and remain on if the alarm clock is plugged in. If only batteries are used, the projector will only be activated when a button is pressed.
DETAILED SET-UP GUIDE BATTERY INSTALLATION 1. 2. 3. 4. 5. Remove the battery cover. Observe the correct polarity and install 2 AA batteries. In addition or instead of inserting batteries, the AC adapter can be used. Simply plug the adapter into the receptacle on the bottom of AC adapter the alarm clock and then receptacle plug in adapter. Replace the battery cover. The projector will activate and remain on if the alarm clock is plugged in.
PROGRAM MODE To enter the Program Mode, hold down the “MODE+” button for 2 seconds, until the time zone (“-5” default) flashes in the lower right. The Program Mode Guide is laid out in a manner that allows you to program each function separately, or you can follow the instructions entirely to program the Projection Alarm. Complete programming is usually done for the initial set-up and will require you to skip step 1 of programming sections III through VIII.
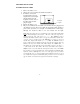
-4h -5h -6h -7h -8h -9h -10h -11h, -12h 0h -1h, -2h, -3h Atlantic Time Eastern Time (default setting) Central Time Mountain Time Pacific Time Alaskan Time Hawaiian Time Next two time zones West of HAW Greenwich Mean Time Three time zones West of GMT 3. From –5h to –8h, a US map with the highlighted time zone will also be displayed to the right of the time display. 4. Press the “AL” button to move to the hour setting or press the “SNOOZE” button to confirm the time zone and return to the display mode.
E. DATE SETTING Note: When the WWVB signal is found, that date will over-ride the manually set date. 1. 2. 3. 4. 5. 6. 7. Hold down the “MODE/+” button for 2 seconds (the selected time zone will flash), press the “AL” button three times until the year flashes. Press the “MODE/+” button to select the year. Press the “AL” button to confirm the year and move to the month setting. Press the “MODE/+” button to select the month. Press the “AL” button to confirm the month and move to the day setting.
B. RADIO-CONTROLLED TIME AND DATE 1. The projection alarm will automatically search for the time signal upon initial set-up and every night. 2. When the signal is being received, there will be a “tower” icon flashing to the right of the time display. 3. When the time signal has been received successfully, the tower icon will remain steady until midnight. 4. The NIST (National Institute of Standards and Technology—Time and Frequency Division) WWVB radio station is located in Ft.
C. PROJECTION OF TIME 1. 2. 3. 4. 5. 6. When plugged into an AC outlet, the projection alarm can continuously project the time. When operating on batteries alone, the Projection Alarm will only project when a button is pressed. The projection will auto-focus for display from three to six feet away. A dark surrounding will be necessary to clearly see the projection. The direction of the display can be rotated 360° in 90° increments by pressing the directional button.
2. ACTIVATING/DEACTIVATING THE ALARM a. After entering the alarm-setting mode, the alarm is activated. b. To toggle between activating Alarm is Active and deactivating the alarm, press the “AL” button briefly. “(((•)))” will be displayed to the left of the time display when the alarm is activated. c. When the snooze bar is pressed, the display will show the time the alarm is set to below the time display. 3.
F. CHANGING DISPLAY MODE (DAY, SECONDS, AND ALARM TIME) There is three possible display modes to view the date, seconds and alarm time. To change the display (starting at the default of month - date): 1. 2. 3. Press the “MODE/+” button and the display will now show seconds. Press the “MODE/+” button and the display will now show alarm time. Press the “MODE/+” button and the display will now show month – date. MAINTENANCE & CARE B.
TROUBLESHOOTING The Projection is faint Problem: 1) Change intensity setting Solution: 2) Use AC adapter 3) Darken surroundings 4) Use fresh batteries (if AC is not used) The LCD is faint. Problem: 1) Replace the batteries. Solution: No reception of WWVB signal. Problem: 1) It may help reception to face the front of the Projection alarm Solution: in the general direction of Ft. Collins, Colorado. 2) Wait overnight for signal. 3) Be sure the Projection alarm is at least 6 feet from any electrical devices, i.
WARRANTY INFORMATION La Crosse Technology, Ltd provides a 1-year limited warranty on this product against manufacturing defects in materials and workmanship. This limited warranty begins on the original date of purchase, is valid only on products purchased and used in North America and only to the original purchaser of this product. To receive warranty service, the purchaser must contact La Crosse Technology, Ltd for problem determination and service procedures.
For warranty work, technical support, or information contact: La Crosse Technology 2809 Losey Blvd. S. La Crosse, WI 54601 Phone: 608.782.1610 Fax: 608.796.1020 e-mail: support@lacrossetechnology.com (warranty work) sales@lacrossetechnology.com (information on other products) web: www.lacrossetechnology.com FCC ID: OMO-01RX (receiver) THIS DEVICE COMPLIES WITH PART 15 OF THE FCC RULES. OPERATION IS SUBJECT TO THE FOLLOWING TWO CONDITIONS: 1. THIS DEVICE MAY NOT CAUSE HARMFUL INTERFERENCE, AND 2.