
World Time Center Product Manual


SET-Key
World Time Center
Introduction
Congratulations on purchasing this state-of-the-art World Time Center as an example of superior design and
engineering. Providing radio controlled time, indoor temperature and humidity displays, outdoor temperature, this unit will
never keep you guessing on time, date or current and future weather conditions. Operation of this product is simple and
straightforward. By reading this operating manual, the user will however receive a better understanding of the WorldTime
Center together with the optimum benefit of all its features.
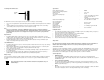
World Time Center
Hanging Hole
Features
World Time Center
• 4 digits showing Hour and Minute in the main display
• WWVB time signal radio-controlled clock with manual time display
• 12/24 hour display
• Time zone selectable
• World time display with specific place represented by 3 sucessive characters
• Calendar display
• Display of weekday (8 languages to choose from)
• Display of current indoor temperature
• Display of current indoor relative humidity
• Display of 8 Moon phases troughout the year
• °C or °F temperature display selectable
• LCD contrast changeable to 8 different tones
• Low battery indicator
• Wall Mounting
Getting started
Remove all parts from the packaging and place onto a table in front of you. Ensure that the following parts are included:
1. World Time Center (main unit)
2. Instruction manual
If any one of the above mentioned parts is missing please contact your supplier.
Please follow all further explanations and descriptions in this manual in order to ensure that your World Time
Center and Outdoor temperature sensor work correctly.
Important Note:
For all users wanting to get additional informations on the function of the World Time Center there is an
alphabetically sorted subject index at the end of this manual offering a number of technical and functional
explanations. For use and operation of this product however the knowledge of this index is not necessary.
Putting into Operation
Basic Setup
1. Open the battery cover of the World Time Center and - checking the correct polarities –
insert 2 x AA, IEC LR6 1.5V batteries into the battery compartment as indicated above and replace the cover.
2. Your World Time Center is now operational.
Reset
To reset the World Time Center. Wait for at least 30 seconds and repeat the setup procedure above.
Important!
After putting into operation (basic setup or reset) all key functions except for the “SET” and the “+” keys should
not be operated until the WWVB time signal has been received or the time is manually set.
Self Programming after Basic Setup or Reset (Putting into Operation)
After the the batteries are inserted (see “Putting into Operation”) into World Time Center and a self programming
sequence will start which cannot be influenced by the user. At first all segments in the LCD will light up for appr. 3
seconds. Next, the unit will perform a battery test followed by the measurements of indoor temperature and humidity,
and a scanning of the WWVB time signals. After this starting phase the indoor temperature (Left on LCD 3) will be
displayed along with the displays “- - -” in the weekday, time (LCD 1), WWVB time (LCD 2) and indoor humidity sections
(Right on LCD 3). If measurements and signal receptions are successful, the dashes will be updated one by one by the
real values measured and received.
Initial Displays
If the “SET” key is pressed after “- - -” is displayed (as described in 7.1), but before the real measurements are
displayed, the learning mode will be terminated. Apart from the temperature already displayed on LCD 3 the following
initial displays will now be assigned to the various sections on the LCD:
• Date (LCD 1) “MON 1.1.99”
• Time of day (LCD 2) “12:00”
If selected:
• Worldtime location (LCD 1) “- - -”
• Worldtime (LCD 1) “12:00”
• Time zone (LCD 2) “EST”
Further default values:
Display modes
• Time: 12 hours
• Temperature: °F (degrees Fahrenheit)
• Language for weekday display: GB (English)
• LCD Contrast: Level 5
Note:
LANGUAGE-
Key
LCD2
LCD3
LCD1
WORLDTIME-Key
TIMEZONE-Ke
y
+ -Key
Battery Cover
Battery
Compartment