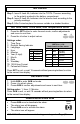
Model: WS-8418U-IT Instruction Manual DC: 062915 ATOMIC WALL CLOCK With Moon Phase and IN/OUT Temperature Front Time, Alarm, + WWVB Icon Indoor Temp, Month, Date, + Moon Phase SET Buttons Back Outdoor Temp + Weekday + ALM SNZ Wall Hanging Hooks TX37U-IT Sensor Battery Compartment 2 “AA” batteries Foldout Stands WS-8418U-IT Battery Cover www.lacrossetechnology.
Get Started Step 1: Insert 2 fresh AA, batteries into the TX37U-IT sensor according to the polarity marked in the battery compartment. Step 2: Insert 2 fresh AA, batteries into the atomic clock according to the polarity markings. Step 3: After 5 minutes place the sensor outside in a shaded location. Set Time, Date, 12/24 Hour, and Temperature Units 1. Press the SET button to enter time set mode, confirm adjustments and move to next item. SET + 2. Press the + button to adjust values. Settings order: 1.
Snooze SNZ Press SNZ to silence an active alarm for 10 minutes. The alarm icon will flash. Press any button to stop the alarm for 24 hours. Seconds Display Features There are four display modes to view the weekday, seconds, and temperatures. The seconds may replace the Indoor temperature, Outdoor Temperature or Weekday. If seconds are counting up on the clock, press the + button to move or remove this feature. Default display: month&date/weekday/indoor temperature /outdoor temperature.
Note: With the moon shown against a light colored background, the phases will show opposite to a paper calendar. The segments that are highlighted will portray the part of the moon that is lit. For instance, the moon will be blank during a new moon and dark during a full moon. Low Battery Icon When the TX icon is displayed replace batteries in the outdoor sensor. When the RX icon is displayed replace batteries in the atomic clock.
Care and Maintenance Do not mix old and new batteries Do not mix Alkaline, Standard, Lithium or Rechargeable Batteries Always purchase the correct size and grade of battery most suitable for the intended use. Replace all batteries of a set at the same time. Clean the battery contacts and also those of the device prior to battery installation. Ensure the batteries are installed correctly with regard to polarity (+and -).
FCC Statement This equipment has been tested and found to comply with the limits for a Class B digital device, pursuant to part 15 of the FCC Rules. These limits are designed to provide reasonable protection against harmful interference in a residential installation. This equipment generates, uses and can radiate radio frequency energy and, if not installed and used in accordance with the instructions, may cause harmful interference to radio communications.