WS-9043U Wireless 433 MHz Radio-controlled Weather Station Instruction Manual
TABLE OF CONTENTS Topic Inventory of Contents/Additional Equipment About WWVB Quick Set-Up Guide Detailed Set-Up Guide Battery installation Program Mode Program Sequence and Default Settings Function Keys Setting the LCD Contrast Setting the Time Zone Daylight Saving Time Setting Radio-controlled Time Setting 12/24-hour Time Setting Setting the Time Setting the Year, Day and Month Setting the Snooze Setting the Forecast Sensitivity Features Weather Forecast Icons and Tendency Arrows Indoor Temperature, Humi
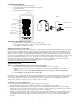
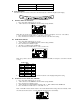
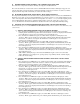
INVENTORY OF CONTENTS 1. The WS-9043U weather station (Figure 1) 2. One TX4U remote temperature/humidity sensor (Figure 2) 3. Mounting hardware 4. Instruction manual and warranty card. Figure 1 Figure 2 Time LCD Moon Phase and Date LCD Rain protection cover Indoor LCD Forecast LCD Wall mounting base Outdoor LCD Heat index and Dew point LCD ADDITIONAL EQUIPMENT (not included) 1. Three fresh AA 1.5V batteries for the indoor weather station. 2. Two fresh AA 1.
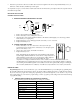
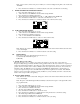
• If a button is pressed before the indoor weather station receives the signal from the remote temperature/humidity sensor, you will need to follow the battery installation procedure again. To complete the set up of your new wireless weather station after the 15 minutes have passed please follow the steps that follow in the Detailed Set-Up Guide. DETAILED SET-UP GUIDE BATTERY INSTALLATION A. REMOTE TEMPERATURE/HUMIDITY SENSOR Mounting Bracket Battery Cover Rain Cover Thermo-Hygro Transmitter 1. 2. 3.
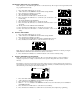
Day Snooze Forecast Sensitivity 1 10 minutes 2 II. FUNCTION KEYS The function keys are located on the front of the unit directly below the LCD (Liquid Crystal Display). II. SETTING THE LCD CONTRAST 1. Press and hold the SET button for 3 seconds. 2. “LCD” will show in the TIME LCD and the number setting will flash. Note: There are 8 LCD contrast levels to choose from—“Lcd 0” is the lightest, and “Lcd 7” is the darkest. 3. Press and release the ALM/+ button to select the level you desire. 4.
Note: Some locations (Arizona and parts of Indiana) do not follow Daylight Saving Time, and should select “DST OFF”. 6. V. Press and release the SET button to confirm and advance to the radio-controlled time on/off setting. RADIO-CONTROLLED TIME ON/OFF SETTING 1. Press and hold the SET button for 3 seconds. 2. “LCD” will show in the TIME LCD and the number setting will flash. 3. Press and release the SET button three times. 4. “RCC” will appear in the DATE LCD and “ON” or “OFF” will flash in the TIME LCD.
VIII. SETTING THE YEAR, DAY AND MONTH Note: Reception of the WWVB signal will also set the date and day. The reception of the signal will override any programmed date and day. 1. 2. 3. 4. 5. 6. Press and hold the SET button for 3 seconds. “LCD” will show in the TIME LCD and the number setting will flash. Press and release the SET button seven times. The year will flash in the DATE LCD. Press and release the ALM/+ button to advance the year.
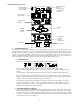
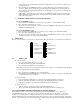
FEATURES OF THE WS-9043U Radio-controlled time icon (indicates radiocontrolled time turned on) WWVB Tower Icon (indicates time reception) Current moon phase display Comfort Level Indicator Forecast icon Weather Tendenc y Arrow Satellite icon (indicates outdoor transmission) Heat Index Dew point I. WEATHER FORECAST The weather forecasting feature is estimated to be 75% accurate and is for the next 12 to 24 hours. The weather forecast is based solely upon the change of air pressure over time.
II. INDOOR TEMPERATURE, HUMIDITY, AND COMFORT LEVEL INDICATOR The current indoor temperature and relative humidity are displayed in the INDOOR LCD. The comfort level indicator is located at the center of the INDOOR LCD. The indicator will display a happy face icon when the temperature is between 68°F and 78.6°F, and the humidity is between 45% and 65%. A sad face icon will be displayed when the temperature and humidity are outside the mentioned ranges. III.
8. 9. date of occurrence are displayed. The maximum record will display for 30 seconds before returning to the normal display mode. Press and release the OUT/MIN button again (once while “MAX” dew point is still displayed, 8 times otherwise). “MIN” appears with the dew point, indicating that the minimum dew point and the time and date of occurrence are displayed. The minimum record will display for 30 seconds before returning to the normal display mode.
monitor temperature only, a TX3U will monitor temperature and display the temperature on its LCD, and the TX3UP will monitor the temperature via a probe for use in pools, spas, etc. Note: When setting up multiple units it is important to remove the batteries from all existing units in operation, then to insert batteries first into all the remote temperature sensor units.
5) Position the remote temperature/humidity sensor in the desired location, ensuring that the indoor weather station can receive the signal. II. THE INDOOR WEATHER STATION The indoor weather station can be mounted in several ways: • With the use of screws • Using its foldout stand A. MOUNTING WITH SCREWS 1) Fix a screw (not included) into the desired wall, leaving approximately 3/16 of an inch (5mm) extended from the wall.
SPECIFICATIONS Weather data measuring range: Indoor Temperature: Outdoor Temperature and Dew Point: Heat Index Indoor relative humidity measuring range: Outdoor relative humidity measuring range: Weather data checking interval: Indoor temperature checking interval: Indoor humidity checking interval: Outdoor temperature checking interval (remote temperature/humidity sensor): Outdoor humidity checking interval (remote temperature/humidity sensor): Outdoor temperature and humidity reception (indoor weather st
For warranty work, technical support, or information contact: La Crosse Technology 2809 Losey Blvd. S. La Crosse, WI 54601 Phone: 608.782.1610 Fax: 608.796.1020 e-mail: support@lacrossetechnology.com (warranty work) sales@lacrossetechnology.com (information on other products) web: www.lacrossetechnology.com Questions ? Instructions? Please visit: www.lacrossetechnology.info/9043 FCC DISCLAIMER This device complies with part 15 of the FCC rules.