WIRELESS WEATHER STATION WITH ADVANCED FORECAST ICON Instruction Manual Contents Language Page _____________________________________________________________ English 1 TABLE OF CONTENTS Topic Inventory of contents Features Setting up About WWVB Function keys LCD screen Manual settings Sunrise, sunset, sun duration Setting the alarm Weather forecast icons Moon phase icons Indoor temperature and humidity Outdoor temperature MIN/MAX readings and resetting 915 MHz Reception 1 This product offers: 2 40 41 42
DST ON/OFF (daylight saving time) Time zone option ±12 hours Year, month, date, weekday calendar display Crescendo alarm with snooze function Advanced Weather Forecast Icons with 15 combinations of weather icons Weather tendency indicator Temperature display with MIN/MAX records and time and date of reception Indoor and outdoor temperature display in ºF or ºC Indoor humidity data display as RH% with MIN/MAX records Can receive up to 3 remote temperature/humidity sensors Sun
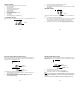
8. 9. In order to ensure sufficient 915 MHz transmission however, this should under good conditions be a distance no more than 330 feet (100 meters) between the final position of the Weather Station and the transmitter (see notes on “Positioning” and “915 MHz Reception”). Once the remote temperature has been received and displayed on the Weather Clock, the WWVB time (radio controlled time) code reception is automatically started. This takes typically between 6-8 minutes in good conditions.
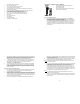
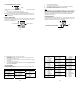
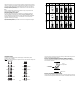
SNOOZE/ SUN key SET key ALM key CH/ + key CH/ + key MIN/ MAX key setting, calendar setting, sun rise/set city selection, snooze function, temperature °F or °C, and weather icon sensitivity setting Reset MIN/MAX values (channels 1, 2, & 3) Stop the alarm during alarm ringing Stop snooze mode Back-light on Increase value in all setting modes Stop the alarm during alarm ringing Press and release to toggle between the outdoor transmitter 1, 2 and 3 (if more than 1 transmitter is used)
MANUAL SETTINGS: The following manual settings can be done in the setting mode: LCD contrast setting Time zone setting Daylight Saving Time (DST) ON/OFF Time reception ON/OFF setting 12/24-Hour setting Manual time setting Calendar setting (Year, Day, & Month) Sunrise/ Sunset city location Snooze setting °F/°C setting Weather forecasting icon sensitivity setting LCD CONTRAST SETTING The LCD contrast can be set within 8 levels, from LCD 0 to LCD7 (Default setting is LCD 5): 1. 2. 3.
1. 2. 3. 4. 5. 12/24 HOUR TIME DISPLAY SETTING flashing The hour display can be selected to show hours in 12-hour or 24-hour settings. (Default 12-Hour). 1. Use the CH/+ key to toggle between 12H or 24H 2. Confirm with the SET key and enter the Manual time setting. Note: When 24h mode display is selected, the calendar format will be date and month display. When 12h mode display is selected, the calendar format will be month and date display.
Hawaii HNL Honolulu Iowa DSM Des Moines DVN Davenport Idaho BOI Boise Illinois ORD Chicago SPI Springfield Indiana EVV Evansville IND Indianapolis Kansas DDC Dodge City K32 Wichita TOP Topeka FAR Fargo Nebraska LNK Lincoln SNY Sidney New Hampshire CON Concord New Jersey TTN Trenton New Mexico ABQ Albuquerque Nevada LAS Las Vegas RNO Reno New York BUF Buffalo JFK New York City SYR Syracuse Ohio CLE Cleveland CMH Columbus SAT San Antonio Utah SLC Salt Lake City Virginia LYH Lynchburg ORF Norfolk Vermont BTV
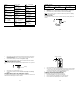
Press the SNOOZE/ SUN key to toggle between the sunrise, sunset, and sun duration time Sun Rise Icon & Sun Rise Time for Selected city City Code Sun Set Icon & Sun Set Time for Selected city Sun Duration Icon & Sun Duration (in hours) for Selected city The alarm time can be set when pressing the ALM key: 1. Press the ALM key until the alarm hour digits flash. 2. Use the CH/+ key to set the alarm hour. 3. Press the ALM key again so the minute digits flash. 4. Use the CH/+ key to set the alarm minutes. 5.
Taking this into account, one can see how the weather has changed and is expected to change. For example, if the indicator is pointing downwards together with cloud and sun icons, then the last noticeable change in the weather was when it was sunny (the sun icon only). Therefore, the next change in the weather will be cloud with rain icons since the indicator is pointing downwards. 78.8ºF (26C) 32 – 49.8ºF 66.2 – 78.6ºF 50 - 66ºF (19– 25.9C) (10-18.9C) (0 – 9.
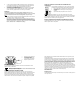
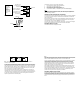
Outdoor Reception Symbol Outdoor temperature Transmitter identification No. (only shown when more than one transmitter is used) TO EXIT THE MANUAL SETTING MODE Maximum icon TOGGLING AND RESETTING THE MIN/MAX READINGS: 1. 2. Note: It is required to reset the outdoor MIN/MAX temperature records of different channels separately (if there are more than 1 wireless sensor used). In normal display mode, press the CH/ + button to select a channel.
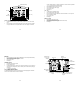
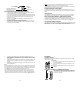
To wall mount: 1. Secure the bracket onto a desired wall using the screws and plastic anchors. 2. Clip the remote temperature sensor onto the bracket. Note: Before permanently fixing the transmitter wall base, place all units in the desired locations to check that the outdoor temperature reading is receivable. In event that the signal is not received, relocate the transmitters or move them slightly as this may help the signal reception.
Crosse Technology, Ltd authorized service center. La Crosse Technology, Ltd will pay ground return shipping charges to the owner of the product to a USA address only.
Have both the indoor display unit and the outdoor transmitter (sensor) inside and five to six feet apart with nothing between them. Remove all power from both units. Press any one of the buttons on the display unit at least 20 times to clear all memory. Verify that the display is blank before proceeding. Let the units sit for ten minutes before installing batteries. Batteries: Use good quality alkaline batteries with an expiration date of at least six years into the future or newer.
Wrong Channel: The channel number is displayed in the lower right corner of your unit above the humidity reading. Use the CH/+ key to move this to Channel 1. If this is set at Channel 2 or 3, you may be getting no signal at all. Or, because of the popularity of our Weather Stations, it is possible for your unit to pick up a signal from a neighbor’s sensor.
Hour is Incorrect. Minutes are Correct. Unit “Jumps” Time. Time Zone Time Zone setting may be incorrect. Please note North American Time Zones are negative numbers. -4 Atlantic, -5 Eastern, -6 Central, -7 Mountain, -8 Pacific, -9 Alaskan, -10 Hawaiian. The dash preceding the number must be showing to properly display the US times. Use the programming mode to select the proper Time Zone. Daylight Savings Time If your time is still off by an increment of one hour, check the Daylight Savings Time setting.
Once the Temperature is recorded, the weather station automatically displays the appropriate Weather Person Icon as an indication of Current Weather and displays a suggestion for dressing accordingly. The Icon will remain permanently visualized on the LCD once it registered a change in temperature and air pressure. Sunrise/Sunset Time To select the City nearest you location, you will need to go into the Set up menu. Press and hold the SET button until you see LCD and a number flashing.
Sensor and Channel Number Indicator Confirming the Unit is Reading Your Sensor Because of the popularity of our Weather Stations, it is possible for your unit to pick up a signal from a neighbor’s sensor. To confirm that your sensor is the primary sensor after a Proper Restart, you can place your sensor in a refrigerator or freezer and recheck the display after 30 minutes to see if the outdoor temperature on the display has fallen accordingly. I Have One Sensor.