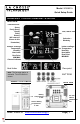
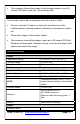
Model: WS6821A Quick Setup Guide WIRELESS COLOR FORECAST STATION FRONT VIEW Forecast icons: Sunny Partly Sunny Cloudy Rainy Stormy (All icons are shown in this illustration) Time, Alarm Time Calendar + Weekday Indoor readings: Temperature Humidity Heat Index Dew Point MIN/MAX Outdoor readings: Temperature Humidity Heat Index Dew Point MIN/MAX Channel Indicator Dew point Heat Index Note: The forecast station is sold with TX141TH-BCHv3 sensor BUTTONS SENSOR :TX141TH-BCHv3 SNOOZE/LIGHT BACK VIEW LED
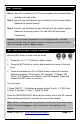
GET STARTED Step 1: Insert the included 5-volt AC power adapter into forecast station and then into wall outlet. Step 2: Insert 3 new AA batteries (not included) into the forecast station. Observe the correct polarity. Step 3: Insert 2 new AA batteries (not included) into the outdoor sensor. Observe the correct polarity. The red LED will flash when transmitting. Restart: If the outdoor temperature is not displayed after 3 minutes, remove batteries from the station & sensor and press a button 20 times.
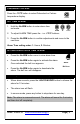
FAHRENHEIT/CELSIUS Press the -/ºC/ºF button to select Fahrenheit or Celsius temperature display. SET TIME ALARM 1. Hold the ALARM button to enter alarm time set mode. 2. To adjust ALARM TIME press the + or -/ºC/ºF buttons. 3. Press the ALARM button to confirm adjustments and move to the next item. Alarm Time setting order: 1. Hours, 2. Minutes ACTIVATE/DEACTIVATE TIME ALARM Press the ALARM button once to view alarm time. Press the ALARM button again to activate the alarm.
ADJUST BACKLIGHT When using A/C power: Press the LIGHT HI/LO button to adjust the backlight brightness. Hold the HOLD ON/OFF button and the backlight will turn off completely. Hold again to turn on the backlight. When using Battery power only: Press the LIGHT HI/LO button for 8 second backlight. FORECAST ICONS The forecast station uses changing atmospheric pressure to predict weather conditions for the next 12-hours with 70-75% accuracy. INTELLIGENT WEATHER FORECAST This station learns.
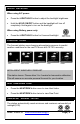
Press the MIN/MAX button to view maximum values. Hold the MIN/MAX button to reset maximum values. Press the MIN/MAX button to view minimum values. Hold the MIN/MAX button to reset minimum values. CHANNEL SCROLL-AUTO The word AUTO will appear in the outdoor temperature/humidity area when multiple sensors are received and the forecast station is set to scroll through the channels automatically. Press the CH button repeatedly until AUTO is displayed.
The maximum transmitting range to the forecast station is over 90 meters (300 feet) in open air, not including walls. POSITION THE FORECAST STATION The forecast station has a wide base to sit on a desk or table. Choose a location 2 meters or more from electronics such as cordless phones, gaming systems, televisions, microwaves, routers etc. Place within range of the outdoor sensor. The maximum transmitting range in open air is 90 meters (300 feet).
Primary Power: HX075-0500600-AG-001 5-volt AC power adapter (included) Optional/Battery Backup Optional 3-AA, IEC, LR6 batteries (not included) TX141TH-BCHv3 Sensor: 2-AA, IEC, LR6 batteries (not included) Battery Life: Forecast Station Battery Backup: Battery life is over 24 months when using the AC adapter for primary power TX141TH-BCHv3 Sensor: Battery life is over 12 months when using reputable battery brands for both Alkaline and Lithium batteries Dimensions: Forecast Station: 150 x 60 x 150
All electronic instruments must from now on be recycled. User shall take an active part in the reuse, recycling and recovery of the electrical and electronic waste. The unrestricted disposal of electronic waste may do harm on public health and the quality of environment. As stated on the gift box and labeled on the product, reading the “User manual” is highly recommended for the benefit of the user. This product must however not be thrown in general rubbish collection points.
sink, kitchen sink, swimming pool, in a wet basement or other damp location. The device must not be exposed to splashes. Do not place objects filled with water, such as vases for example, near the appliance. Connect the power supply to an easily accessible AC outlet. Ensure that the power cord cannot be crushed or pinched, particularly at plugs, convenience receptacles, and the point where they are connected to the apparatus. The supplied power supply is intended for indoor use only.