WIRELESS 868 MHz WEATHER STATION Instruction Manual INTRODUCTION: Congratulations on purchasing this Weather Station with wireless 868MHz transmission of outdoor temperature and humidity and display of indoor temperature and humidity. It is further featuring a DCF-77 radio controlled clock with date display. With four easy to use function keys, this innovative product is ideal for use in the home or office.
FEATURES: The Weather Station Hanging Hole LCD Display Battery cover Function Keys Detachable stand • • • • • • • • • • DCF-77 Radio controlled time with manual setting options Time reception ON/OFF 12/24 hour display Hour and minute display, seconds indicated by flashing dot Time zone option ±12hours Date and month / weekday and date calendar display selectable Weather forecasting with 3 weather icons and weather tendency indicator Weather forecasting icon sensitivity setting Temperature display in degr
• • • • • • • • • • Indoor and outdoor humidity reading displayed as RH% with MIN/MAX recordings All MIN/MAX temperature recordings show date and time received All MIN/MAX recordings can be reset Indoor comfort level indicator - happy or sad face icons Can take up to three outdoor transmitters LCD contrast setting Low battery indicator Wireless transmission at 868 MHz Signal reception intervals at 4 seconds Wall mounting or table standing The Thermo-Hygro Outdoor Transmitter • • • • Remote transmission
HOW TO INSTALL AND REPLACE BATTERIES IN THE WEATHER STATION The Weather station uses 3 x AA, IEC LR6, 1.5V batteries. When batteries will need to be replaced, the low battery icon will appear on the LCD. To install and replace the batteries, please follow the steps below: 1. Insert finger or other solid object in the space at the bottom center of the battery compartment and lift up to remove the cover. 2. Insert batteries observing the correct polarity (see marking). 3. Replace compartment cover.
BATTERY CHANGE: It is recommended to replace the batteries in all units on an annual basis to ensure optimum accuracy of these units. Please participate in the preservation of the environment. Return used batteries to an authorised depot. SETTING UP: WHEN ONE TRANSMITTER IS USED 1. First, insert the batteries in the transmitter (see “How to install and replace batteries in the Termo-hygro outdoor transmitter” above). 2.
Note: In the event of changing batteries of the units, ensure the batteries do not spring free from the contacts. Always wait at least 1 minute after removing the batteries before reinserting, otherwise start up and transmission problems may occur. WHEN MORE THAN ONE TRANSMITTER IS USED 1. User shall remove all the batteries from the Weather Station and transmitters, and wait 60 seconds. 2. Insert the batteries in the first transmitter. 3.
8. finished. In order to ensure sufficient 868 MHz transmission however, the distance between the Weather Station and the transmitter should not be more than 100 meters (see notes on “Positioning” and “868 MHz Reception”). IMPORTANT! Transmission problems will arise if the setting for additional sensors is not followed as described above. Should transmission problems occur, it is necessary to remove the batteries from all units and start again the set-up from step 1.
Note: in 24hr time display mode, the day is set by using the IN key.
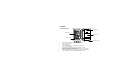
LCD SCREEN: DCF Tower Icon (for time reception) Time Calendar Weather Forecast icon Weather Tendency Icon Low battery indicator (weather station) Comfort Indicator Icon Indoor Temperature in °C Indoor Relative Humidity % Low battery indicator (transmitter) Outdoor reception signal Outdoor Relative Humidity % Outdoor Temperature in °C Number showing Transmitter unit* * When the signal is successfully received by the Weather Station, the outdoor transmission icon will be switched on.
was successful (icon on) or not (icon off). On the other hand, the short blinking of the icon shows that a reception is currently taking place. For better distinctness the LCD screen is split into 5 sections displaying the information for time, date, weather forecast, indoors and outdoors. LCD1 RADIO CONTROLLED TIME • • • In normal mode display of radio controlled time.
• Display of low battery indicator. A small battery symbol on the upper right side indicates low running batteries. LCD5 - OUTDOOR TEMPERATURE AND HUMIDITY • • • • • • In normal mode, on the left, display of the current outdoor temperature. In normal mode, on the right, display of the current outdoor relative humidity. By pressing the “OUT” key, display of the stored MIN/MAX outdoor temperature and humidity with simultaneous display of a MIN or MAX symbol in the upper center.
DCF reception is done twice daily at 02:00 and 03:00 am. If the reception is not successful at 03:00 am, then the next reception takes place the next hour and so on until 06:00am, or until the reception is successful. If the reception is not successful at 06:00 am, then the next attempt will take place the next day at 02:00 am.
LCD CONTRAST SETTING LCD (flashing) The LCD contrast can be set to 8 different levels to suit the users needs (default LCD contrast setting is LCD 5). To set the desired contrast level: 1. Press the IN key to select the level of contrast desired. 2. Press the SET key to confirm and enter the “Time Zone setting” or exit the setting mode by pressing the CH key TIME ZONE SETTING: Time Zone (flashing) The time zone default of the Weather Station is 0. To change to another time zone: 1.
In area where reception of the DCF-77 time is not possible, the DCF-77 time reception function can be turned OFF. The clock will then work as a normal Quartz clock. (Default setting is ON). 1. The digit “ON” will start flashing on the LCD. 2. Use the IN key to turn OFF the time reception function. 3. Confirm with the SET key and enter the “12/24-Hour Display setting” or exit the setting mode by pressing the CH key.
Minutes (flashing) Hours (flashing) To set the clock: 1. The hour and minute digits start flashing in the time display section. 2. Use the IN key to adjust the hours and the OUT key to adjust the minutes. If you hold the key while you adjust, the hours move 1 hour and the minutes move 5 minutes. 3. Confirm with the SET key and enter the “Calendar Setting” or exit the setting mode by pressing the Note: The unit will still try and receive the signal despite it being manually set.
3. Press the IN (or OUT) key to set the date and the OUT (or IN) key to set the month required. 4. Confirm with the SET key and exit the setting mode by pressing the CH key twice. Note: Skip the SNOOZE function, as it is not available in France’s model. °C/°F TEMPERATURE DISPLAY SETTING Flashing The default temperature reading is set to °C (degre e Celsius). To select °F (degree Fahrenheit): 1. The “°C” will be flashing, use the IN key to tog gle between “°C” and “°F”. 2.
WEATHER FORECAST AND TENDENCY: The weather forecasting icons: There are 3 weather icons in the third section of LCD which can be displayed in any of the following combinations: Sunny Cloudy with sunny intervals Rainy For every sudden or significant change in the air pressure, the weather icons will update accordingly to represent the change in weather. If the icons do not change, then it means either the air pressure has not changed or the change has been too slow for the Weather station to register.
Station will be more accurate compared to use in areas where the weather is stagnant most of the time (for example mostly sunny). If the Weather Station is moved to another location significantly higher or lower than its initial standing point (for example from the ground floor to the upper floors of a house), remove the batteries and re-insert them after about 30 seconds.
INDOOR TEMPERATURE AND HUMIDITY READING WITH COMFORT LEVEL INDICATOR: Minimum Display Indoor Relative Humidity % Indoor Temperature in °C The indoor temperature and humidity are measured automatically and displayed on the fourth section of the LCD. THE COMFORT LEVEL INDICATORS: Comfortable: Uncomfortable: A happy face icon “☺” indicating a temperature level between 20.0°C and 25.9°C (68°F to 78.6°F and humidity between 45% and 65%. A sad face icon “ ” indicating any value outside the comfortable range.
OUTDOOR TEMPERATURE AND HUMIDITY: Maximum Display Outdoor Reception Signal Outdoor Temperature in °C Relative Humidity % Number showing Transmitter unit (only if there is more than one transmitter) The last LCD section shows the outdoor temperature and humidity, a reception signal and a number beside the temperature will also show if more than one transmitter has been used. TOGGLING AND RESETTING THE OUTDOOR RECORDINGS: 1.
Note: The MIN/MAX data for each transmitter needs to be reset separately. TO VIEW THE MIN/MAX DATA FROM DIFFERENT TRANSMITTERS When more than 1 transmitter used: 1. To toggle between transmitters, press the CH key: Once to show transmitter 2 Twice to show transmitter 3 Three times to return to transmitter 1 2. Use OUT key to view the MIN/MAX temperature and humidity data for the selected transmitter. 3.
1. 2. 3. 4. The distance of the weather station or transmitter should be at least 1.5 to 2 meters away from any interfering sources such as computer monitors or TV sets. Avoid positioning the Weather Station onto or in the immediate proximity of metal window frames. Using other electrical products such as headphones or speakers operating on the same signal frequency (868MHz) may prevent correct signal transmission and reception.
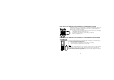
POSITIONING THE THERMO-HYGRO OUTDOOR TRANSMITTER The Transmitter is supplied with a holder that may be attached to a wall with the two screws supplied. The Transmitter can also be position on a flat surface by securing the stand to the bottom to the Transmitter. To wall mount: 1. Secure the bracket onto a desired wall using the screws and plastic anchors. 2. Clip the remote thermo-hygro transmitter onto the bracket.
• • • • • • • • Precautions shall be taken when handling the batteries. Injuries, burns, or property damage may be resulted if the batteries are in contact with conducting materials, heat, corrosive materials or explosives. The batteries shall be taken out from the unit before the product is to be stored for a long period of time. Immediately remove all low powered batteries to avoid leakage and damage. Replace only with new batteries of the recommended type.
Relative humidity measuring range: Indoor humidity range : Outdoor humidity range : Interior data checking intervals Indoor temperature checking interval Indoor humidity checking interval Outdoor temperature and humidity data checking interval Power consumption: Weather station Thermo-Hygro outdoor transmitter Battery life Dimensions (L x W x H) Weather Station Thermo-Hygro outdoor transmitter 1% to 99% with 1% resolution (Display “- -“ if temperature is OL.
• • • • • • • As stated on the gift box and labeled on the product, reading the “User manual” is highly recommended for the benefit of the user. The manufacturer and supplier cannot accept any responsibility for any incorrect readings and any consequences that occur should an inaccurate reading take place. This product is not to be used for medical purposes or for public information. This product is only designed to be used in the home as indication of the future weather and is not 100% accurate.