WT-8112U RADIO-CONTROLLED SOLAR CLOCK INSTRUCTION MANUAL Contents Languages Page __________________________________________ English 2 French 18 Spanish 36 1
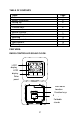
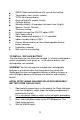
TABLE OF CONTENTS Topic Features Battery Installation Setting Up Atomic time - WWVB Radio Controlled Time Function keys LCD Screen Manual Settings Alarm setting and snooze Mounting Care and maintenance Specifications Warranty Page 3 3 5 5 6 7 7 11 12 14 15 16 FEATURES: RADIO-CONTROLLED SOLAR CLOCK: LCD1 display LCD2 display Solar panel Wall Mount Location Function keys Battery cover Foldable stands 2
WWVB Radio controlled time with manual time setting Time display: hour, minute, second 12/24h time format display Alarm setting with snooze function Calendar display Weekday display (4 languages to choose from: English, Spanish, French, German) Time zone setting Daylight savings time ON/OFF option (DST) Solar mode setting Indoor temperature display in ºF/ ºC selectable Indoor humidity display in RH% Primary Alkaline battery or Solar Rechargeable Alkaline battery selection Low battery indicator Wall mount or
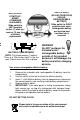
SWITCH RIGHT (SOLAR OPERATION) (SOLARRECHARGEABLE BATTERY) Slide switch to RIGHT position once solarrechargeable battery are inserted and insulator tab is removed SWITCH LEFT (START-UP / RESET) (STANDARD ALKALINES) Slide switch to LEFT position before (1) start-up / reset or (2) any type of battery replacement WARNING Do NOT recharge the included solarrechargeable battery outside of this product because it will damage the battery and other charging devices.
SETUP AFTER CHANGING/REPLACING THE BATTERY 1. After powering up the solar clock, all LCD segments will light up briefly and it will show the time (12:00), indoor temperature, date, and indoor humidity. 2. Next the WWVB time code reception will automatically start. This reception typically takes 10 minutes in good conditions. If after 10 minutes the WWVB time has not been received, use the ―SET‖ key to enter the set-up mode to manually set the Time, Time Zone and Date (see manual settings below).
Recommended distance to any interfering sources like computer monitors or TV sets is a minimum of 6 feet (2 meters). Within ferro-concrete rooms (basements, superstructures), the received signal is naturally weakened. In extreme cases, please place the unit close to a window and/ or point its front or back towards the Fort Collins, Colorado, transmitter. During nighttime, the atmospheric disturbances are usually less severe and reception is possible in most cases.
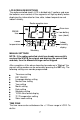
LCD SCREEN DESCRIPTIONS The radio-controlled clock's LCD is divided into 2 sections and once the batteries are inserted, all the segments will light up briefly before displaying the information for time, date, indoor temperature and indoor humidity.
1. The time zone (LCD2) will start flashing (Default setting "EST -5―). Select the desired time zone by pressing and releasing the + key. Time zone settings: -12, -11, -10, ALA, PST, MST, CST, EST, ATL, -3, -2, -1, 0, +1, +2...+12. (Default: EST) 2. Press and release the SET key to enter the “DST Setting“. DST (daylight saving time) 1. The ON digit will start flashing on LCD1. Set the DST ON or OFF by pressing the + key. 2. Press and release the SET key to enter the “Language Setting“.
unsuccessful, then the WWVB tower icon will not appear but reception will still be attempted the following hour. WWVB time reception takes place from 12:00 am through 6:00 am each day (attempts WWVB reception every full hour within this time frame). When the time signal is received for example at 1:00 am, the radio-controlled clock will not attempt to receive the WWVB signal for the remaining hours until 6:00 am. Therefore, the next signal attempt will take place between 12:00 am and 6:00 am the next day.
2. NOTE: The date can only be set in conjunction with the selected month. For example, it is not possible to set the date 30 if the month of February is selected. Press and release the SET key to move to ―Weekday setting‖. WEEKDAY 1. The weekday symbols will be displayed on LCD2 in the preset language and flashing. Set the desired weekday by use of the + key. 2. Press and release the SET key to enter the mode “12/24h Time Format Setting”.
LCD will automatically turn ON automatically if the environment is bright enough; the surrounding environment brightness is checked every 5 seconds No information will be displayed when the LCD is OFF, but all the settings and operations will remain, except for the temperature and humidity measurements. If the solar mode setting is OFF: LCD will remain ON constantly. EXIT THE MANUAL SETTING MODES To return to the normal display mode from anywhere in manual setting mode simply press the SNZ key anytime.
The alarm will be automatically ON when the alarm time is set. To deactivate the alarm (OFF), press and release once the ALM key in normal mode display. The alarm icon will disappear the alarm is now off. SNOOZE SETTING The snooze can only be activated during alarm time for a snooze duration of 10 minutes by pressing the SNZ key on the back of the clock.
TROUBLESHOOTING: Problem: Solution: Problem: Solution: Problem: Solution: Problem: Solution: Problem: Solution: Problem: The LCD is OFF. 1) Move the solar clock to a brighter environment. 2) Check that the solar panel is not covered. 3) Replace the battery if using alkaline battery. 4) Enter program menu and turn Solar Mode OFF (this is a power saving feature). No reception of WWVB signal 1) It may help reception to face the front of the radio-controlled clock in the general direction of Ft.
Solution: Remove the battery, slide the battery switch to BATTERY and reinsert the the battery. If you are using a rechargeable battery, you can then slide the battery switch to SOLAR. CARE AND MAINTENANCE: Avoid placing the unit in areas prone to vibration and shock as these may cause damage. Avoid areas where the unit can be exposed to sudden changes in temperature, i.e. direct sunlight, extreme cold and wet/moist conditions as these will lead to rapid changes which reduce the accuracy of readings.
Power consumption Alkaline rechargeable Battery: 1 x AA, 1.5V (included), rechargeable by solar cell Rechargeable Alkaline battery life: 18 – 60 months, depending on usage Primary Alkaline battery: 1 x AA, 1.5V battery (not included) Primary Alkaline battery life: about 24 months Dimensions (L x W x H) Solar clock: 9.18" x 1.12" x 8.52" Low battery indicator: RX - Low battery indicator is displayed on the LCD when the battery voltage is low.
La Crosse Technology, Ltd will repair or replace this product, at our option and at no charge as stipulated herein, with new or reconditioned parts or products if found to be defective during the limited warranty period specified above. All replaced parts and products become the property of La Crosse Technology, Ltd and must be returned to La Crosse Technology, Ltd. Replacement parts and products assume the remaining original warranty, or ninety (90) days, whichever is longer.
LA CROSSE TECHNOLOGY, LTD WILL NOT ASSUME LIABILITY FOR INCIDENTAL, CONSEQUENTIAL, PUNITIVE, OR OTHER SIMILAR DAMAGES ASSOCIATED WITH THE OPERATION OR MALFUNCTION OF THIS PRODUCT. THIS PRODUCT IS NOT TO BE USED FOR MEDICAL PURPOSES OR FOR PUBLIC INFORMATION. THIS PRODUCT IS NOT A TOY. KEEP OUT OF CHILDREN’S REACH. This warranty gives you specific legal rights. You may also have other rights specific to your State.