
User Manual


Labconco Glassware Washer Service/Technical Manual
31
Inspecting the Base
The base of the unit can be accessed by all four sides: The front of the unit
is accessible by removing the kick and toe plates then lowering the relay
panel. The two sides and back can be accessed by removing the service panels
(held on by four bolts each) near the bottom of the unit (under-counter), or
the 2 cosmetic sides and back (free-standing).
Once the base is accessible, using a flashlight, check for standing water,
first near the back of the unit, where the sensor is located. Then
thoroughly inspect the base of the unit from the sides to find and mop up any
standing water.
Clearing the Alarm
To run the unit again, the alarm must be cleared. This is simply done by
using a dry towel or rag and wiping the Overflow Sensor until dry.
Before running the washer in a new cycle, perform the following diagnostic
and systems check.
1) Open the door latch
2) Push and hold the ▲ button
3) While holding the ▲ button, simultaneously close the latch, and hold
the button until the machine beeps.
4) Scroll down (▼) to Tap Fill and push ◄ or ► until the screen says "yes"
next to Tap Fill.
a. This will allow the machine to fill with Tap water. It should
take less than 3.5 minutes for it to stop.
5) When the tank stops filling, open the door and inspect the water level.
a. The water level should be touching the bottom of the sump heater
but not be over the top.
b. Inspect for any leaks at this time
6) If no leak is found, Repeat steps 1-3.
7) Scroll down (▼) to “Wash Pump” and push ◄ or ► until the screen says
"yes".
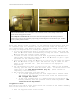
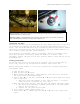
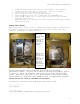
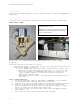
Fig 3 (above left): Looking down on the back of a unit, with the Service Panel removed. (A) Overflow Sensor.
(B) Pure Water Valve. (C) Hot Tap Valve.
Fig 4 (above right): Looking through the service panel area, the Overflow Sensor (A) is bolted to a stud on the
base of the unit with two red connectors with grey leads coming off of it.