
User manual


LaCie 12big Rack Serial Installation
User Manual page 19
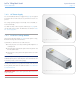
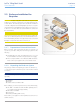
Assemble the rack brackets to the rack posts as follows (see
Fig. 20).
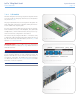
a. Locate the location pin at the rear of the rail into a rear rail post
hole. Attach the bracket to the rear rack post using the washers
and screws supplied. The screws should be left loose.
b. Extend the rail to fit between the front and rear rack posts.
c. Attach the bracket to the front rack post using the washers
and screws supplied. The screws should be left loose.
d. Tighten the two clamping screws located along the inside of
the rear section of the rack bracket (see Fig. 19).
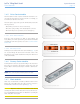
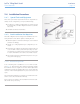
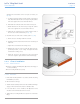
5. Mount the enclosure in the rack as follows (refer to Fig. 20):
a. Lift the enclosure and align it with the rack rails.
b. Carefully insert the chassis slides into the rack rails and push
fully home.
c. Tighten the rear rack bracket mounting screws.
d. Withdraw the enclosure until it reaches the hard stops (ap-
proximately 400mm, 16.75 inches) and tighten the front
rack bracket mounting screws.
e. Return the enclosure to the fully home position and attach
to the rack using the captive fasteners on the front flanges.
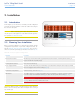
2.4.4. Chassis Installation
2.4.4.1. Parts Check List
✦ Chassis (complete with Backplane, Ops Panel and all plug-in
modules installed).
✦ Rack mounting thumbscrews (4 off).
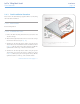
2.4.4.2. Procedure
1. Fit the Rack Mounting Rail Kit in accordance with the mounting
kit Installation procedure.
2. Check chassis for damage.
3. Slide the chassis assembly onto the rack rails until the front flanges
engage on the rack. Ensure the chassis is centrally located.
4. If in doubt about correct orientation, the Operator’s Panel
should be on the left hand side of the enclosure.
5. Tighten the two mounting thumbscrews present on each chassis
flange.
Fig. 19 - Rack Mounting Rail Kit
Fig. 20 - Mounting the Enclosure into a Rack (step 4)