LACIE FASTKEY: USER MANUAL CLICK HERE TO ACCESS UP-TO-DATE ONLINE VERSION of this document for the most recent content as well as for features such as expandable illustrations, easier navigation, and search capability.
INTRODUCTION Thank you for purchasing the LaCie FastKey. The FastKey is the perfect tool for all your portable storage needs: ■ ■ ■ ■ ■ ■ ■ ■ Easy to use - Plug & Play Compatible with all modern computers - USB 3.0 and USB 2.0 Compact - 26cm3 fits on any keychain Durable body - strong aluminum build Large capacity - up to 120 GB USB 3.
MINIMUM SYSTEM REQUIREMENTS ■ ■ ■ ■ ■ Computer with a USB 3.0 or USB 2.0 port Windows: Latest version of XP, Vista, or 7 Mac: Latest version of OS X 10.5 or 10.6 (Mac Intel only for LaCie Private-Public software) Minimum free disk space: 600MB recommended High-speed Internet for online storage Technical note: The LaCie FastKey transfer rates will be affected by the USB interface on your computer. While compatible with USB 2.0, LaCie recommends using a USB 3.0 port for optimal performance.
USB SUPERSPEED 3.0 AND HI-SPEED 2.0 INTERFACES USB 3.0 USB is a serial input/output technology for connecting peripheral devices to a computer. SuperSpeed USB 3.0 is the latest version of the USB standard, providing higher bandwidth and greater power economy. Transfer rates for USB 3.0 can attain up to 5 Gigabits per second (Gb/s). Due to such high potential for reading and writing data, USB 3.0 is theoretically up to ten times faster than its predecessor, USB 2.0.
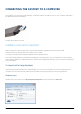
CONNECTING THE FASTKEY TO A COMPUTER The FastKey is an easy Plug & Play USB Key. Locate the USB 3.0 or USB 2.0 port on your computer and attach the USB male end of the FastKey. FastKey USB 3.0 Male Connection RUNNING LACIE SETUP ASSISTANT Before using your LaCie storage device, LaCie Setup Assistant software must be launched. It will: ■ ■ Easily format your storage device according to your needs. Copy the User Manual and software utilities onto the storage device.
Mac users Double click on the LaCie icon on your desktop.
All users Follow the on-screen instructions to partition your storage device and install preloaded software. You will be given the choice of creating a single partition called “LA-PUBLIC” or two partitions called “LaCie” and “LA-PUBLIC”. Once you have selected, LaCie Setup Assistant will format your LaCie storage device. Please see About File System Formats to learn more about file system formats.
Important info: LaCie recommends that you copy the User Manual and utilities onto your computer's internal hard drive or another storage source when the setup is complete. The LaCie Setup Assistant does not prevent you from using your computer's native disk utility program to format or partition your LaCie storage device. Simply follow the Setup Assistant through completion, then use your computer's native disk utility (Disk Management for Windows or Disk Utility for Mac) to reformat your drive.
UNMOUNTING THE LACIE KEY USB, FireWire, and eSATA external devices feature “plug & play” connectivity, which means that your drive can be connected and disconnected while the computer is running. To prevent failures, however, it is important to follow these steps when disconnecting your LaCie hard disk. WINDOWS XP USERS From the System Tray (located in the lower right-hand side of your screen), click the Eject icon (a small green arrow over a hardware image).
MAC USERS Drag the hard drive icon to the trash. (The icon pictured below is a generic USB device icon. Your drive may be represented by an icon that looks like the drive itself.) When the icon disappears from the desktop, the drive can be disconnected.
CREATING AND USING THE SECURE LA-PRIVATE VOLUME Note: You may have questions following the creation of your secure LA-PRIVATE volume. Please see LA-PRIVATE Frequently Asked Questions for additional information on using and managing LA-PRIVATE. Follow the directions below to install and run the included LaCie Private-Public application. LaCie Private-Public allows you to create a password-protected volume on your LaCie disk called LA-PRIVATE.
3. If your computer does not have MacFUSE, a window will prompt you to install it. Click Download MacFuse 4. Follow the MacFUSE links to download the .dmg file.
5. Once downloaded, click twice on the MacFUSE.pkg file. 6. Follow the MacFUSE installer to completion. LaCie recommends accepting the licensing terms in order to finish the MacFUSE installation. MacFUSE must be installed to create the LA-PRIVATE volume.
7. Go to the next section to create the LA-PRIVATE volume.
CREATE THE LA-PRIVATE VOLUME All users Please read the following recommendations before creating LA-PRIVATE: ■ ■ ■ ■ ■ ■ ■ Passwords. You will be prompted to create a password for the LA-PRIVATE volume. Since short passwords are easy to crack, LaCie recommends a minimum of 12 characters. Stronger passwords also include a combination of letters, numbers, and symbols. Accented letters or symbols are not supported. Please consider writing your password on paper and keeping it in a safe place.
Follow the steps below to create LA-PRIVATE: 1. Insert the LaCie storage device into the compatible interface port on your computer. The LA-PUBLIC partition will appear in My Computer/Computer (Windows) or on your desktop (Mac). 2. Click twice on the LA-PUBLIC icon in My Computer/Computer (Windows) or on the desktop (Mac).
3. Click twice on the LaCie Private-Public application. 4. Windows: You may receive a prompt asking if you wish to run LaCie Private-Public. Please confirm that you would like to continue.
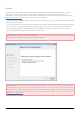
5. The first window will ask you to enter a size for the LA-PRIVATE volume. Please note that you can use the pulldown menu to select the LA-PRIVATE capacity in MB (Megabytes) or GB (Gigabytes). As a guide, 1000 MB = 1 GB. Choosing GB will allow for sizes such as 1 GB, 10 GB, 50 GB, etc. It is not possible to enter 1.5 GB, 10.5 GB or 50.5 GB. Instead, use MB for capacity to select 1500 MB, 10500 MB or 50500 MB. LA-PRIVATE cannot exceed 4 GB if LA-PUBLIC is formatted FAT 32.
6. Click Next>. 7. Enter and confirm your password. Selecting the check box for Display password will allow you to see the characters in the password field.
8. Click Next>. 9. Click Format to create the LA-PRIVATE volume with AES 256 encryption. 10. The format could take a few minutes to many hours. Estimate the time by assuming one minute per one gigabyte. Please do not turn off your computer during the format.
11. Once the format is complete, LA-PRIVATE will mount automatically in My Computer/Computer (Windows) or in the Finder (Mac). It is now ready to store your most important data.
MOUNTING THE LA-PRIVATE VOLUME LA-PRIVATE may be locked to protect data from being accessed by unauthorized users. Follow the steps below to unlock and mount the LA-PRIVATE volume. Important Info: You must create LA-PRIVATE before attempting to mount the volume. 1. Insert the LaCie storage device into the compatible interface port on your computer. The LA-PUBLIC partition will appear in My Computer/Computer (Windows) or on your desktop (Mac). 2.
6. The LA-PRIVATE volume will appear in My Computer/Computer (Windows) or in the Finder (Mac). 7. Copy and paste, drag and drop, or retrieve existing files from your encrypted LA-PRIVATE volume.
UNMOUNTING AND LOCKING LA-PRIVATE Important Info: You may wish to unmount both LA-PRIVATE and LA-PUBLIC at the same time. For your security, LA-PRIVATE must be unmounted before LA-PUBLIC. Your operating system will alert you when attempting to unmount LA-PUBLIC first. Unmounting LA-PRIVATE will prevent others from accessing your private data. It is a great way to lock LA-PRIVATE since the secure volume will no longer be available for unauthorized use. Follow the steps below to unmount and lock LA-PRIVATE.
3. The LA-PRIVATE volume has been unmounted and locked. Mac 1. Go to the Dock and search for the LaCie Private-Public icon. 2. Select the LaCie Private-Public icon to choose the application. 3. Go to the pulldown menu File > Quit. 4. LA-PRIVATE has been unmounted and locked. CHANGING THE LA-PRIVATE PASSWORD Important Info: You must create the LA-PRIVATE volume before attempting to change its password. Follow the steps below to change the password to LA-PRIVATE. 1.
4. Click on the button Change Password. 5. Enter your Current Password as well as the New Password. You must also complete the field Confirm Password with the new password. 6. Check the Display Password boxes to see the characters as they are typed.
7. Click OK. 8. Your password has been changed. DELETE LA-PRIVATE Important Info: Removing the LA-PRIVATE volume will delete all of its data. LaCie highly recommends that you copy all data from LA-PRIVATE to a temporary location before deleting the secure volume. Invisible Files Deleting LA-PRIVATE requires that hidden files are made visible. Follow the steps below to reveal hidden files and delete the LA-PRIVATE volume. Windows 1.
2. Click Start > My Computer/Computer. You should see LA-PUBLIC. 3. Go to the pulldown menu Tools > Folder Options. 4. Note the section called Hidden files and folders. The default setting is “Don't show hidden files, folders, or drives”.
5. Change the Hidden files and folders setting to “Show hidden files, folders, and drives”. Click Apply.
6. Go to the LA-PUBLIC partition and open the folder called LaPrivate.
7. Look for the file called “LaPrivate.lc”. 8. Right-click on “LaPrivate.lc” and select Delete.
9. The LA-PRIVATE volume has been deleted. 10. To restore your folder settings, go to Tools > Folder Options. Select “Don't show hidden files, folders, or drives” and click Apply. Mac Revealing hidden files in Mac OS X 10.5/10.6 requires the Terminal program. 1. Insert the LaCie storage device into the compatible interface port on your computer. The LA-PUBLIC icon should appear on the desktop. 2. Go to the pulldown menu Go > Utilities. 3. Click twice on the program Terminal.
4. The Terminal window will appear. To reveal hidden files, type the following string exactly as it appears, including spaces and capital letters: defaults write com.apple.
5. You must now restart the Finder. Push the following buttons on your Macintosh keyboard at the same time: option+cmd+esc. The Force Quit Applications window will open. Select Finder and click Relaunch. 6. After the Finder has restarted, open the LA-PUBLIC partition on your LaCie storage device. 7. Open the LaPrivate folder and look for the file called “LaPrivate.lc”.
8. Right-click on “LaPrivate.lc” and select Move to Trash. 9. The LA-PRIVATE volume has been deleted. 10. To conceal hidden files, go to the pulldown menu Go > Utilities. Open the Terminal application and type the following string exactly as it appears, including spaces and capital letters: defaults write com.apple.
11. You must now restart the Finder. Push the following buttons on your Macintosh keyboard at the same time: option+cmd+esc. The Force Quit Applications window will open. Select Finder and click Relaunch. 12. Hidden files are now concealed.
FORMATTING YOUR LACIE USB KEY With the aid of LaCie Setup Assistant, you have created a partition called LA-PUBLIC. Using the LaCie Private-Public application included on your USB key, you can also create a secure volume called LA-PRIVATE. The LA-PRIVATE partition is password-protected and it uses strong AES 256 encryption to keep your most important data safe from unauthorized users. You may also use Disk Management (Windows) or Disk Utility (Mac) to format and partition your LaCie USB Key.
Standard LaCie storage devices will prompt you to run LaCie Setup Assistant when they are first connected to a computer (Windows or Mac). LaCie Setup Assistant helps you to quickly format the storage device according to your needs. Please read the information below carefully if you: ■ ■ ■ Abort LaCie Setup Assistant while it is formatting. Wish to reformat your storage device after LaCie Setup Assistant has successfully completed.
Mac Users You may customize the storage device by reformatting and/or partitioning it with separate file system formats. For optimal performance in Mac OS environments, format and partition the storage device as one large Mac OS Extended volume. Mac OS Extended (HFS+): Mac OS Extended refers to the file system used by Mac OS X. HFS+ represents an optimization of the older HFS file system by using hard disk space more efficiently. With HFS+, you are no longer limited by block size.
Windows Users Technical Note on volumes larger than 2TB: Windows XP 32-bit - This version of Windows will not recognize volumes larger than 2TB; Windows XP x64, Vista and 7 - All of these versions of Windows can recognize volumes greater than 2TB. However, disks must be converted to the GPT file system before partitions greater than 2TB can be created. To do this, go to Windows Disk Management and right-click on the disk. Select Convert to GPT. You may now create partitions greater than 2TB. 1. 2. 3. 4.
GETTING HELP If you are having problems with your LaCie product, consult the table below for a list of available resources. Order Source Description Location Quick Install Guide Concise steps to follow for getting your product up and running Printed and included in the product box, or download PDF from the product page 2 Support Pages Includes interactive troubleshooting www.lacie.
TROUBLESHOOTING TOPICS Note: Interactive troubleshooting, a highly effective way to resolve problems with your product, is available from www.lacie.com/support/. Select your product, then click the “Troubleshooting” tab. All Users Problem: My file transfers are too slow. Q: Are there other USB devices connected to the same port or hub? A: Disconnect any other USB devices and see if the performance increases. Q: Is the storage device connected to a USB 2.0 port on your computer or a USB 2.
Problem: File transfer error messages. Q: Did you get an "Error -50" message while copying to a FAT 32 volume? A: Certain characters cannot be included in the names of folders and files that are copied to a FAT 32 volume. These characters include but are not limited to: ?<>/\: Check your files and folders to ensure that these types of characters are not being used. The easiest solution is to check for incompatible characters in file names, change them, then resume file transferring.
Still not working? There may be a hardware defect or other problem. Contact www.lacie.com/support/. Windows XP, Vista, and 7 Users Problem: The storage device icon does not appear in My Computer/Computer. Q: Is the USB device firmly attached to your computer's USB port? A: Check the USB connection between the device and your computer. Confirm that it is fully seated in the USB port. You can also try disconnecting the device, waiting 10 seconds, and then reconnecting it.
LA-PRIVATE FREQUENTLY ASKED QUESTIONS LA-PRIVATE is a secure volume that takes advantage of strong Advanced Encryption Standard (AES) 256 to keep your most important data safe. The included LaCie Private-Public application allows a user to easily create and manage a LA-PRIVATE volume (See Creating and Using the Secure LA-PRIVATE Volume). Please see our list of frequently asked questions below for further information on LA-PRIVATE. Q: Does LaCie Private-Public work on a Macintosh computer? A: Yes.
This also applies to an authorized user who has lost or forgotten his LA-PRIVATE password. Unfortunately, the data on LA-PRIVATE is not available to anyone, including LaCie, without the password. Please note that LaCie is not responsible for any data that has been lost due to a forgotten LA-PRIVATE password. Consider using a password that is easy for you to remember but close to impossible for unauthorized users to guess.
PRECAUTIONS Caution: Modifications not authorized by the manufacturer may void the user's authority to operate this device. Important info: Any loss, corruption or destruction of data while using a LaCie storage device is the sole responsibility of the user, and under no circumstances will LaCie be held liable for the recovery or restoration of this data. To help prevent the loss of your files, LaCie highly recommends that you keep TWO copies of your data.
■ device, increasing the risk of damage or malfunction. Never use benzene, paint thinners, detergent, or other chemical products to clean the outside of the LaCie device. Such products will disfigure and discolor the casing. Instead, use a soft, dry cloth to wipe the device.
WARRANTY INFORMATION LaCie offers first-rate service and support through our generous three-tiered warranty policy. Our 1-, 2- and 3-year policies include comprehensive, complimentary web-based resources, expert in-house technical support, and worldwide repair and/or replacement coverage. To benefit from this warranty, please contact LaCie Support at www.lacie.com/us/support/index.htm where you can find online support and contact information.
EXCLUSIONS AND LIMITATIONS This Limited Warranty applies only to hardware products manufactured by or for LaCie that can be identified by the “LaCie” trademark, trade name, or logo affixed to them. The Limited Warranty does not apply to any non-LaCie hardware products or any software, even if packaged or sold with LaCie hardware.
SERVICE DOA On rare occasions, a newly purchased LaCie product may be delivered in non-working order. We are working to avoid these issues, but unfortunately, these situations may arise from time to time. Within the 15 calendar days of purchase, should you experience an issue with your new LaCie product, we ask you to return the product to the place where it was originally bought. You will be required to give a proof of purchase.
LEGAL INFORMATION COPYRIGHTS Copyright © 2010 LaCie. All rights reserved. No part of this publication may be reproduced, stored in a retrieval system, or transmitted in any form or by any means, electronic, mechanical, photocopying, recording or otherwise, without the prior written consent of LaCie. CHANGES The material in this document is for information only and subject to change without notice.
WEE This symbol on the product or on its packaging indicates that this product must not be disposed of with your other household waste. Instead, it is your responsibility to dispose of your waste equipment by handing it over to a designed collection point for the recycling of waste electrical and electronic equipment.
MANUFACTURER'S DECLARATION FOR CE CERTIFICATION We, LaCie, solemnly declare that this product conforms to the following European standards: Electromagnetic Compatibility Directive (2004/108/EC); Low-Voltage Directive: 2006/95/EC LaCie User Manual 54


