2big RAID User Manual Model: Click here to access an up-to-date online version of this document. You will also find the most recent content as well as expandable illustrations, easier navigation, and search capability.
Cont ent s 1 Introduction ....................................................................................5 ....... . . . . content Box . . . . . . . . . . . . . . . . . . . . . . . . . . . . . . . . . . . . . . . . . . . . . . . . . . . . . . . . . . . . . . . . . . . . . . . . . . . . . . . . . . . . . . . . . . . . . . . . . . . . . . . . . . . . .5. . . . . . . . . . . . . . . . and Storage . . . . RAID . . . . .m . .anagem . . . . . . .ent . . . . . . . . . . . . . . . . . . . . . . . . . . . . .
. . . . . . off Power . . . . . . . . . . . . . . . . . . . . . . . . . . . . . . . . . . . . . . . . . . . . . . . . . . . . . . . . . . . . . . . . . . . . . . . . . . . . . . . . . . . . . . . . . . . . . . . . . . . . . . . . . .21 .......... . . . . . . . . . . . . .m. ode Power-saving . . . . . . . . . . . . . . . . . . . . . . . . . . . . . . . . . . . . . . . . . . . . . . . . . . . . . . . . . . . . . . . . . . . . . . . . . . . . . . . . . . . . . . . . . . . . . . . . . .21 .......... . . . . .
. . . .blem: Pro . . . . .The . . . .hard . . . . drive . . . . . .ico ..n . . do . . .esn’t . . . . appear . . . . . . . in . . Co . . . mputer . . . . . . . . . . . . . . . . . . . . . . . . . . . . . . . . . . . . . . . . . . . . . . . . . . . . . . . . . . . . . . . .39 .......... 12 .Regulatory . . . . . . . . . .Compliance . . . . . . . . . . . . . . . . . . . . . . . . . . . . . . . . . . . . . . . . . . . . . . . . . . . . . . . . . . . . . . . . . . . . . . . . 40 ........ . . . . . .
Introduc on This manual provides details on configuring and managing your LaCie 2big RAID. For common questions and answers about your device, please see Frequently Asked Questions. You can get the latest tips regarding your product and updated technical information at LaCie customer support. Box content LaCie 2big RAID USB-C (USB 3.1 Gen 2) cable USB-C to USB-A (USB 3.0/USB 2.0) cable External power supply Quick Install Guide Important—Save your packaging.
2big RAID 3/22/19 6
System Overview Specifica ons Enclosure dimensions Side Dimensions (mm) Width 118 Height 88.5 Length 217 Enclosure weight Capacity Weight (kg) 4TB 2.4 8TB 2.8 16TB 2.9 Electrical Power supply 36W (12V-3A) Use only the power supply provided with your LaCie 2big RAID. Power supplies from third-party devices and other LaCie products can damage your 2big RAID.
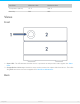
Condition Minimum value Maximum value Temperature (still air) +5º C +40º C Humidity 20% 80% Views Front 1. Status LED—The LED indicates that the device is powered on and provides status signals. See Status LEDs. 2. Swappable hard drive trays—Hard drive trays can be removed to replace failed hard drives. The LaCie 2big RAID hard drives are hot-swappable. See Hard Drive Maintenance.
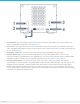
1. Power button—Use this button to power the device off and on. The button is also used confirm key actions during RAID configuration. See Operation. 2. Power input—Use this port to connect the power cable. Only use the power cable included with your LaCie 2big RAID. Attaching third-party or other LaCie power cables with incorrect voltage can damage the device. SeeOperation. 3. Kensington™ lock port—Use this port to physically lock the 2big RAID to a desk or rack. 4. USB 3.
Status LEDs The LEDs help you identify the status of 2big RAID’s system and drives. 1. System status 2.
2big RAID 3/22/19 11
Cables and Connectors USB-C protocols USB is a serial input/output technology for connecting peripheral devices to a computer. USB-C is the latest implementation of this standard and it provides higher bandwidth and new power management features. USB-C supports many protocols: Port Transfer rates Hi-Speed USB 2.0 up to 480Mb/s SuperSpeed USB 3.0 up to 5Gb/s USB 3.1 Gen 1 up to 5Gb/s USB 3.
2big RAID Computer USB-C to USB Type A cable Use the USB-C to USB Type A cable to connect 2big RAID to a USB-A (USB 3.0 or USB 2.0) port on your computer.
2big RAID SuperSpeed USB 3.0 up to 5Gb/s Hi-Speed USB 2.
Ge ng Connected Connect the power supply Connect the included power cable in the order listed below. 1. 2big RAID power input. 2. A live power outlet. 2big RAID Use only the power supply provided with your 2big RAID. Power supplies from third-party devices and other LaCie products can damage your 2big RAID.
Connect the USB cable Confirm the type of USB port on your computer, and then choose the appropriate cable to connect 2big RAID. USB-C to USB-C For optimal transfer rates, use the USB-C to USB-C cable to connect 2big RAID to a USB-C port (USB 3.1 or Thunderbolt 3) on your computer. USB-C to USB-A Use the USB-C to USB-A (USB 3.0 or USB 2.0) cable if your computer doesn’t have a USB-C port.
Set up LaCie 2big RAID The setup process lets you: Register your device Get the most from your device with easy access to information and support. Install Toolkit Manage Sync Plus plans and more. Learn more about Toolkit Toolkit provides useful tools that let you easily: Set up your drives for performance or protection. Sync your computer data with 2big RAID. Archive edited and deleted files. For details on Toolkit features, see the Toolkit user manual.
Using a file manager such as File Explorer or Finder, open LaCie 2big RAID and launch Start Here Mac or Start Here Win. Register your device Enter your information and click Register. Download Toolkit Click the Download button.
Install Toolkit Using a file manager such as Finder or File Explorer, go to the folder where you receive downloads. Open the SeagateToolkit.zip file. Click on the Seagate Toolkit Installer to launch the application. Click on the SeagateToolkit.exe file to launch the application. Your computer must be connected to the internet to install and run Toolkit.
macOS and Windows. Install Toolkit to help you initially set up the drives for performance or protection. See RAID Setup in the Toolkit user manual for details. If you use 2big RAID with only one type of computer, you can optimize file copy performance by formatting the drives in the native file system for your operating system. Choose one of the following methods to optimize your drive: Use Toolkit to optimize disk format. See Optimize in the Toolkit user manual for details. Manually format your drive.
Opera on LaCie 2big RAID is ready to be powered on when it is: Connected to a computer that supports Thunderbolt 3 or USB. Plugged into a live power outlet. The LEDs blink blue while the disks spin up. Caution—Do not operate LaCie 2big RAID until the ambient temperature is within the specified temperature range (see System Overview). If the hard drives have been recently installed, make sure they have time to acclimatize to the ambient temperature before operating them.
inactivity. The device can be put into power-saving mode using the power button: 1. Make certain that the device’s volumes are not being accessed. 2. Eject the volumes from your computer’s operating system. 3. Apply a short press to the power button. A short press lasts no longer than 1 second. To wake up the device, apply another short press.
Important—Always eject LaCie 2big RAID volumes from your computer before applying a short push. Short push and RAID synchroniza on Applying a short push during RAID synchronization spins down the hard drives. The RAID synchronization continues the next time you spin the hard drives up via a short push. Long push A long push is a manual depression on the button that lasts more than four seconds.
2big RAID 3/22/19 24
Manage RAID RAID stands for redundant array of independent disks. RAID contains the word array, and the two terms are often used interchangably. An array is a combination of two or more physical disks that are presented to the operating system as a single volume. Disks are combined into different RAID configurations known as RAID levels. The RAID level you choose depends on which storage attributes are most important to you: Capacity The total amount of data you can store.
Toolkit will not launch the RAID setup wizard in the following circumstances: Toolkit was previously installed on your computer—for example, for use with another Seagate or LaCie device. The RAID level and/or format for your device were changed from their factory settings.
Hard Drive Maintenance Precau ons “Hot-swapping” means that you can remove and replace hard drives while the enclosure is powered on. During operation, the hard drives should remain in their slots for optimal air flow. Airflow and fan performance are regulated by temperature. Observe all conventional ESD precautions when handling hard drives. Replacing a hard drive If a failed hard drive is under warranty, make certain to contact LaCie support to receive a replacement disk.
3. If you are replacing a failed hard drive with a full disk tray, skip to Step 4. Continue here if you are replacing the hard drive using the same disk tray. Using a Phillips head screwdriver, carefully unfasten all four screws from their four slots.
Gently slide the disk out of the tray. Place the empty disk tray onto a flat work area with the handle on the bottom left. Many disks have a label on one side and the printed circuit board on the opposite side. With its label side facing up, gently place the hard disk within the disk tray. Ensure the SATA connector is on the left. The four screw slots should align with the disk’s four screw holes. 4. Using a Phillips head screwdriver, carefully fasten all four screws into their four slots.
5. Carefully insert the full disk tray into the empty disk slot. Gently push the disk tray handle until you feel it snap into place. When replacing hard drives that are members of an active RAID array, the hard drive LEDs blink red and blue indicating that the RAID is synchronizing data.
performance is reduced until the synchronization is complete. LaCie 2big RAID enclosure: non-serviceable components The components inside the chassis are NOT hot-swappable and are NOT serviceable at any location outside of LaCie-approved service centers. Removing the cover voids your product’s warranty. Additionally, removing, replacing or changing any part in the enclosure or, performing any action that involves the components in the enclosure, voids the product’s warranty.
Op onal Forma ng and Par oning LaCie 2big RAID is delivered formatted in exFAT for compatibility with both Windows and Mac computers. If you use 2big RAID with only one type of computer, you can optimize file copy performance by formatting the drive in the native file system for your operating system—NTFS for Windows or HFS+ for Macs. There are two ways you can optimize performance: Toolkit Optimize Format your drive for optimal performance with just a few simple clicks.
Use NTFS if: …you connect the storage device to Windows computers, and you don’t need to allow a Mac to write to the disk. Use HFS+ if: …you connect the storage device to Mac computers, and you don’t need to allow a Windows computer to read or write to the disk. HFS+ is the only format compatible with Time Machine. Use exFAT if: …you need to allow both Mac and Windows computers to read and write to the disk. You can use FAT32 if: …you connect the storage device to older Windows and Mac computers.
3. 4. 5. 6. 7. 8. macOS starting version 10.13—Make sure to select the disk and not just the volume. If you don’t see two entries listed in the sidebar, change the view in disk utility to show both the drive and the volume. The view button is in the upper left side of the Disk Utility window. Change the view to Show All Devices. This feature was introduced in macOS 10.13 and is not available in 10.11 or 10.12. Select Erase. A dialog box opens. Enter a name for the drive.
Safely Remove LaCie 2big RAID From Your Computer Always eject a storage drive from your computer before physically disconnecting it. Your computer must perform filing and housekeeping operations on the drive before it is removed. Therefore, if you unplug the drive without using the operating system’s software, your files can become corrupt or damaged. Mac There are several ways you can eject your device from a Mac. See below for two options. Eject via Finder window 1. Open a Finder window. 2.
2. If you don’t see the Safely Remove Hardware icon, click the Show hidden icons arrow in the system tray to display all icons in the notification area. 3. In the list of devices, choose the device you want to eject. Windows displays a notification when it is safe to remove the device. 4. Disconnect the hard drive from the computer.
Frequently Asked Ques ons For help setting up and using your LaCie hard drive, review the frequently asked questions below. For additional support resources, go to www.lacie.com/support/2big-raid. All users Problem: My file transfers are too slow Q: Are both ends of the USB cable firmly attached? A: Review troubleshooting tips for cable connections below: Check both ends of the USB cable and make sure that they are fully seated in their respective ports.
Q: Can I use my hard drive with a USB hub? A: Yes, the hard drive can be connected to a USB hub. If you use a hub and encounter detection problems, slower than normal transfer rates, random disconnection from your computer or other unusual issues, try connecting the hard drive directly to the computer’s USB port. Please note that USB 2.0 hubs limit your hard drive’s transfer rates to USB 2.0 speeds.
Q: Did you follow the correct installation steps for your operating system? A: Review the installation steps in Getting Connected. Windows Problem: The hard drive icon doesn’t appear in Computer Q: Is the hard drive listed in Device Manager? A: All drives appear in at least one place in Device Manager. Type Device Manager in Search to launch it. Look in the Disk Drives section and, if necessary, click the Plus (+) icon to view the full list of devices.
Regulatory Compliance Product Name LaCie 2big RAID Regulatory Model Number LRDMU04 China RoHS China RoHS 2 refers to the Ministry of Industry and Information Technology Order No. 32, effective July 1, 2016, titled Management Methods for the Restriction of the Use of Hazardous Substances in Electrical and Electronic Products.
Taiwan RoHS Taiwan RoHS refers to the Taiwan Bureau of Standards, Metrology and Inspection’s (BSMI’s) requirements in standard CNS 15663, Guidance to reduction of the restricted chemical substances in electrical and electronic equipment. Beginning on January 1, 2018, Seagate products must comply with the “Marking of presence” requirements in Section 5 of CNS 15663. This product is Taiwan RoHS compliant. The following table meets the Section 5 “Marking of presence” requirements.
2big RAID 3/22/19 42