
User Manual


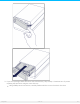


Gently slide the disk out of the tray.
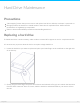
Place the empty disk tray onto a flat work area with the handle on the bottom left.
Many disks have a label on one side and the printed circuit board on the opposite side. With its label
side facing up, gently place the hard disk within the disk tray. Ensure the SATA connector is on the
left. The four screw slots should align with the disk’s four screw holes.
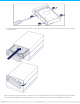
4. Using a Phillips head screwdriver, carefully fasten all four screws into their four slots. Do not force the
screws into the slots. Forcing the screws too tight into the slots can make it difficult to remove them
later and strip the screws’ teeth.
292big RAID
3/22/19