Oven User Manual LAM4602
CONTENTS Safety information Safety instructions Product description Before first use Daily use Clock functions Using the accessories 2 3 6 6 7 9 10 Additional functions Hints and tips Care and cleaning Troubleshooting Energy efficiency Your guarantee 11 11 16 19 19 20 Subject to change without notice. SAFETY INFORMATION Before the installation and use of the appliance, carefully read the supplied instructions.
General Safety • • • • • • • • • Only a qualified person must install this appliance and replace the cable. Internally the appliance becomes hot when in operation. Do not touch the heating elements that are in the appliance. Always use oven gloves to remove or put in accessories or ovenware. Before maintenance cut the power supply. Ensure that the appliance is switched off before replacing the lamp to avoid the possibility of electric shock. Do not use a steam cleaner to clean the appliance.
• Always use a correctly installed shockproof socket. • Do not use multi-plug adapters and extension cables. • Make sure not to cause damage to the mains plug and to the mains cable. Should the mains cable need to be replaced, this must be carried out by our Authorised Service Centre. • Do not let mains cables touch or come near the appliance door, especially when the door is hot. • The shock protection of live and insulated parts must be fastened in such a way that it cannot be removed without tools.
damage to the appliance, the housing unit or the floor. Do not close the furniture panel until the appliance has cooled down completely after use. Care and cleaning WARNING! Risk of injury, fire, or damage to the appliance. • Before maintenance, deactivate the appliance and disconnect the mains plug from the mains socket. • Make sure the appliance is cold. There is the risk that the glass panels can break. • Replace immediately the door glass panels when they are damaged.
PRODUCT DESCRIPTION General overview 1 2 3 4 5 2 6 4 7 8 12 4 3 2 9 1 11 5 4 12 3 9 10 2 1 11 Accessories • Wire shelf For cookware, cake tins, roasts. • Grill- / Roasting pan To bake and roast or as pan to collect fat.
Changing the time You cannot change the time of day if the Duration or End function operates. Press again and again until the indicator for the Time of Day function flashes. To set a new time, refer to "Setting the time". Preheating Preheat the empty appliance to burn off the remaining grease. Preheat the two ovens. Heat up one oven at a time. Set the functions listed below, if applicable. 1. Set the function and the temperature to 250ºC. Let the appliance operate for 1 hour. 2.
Oven function Application Top Heat To brown bread, cakes and pastries. To finish cooked dishes. Bottom Heat To bake cakes with crispy bottom and to preserve food. Grilling To grill flat food and to toast bread. Fast Grilling To grill flat food in large quantities and to toast bread. Main oven functions Symbol Oven function Application Light To activate the lamp without a cooking function. True Fan Cooking To bake on up to 2 shelf positions at the same time and to dry food.
Button Function Description PLUS To set the time. CLOCK FUNCTIONS Clock functions table Clock function Application Time of day To set, change or check the time of day. Minute Minder To set countdown time. This function has no effect on the operation of the appliance. Duration To set the cooking time of the oven. End To set the time of day when the oven should deactivate.
USING THE ACCESSORIES WARNING! Refer to Safety chapters. Inserting the accessories Wire shelf: Push the shelf between the guide bars of the shelf support and make sure that the feet point down. • All accessories have small indentations at the top of the right and left side to increase safety. The indentations are also anti-tip devices. • The high rim around the shelf is a device which prevents cookware from slipping.
You can use the trivet to grill flat dishes in large quantities and to toast. 2. Put the deep pan into the oven on the necessary shelf position. 1. Put the trivet into the deep pan so that the supports of the wire shelf point down. ADDITIONAL FUNCTIONS Cooling fan When the appliance operates, the cooling fan activates automatically to keep the surfaces of the appliance cool. If you deactivate the appliance, the cooling fan can continue to operate until the appliance cools down.
When you cook frozen food, the trays in the oven can twist during baking. When the trays become cold again, the distortions are gone. Tips on baking Baking results Possible cause Remedy The bottom of the cake is not browned sufficiently. The shelf position is incorrect. Put the cake on a lower shelf. The cake sinks and becomes soggy, lumpy or streaky. The oven temperature is too high. The next time you bake, set a slightly lower oven temperature.
Food Temperature (°C) Time (min) Shelf position - Small & Queen 160 - 170 18 - 25 2 - Sponges 160 - 175 20 - 30 2 - Victoria Sandwich 160 - 170 18 - 25 2 - Madeira 140 - 150 75 - 90 2 - Rich Fruit 140 - 150 120 - 150 2 - Gingerbread 140 - 150 75 - 90 2 - Meringues 90 - 100 150 - 180 2 - Flapjack 160 - 170 25 - 30 2 - Shortbread 130 - 150 45 - 65 2 - Beef / Lamb 160 - 170 150 - 180 1 - Chicken 160 - 180 75 - 90 1 Convenience Foods Follow manufacturer's ins
Food Temperature (°C) Time (min) Shelf position - Baked Jacket Potatoes 180 - 190 60 - 90 2 - Roast Potatoes 180 - 190 60 - 90 2 - Large 200 - 210 25 - 40 1 - Individual 210 - 220 15 - 25 1 Yorkshire Pudding: Main oven Food Temperature (°C) Time (min) Shelf position Biscuits 180 - 190 10 - 20 3 Bread 190 - 210 30 - 35 3 - Small & Queen 160 - 170 18 - 25 3 - Sponges 160 - 170 20 - 25 3 - Madeira 140 - 160 60 - 75 3 - Rich Fruit 130 - 140 120 - 150 3 - Chri
• All types of meat that can be browned or have crackling can be roasted in the roasting tin without the lid. • We recommend that you cook meat and fish weighing 1 kg and above in the appliance. • To prevent the meat juices or fat from burning onto the pan, put some liquid into the deep pan. • If necessary, turn the roast (after 1/2 2/3 of the cooking time). • Baste large roasts and poultry with their juices several times during roasting. This gives better roasting results.
Defrost - Main oven Do not cover the food with a bowl or a plate, as this can extend the defrost time. Remove the food packaging and put the food on a plate. Use the first shelf position from the bottom. Food Quantity Defrosting time (min) Further defrosting time (min) Comments Chicken 1 kg 100 - 140 20 - 30 Put the chicken on an upturned saucer in a big plate. Turn halfway through. Meat 1 kg 100 - 140 20 - 30 Turn halfway through. Meat 500 g 90 - 120 20 - 30 Turn halfway through.
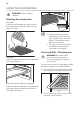
2. Pull the rear end of the shelf support away from the side wall and remove it. 2 1 Install the shelf supports in the opposite sequence. Oven ceiling WARNING! Deactivate the appliance before you remove the heating element. Make sure that the appliance is cold. There is a risk of burns. Remove the shelf supports. You can fold down the heating element on the oven ceiling to clean the oven ceiling easily. 1. Hold the heating element with two hands at the front. 2.
9. Clean the glass panel with water and soap. Dry the glass panel carefully. When the cleaning is completed, install the glass panels and the door. Do the above steps in the opposite sequence. Install the smaller panel first, then the larger. Replacing the lamp 45° Put a cloth on the bottom of the interior of the appliance. It prevents damage to the lamp glass cover and the cavity. 4. Hold the door with one hand on each side and pull it away from the appliance at an upwards angle. 5.
TROUBLESHOOTING WARNING! Refer to Safety chapters. What to do if... Problem Possible cause Remedy The oven does not heat up. The oven is deactivated. Activate the oven. The oven does not heat up. The clock is not set. Set the clock. The oven does not heat up. The necessary settings are not set. Make sure that the settings are correct. The oven does not heat up. The fuse is released. Make sure that the fuse is the cause of the malfunction.
Model identification LAM4602 Energy Efficiency Index Top oven: 116.4 Main oven: 103.6 Energy efficiency class Top oven: B Main oven: A Energy consumption with a standard load, conventional mode Top oven: 0.85 kWh/cycle Main oven: not applicable Energy consumption with a standard load, fan-forced mode Top oven: not applicable Main oven: 0.86 kWh/cycle Number of cavities 2 Heat source Electricity Volume Top oven: 42 l Main oven: 66 l Type of oven Built-In Oven Mass 49.
Please ensure you have ready: • This guarantee does not cover accidental damage, misuse or alternations which are likely to affect the product. • The guarantee is invalid if the product is tampered with, or repaired by any unauthorised person.
867300177-A-092015 If supplied, please stick your self adhesive product rating plate here, or make a note of the product serial number below in the box below for future reference. Serial Number : ...........................................................................................