Dishwasher User Manual LAM8604
CONTENTS Safety information Safety instructions Product description Control panel Programmes Settings Options 2 3 5 5 6 7 9 Before first use Daily use Hints and tips Care and cleaning Troubleshooting Technical information Your guarantee 10 11 12 14 15 18 19 Subject to change without notice. SAFETY INFORMATION Before the installation and use of the appliance, carefully read the supplied instructions.
• • • • • • • • • • Do not change the specification of this appliance. The operating water pressure (minimum and maximum) must be between 0.5 (0.05) / 8 (0.8) bar (Mpa) Obey the maximum number of 13 place settings. If the supply cord is damaged, it must be replaced by the manufacturer, its Authorised Service Centre or similarly qualified persons in order to avoid a hazard. Put knives and cutlery with sharp points in the cutlery basket with the points down or in a horizontal position.
• Only for UK and Ireland. The appliance has a 13 amp mains plug. If it is necessary to change the fuse in the mains plug, use fuse: 13 amp ASTA (BS 1362). Water connection • Do not cause damage to the water hoses. • Before connection to new pipes, pipes not used for a long time, where repair work has been carried out or new devices fitted (water meters, etc.), let the water flow until it is clean and clear. • Ensure that there are no visible water leaks during and after the first use of the appliance.
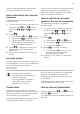
PRODUCT DESCRIPTION 1 2 11 10 1 2 3 4 5 6 9 8 7 6 Upper spray arm Lower spray arm Filters Rating plate Salt container Air vent 5 4 7 8 9 10 11 Rinse aid dispenser Detergent dispenser Cutlery basket Lower basket Upper basket 3 CONTROL PANEL 1 1 On/off button 2 Programme buttons 3 Delay button 2 3 4 Indicators 4
Indicators Indicator Description End indicator. Combi tablet indicator. Salt indicator. It is always off while the programme operates.
Programme 1) Water (l) Energy (kWh) Duration (min) P2 Intensive 13 - 15 1.5 - 1.6 150 - 170 P3 Normal 15 - 17 1.3 - 1.6 120 - 130 P4 Quick 9 0.8 30 P5 Rinse & Hold 4 0.1 14 1) The pressure and the temperature of the water, the variations of the mains supply, the options and the quantity of dishes can change the values.
Water hardness German degrees (°dH) French degrees (°fH) mmol/l Clarke degrees Water softener level 47 - 50 84 - 90 8.4 - 9.0 58 - 63 10 43 - 46 76 - 83 7.6 - 8.3 53 - 57 9 37 - 42 65 - 75 6.5 - 7.5 46 - 52 8 29 - 36 51 - 64 5.1 - 6.4 36 - 45 7 23 - 28 40 - 50 4.0 - 5.0 28 - 35 6 19 - 22 33 - 39 3.3 - 3.9 23 - 27 5 1) 15 - 18 26 - 32 2.6 - 3.2 18 - 22 4 11 - 14 19 - 25 1.9 - 2.5 13 - 17 3 4 - 10 7 - 18 0.7 - 1.8 5 - 12 2 <4 <7 <0.
With the rinse aid dispenser deactivated, the rinse aid indicator is always off. How to deactivate the rinse aid dispenser The appliance must be in programme selection mode. 1. To enter the user mode, press and hold simultaneously and until the indicators , and start to flash. 2. Press . • The indicators and a go off. • The indicator continues to flash. • The end indicator indicates the current setting: End indicator on = rinse aid dispenser activated. 3. Press to change the setting.
BEFORE FIRST USE 1. Make sure that the current level of the water softener agrees with the hardness of the water supply. If not, adjust the level of the water softener. 2. Fill the salt container. 3. Fill the rinse aid dispenser. 4. Open the water tap. 5. Start a programme to remove any processing residuals that can still be inside the appliance. Do not use detergent and do not load the baskets.
CAUTION! Only use rinse aid specifically designed for dishwashers. 4. Close the lid. Make sure that the release button locks into position. Fill the rinse aid dispenser when the indicator (E) becomes clear. 1. Press the release button (D) to open the lid (C). 2. Pour the rinse aid in the dispenser (A) until the liquid reaches the fill level 'max'. 3. Remove the spilled rinse aid with an absorbent cloth to prevent too much foam.
Starting a programme 1. Keep the appliance door ajar. 2. Press the on/off button to activate the appliance. Make sure that the appliance is in programme selection mode. 3. Press the button related to the programme you want to start. The related programme indicator comes on. 4. Close the appliance door to start the programme. Starting a programme with delay start 1. Set a programme. 2. Press again and again until the indicator related to the number of hours want to set comes on (3, 6 or 9).
Make sure that items do not touch or cover each other. • You can use dishwasher detergent, rinse aid and salt separately or you can use the multi-tablets (e.g. ''3in1'', ''4in1'', ''All in 1''). Follow the instructions written on the packaging. • Select the programme according to the type of load and degree of soil. With the ECO programme you have the most efficient use of water and energy consumption for crockery and cutlery with normal soil.
Unloading the baskets 1. Let the tableware cool down before you remove it from the appliance. Hot items can be easily damaged. 2. First remove items from the lower basket, then from the upper basket. At the end of the program water can still remain on the sides and on the door of the appliance. CARE AND CLEANING WARNING! Before maintenance, deactivate the appliance and disconnect the mains plug from the main socket. Dirty filters and clogged spray arms decrease the washing results.
Cleaning the spray arms Do not remove the spray arms. If the holes in the spray arms are clogged, remove remaining parts of soil with a thin pointed object. External cleaning 7. Reassemble the filters (B) and (C). 8. Put back the filter (B) in the flat filter (A). Turn it clockwise until it locks. CAUTION! An incorrect position of the filters can cause bad washing results and damage to the appliance. • Clean the appliance with a moist soft cloth. • Only use neutral detergents.
Problem and alarm code Possible cause and solution You cannot activate the appliance. • Make sure that the mains plug is connected to the mains socket. • Make sure that there is no damaged fuse in the fuse box. The programme does not start. • Make sure that the appliance door is closed. • If the delay start is set, cancel the setting or wait for the end of the countdown. • The appliance has started the procedure to recharge the resin inside the water softener.
Problem and alarm code Possible cause and solution Rattling/knocking sounds from inside the appliance. • The tableware is not properly arranged in the baskets. Refer to basket loading leaflet. • Make sure that the spray arms can rotate freely. The appliance trips the circuit-beaker. • The amperage is insufficient to supply simultaneously all the appliances in use. Check the socket amperage and the capacity of the meter or turn off one of the appliances in use.
Problem Possible cause and solution The dishes are wet. • The programme does not have a drying phase or has a drying phase with low temperature. • The rinse aid dispenser is empty. • The quality of the rinse aid can be the cause. • The quality of the multi-tablets can be the cause. Try a different brand or activate the rinse aid dispenser and use rinse aid and multi-tablets together. • Keep the dishwasher door ajar for some time before removing tableware. The interior of the appliance is wet.
Voltage (V) 220 - 240 Frequency (Hz) 50 Water supply pressure Min. / max. bar (MPa) 0.5 (0.05) / 8 (0.8) Water supply Cold water or hot water 2) max 60 °C Capacity Place settings 13 Power consumption Left-on mode (W) 5.0 Power consumption Off-mode (W) 0.10 Electrical connection 1) 1) Refer to the rating plate for other values. 2) If the hot water comes from alternative source of energy, (e.g. solar panels, aeolian energy), use the hot water supply to decrease energy consumption.
156901710-A-482015 If supplied, please stick your self adhesive product rating plate here, or make a note of the product serial number below in the box below for future reference. Serial Number : ...........................................................................................