Table of Contents Rotary Cutters RCR2596, RCR2510 and RCRM2510 22288 312-753M Operator’s Manual ! Read the Operator’s Manual entirely. When you see this symbol, the subsequent instructions and warnings are serious - follow without exception. Your life and the lives of others depend on it! © Copyright 2008 Printed 5/09/08 Cover photo may show optional equipment not supplied with standard unit.
Land Pride Table of Contents Table of Contents Important Safety Information . . . . . . . . . . .1 Safety at All Times . . . . . . . . . . . . . . . . . . . . . . . . . 1 Look For The Safety Alert Symbol . . . . . . . . . . . . . 1 Safety Labels . . . . . . . . . . . . . . . . . . . . . . . . . . . . . 4 Introduction . . . . . . . . . . . . . . . . . . . . . . . .8 Application . . . . . . . . . . . . . . . . . . . . . . . . . . . . . . . 8 Using This Manual . . . . . . . . . . . . . . . . . . . . . .
Land Pride Table of Contents Important Safety Information Important Safety Information These are common practices that may or may not be applicable to the products described in this manual. Safety at All Times Look For The Safety Alert Symbol Thoroughly read and understand the instructions given in this manual before operation. Refer to the “Safety Label” section, read all instructions noted on them.
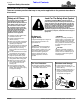
Table of Contents Land Pride Important Safety Information These are common practices that may or may not be applicable to the products described in this manual. Use Safety Lights and Devices Transport Machinery Safely ▲ Slow moving tractors, selfpropelled equipment, and towed implements can create a hazard when driven on public roads. They are difficult to see, especially at night. ▲ Flashing warning lights and turn signals are recommended whenever driving on public roads.
Table of Contents Land Pride Important Safety Information These are common practices that may or may not be applicable to the products described in this manual. Prepare for Emergencies ▲ Be prepared if a fire starts. ▲ Keep a first aid kit and fire extinguisher handy. ▲ Keep emergency numbers for doctor, ambulance, hospital and fire department near phone. Wear Protective Equipment Avoid High Pressure Fluids Hazard ▲ Protective clothing and equipment should be worn.
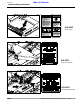
Table of Contents Land Pride Important Safety Information Safety Labels Your Cutter comes equipped with all safety labels in place. They were designed to help you safely operate your implement. 1. Read and follow label directions. 2. Keep all safety labels clean and legible. 3. Replace all damaged or missing labels. 4. Some new equipment installed during repair require safety labels to be affixed to the replaced component as specified by Land Pride.
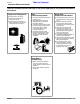
Land Pride Table of Contents Important Safety Information 818-830C Safety Combo 22288 ROTATING DRIVELINE KEEP AWAY! 818-552C Danger PTO Driveline 22288 818-543C Danger Guard Missing 22297 5/09/08 RCR2596, RCR2510 and RCRM2510 Rotary Cutters 312-753M 5
Table of Contents Land Pride Important Safety Information 818-564C Chain Shield 22288 818-556C Danger Thrown Object 22288 818-142C Rotating Driveline 22288 6 RCR2596, RCR2510 and RCRM2510 Rotary Cutters 312-753M 5/09/08
Land Pride Table of Contents Important Safety Information 838-094C Warning: High Pressure 22288 818-540C Danger Guard Missing Do Not Operate 22296 ROTATING DRIVELINE KEEP AWAY! 818-552C 22296 5/09/08 Rotating Driveline Hazard Keep Away RCR2596, RCR2510 and RCRM2510 Rotary Cutters 312-753M 7
Table of Contents Land Pride Introduction Introduction Land Pride welcomes you to the growing family of new product owners. This Cutter has been designed with care and built by skilled workers using quality materials. Proper assembly, maintenance, and safe operating practices will help you get years of satisfactory use from the machine.
Table of Contents Land Pride Introduction Further Assistance Your dealer wants you to be satisfied with your new Cutter. If for any reason you do not understand any part of this manual or are not satisfied with the service received, the following actions are suggested: 1. Discuss the matter with your dealership service manager making sure he is aware of any problems you may have and that he has had the opportunity to assist you. 2.
Table of Contents Land Pride Section 1: Assembly and Set-Up Section 1: Assembly and Set-Up Tractor Requirements 3-Point Hitch Weight & Horsepower Tractor horsepower and weight must be capable of controlling the cutter under all operating conditions. Tractors outside the horsepower range must not be used. • RCR2596 cutters • RCR2596 (Category l or ll hitch) • RCR2510 & RCRM2510 (Category ll or lll hitch) Three-point. . . . . . . . 45-110 HP Pull-type . . . . . . . . . .
Table of Contents Land Pride Section 1: Assembly and Set-Up Gearbox Vent Plug Refer to Figure 1-2 Gearbox vent plugs are shipped loose and packaged with the Operator’s Manual. Remove existing splitter gearbox pipe plug and replace with 3/8” vent plug. Remove wing box pipe plugs and replace with 1/2” vent plugs. 2. 3. 1/2” Wing Box Pipe Plug 3/8” Splitter Box Pipe Plug 4. 1/2” Wing Box Pipe Plug 5.
Table of Contents Land Pride Section 1: Assembly and Set-Up Pull-Type Cutter Hitch Assembly NOTE: Do not tighten hardware until assembly is complete. Refer to “Torque Values Chart for Common Bolt Sizes” on page 38. Refer to Figure 1-4 for RCR2596 hitch assembly and Figure 1-5 for RCR2510 hitch assembly: 1. Assemble tongue (#1) to the deck using hitch pins (#2), spacer tubes (#3) and linch pins (#4). 2.
Table of Contents Land Pride Section 1: Assembly and Set-Up Equal Angle Driveline Installation Refer to Figure 1-6: Equal angle drivelines can be installed on RCR2596, RCR2510 and RCRM2510. Maximum turning angle is limited to 35 degrees. 1. Remove gearbox cover (cover not shown). 2. Securely attach the slip-clutch end of the driveline jackshaft (#2) to the gearbox input shaft (#1). Make certain the slip-clutch is fully on the gearbox input shaft.
Table of Contents Land Pride Section 1: Assembly and Set-Up Constant Velocity Driveline Installation NOTE: Do not tighten hardware until assembly is complete. Refer to “Torque Values Chart for Common Bolt Sizes” on page 38. Refer to Figure 1-7: Constant velocity driveline can be installed on RCR2510 and RCRM2510 cutters only. Maximum turning angle is limited to 80 degrees. 1. Securely attach slip-clutch end of jackshaft driveline (#1) to gearbox input shaft (#8).
Land Pride Table of Contents Section 1: Assembly and Set-Up Chain Safety Shields (Optional) ! DANGER! Rotary Cutters have the ability to discharge objects at high speeds; therefore, the use of front and rear safety shields is strongly recommended when cutting along highways or in an area where people may be present. NOTE: Do not tighten hardware until assemblies are complete. Refer to “Torque Values Chart for Common Bolt Sizes” on page 38.
Table of Contents Land Pride Section 1: Assembly and Set-Up Rubber Safety Shields (Optional) ! DANGER! Rotary Cutters have the ability to discharge objects at high speeds; therefore, the use of front and rear safety shields is strongly recommended when cutting along highways or in an area where people may be present. NOTE: Do not tighten hardware until assemblies are complete. Refer to “Torque Values Chart for Common Bolt Sizes” on page 38.
Table of Contents Land Pride Section 1: Assembly and Set-Up 3-Point Tractor Hook-Up Refer to Figure 1-14: ! DANGER! Tractor hook-up can be hazardous to you or your helper. Do not allow anyone to stand between the cutter and tractor during hook-up operations. Do not operate hydraulic 3-point lift controls while someone is directly behind the tractor. ! CAUTION! Always engage parking brake, shut off tractor and remove key before dismounting from tractor. 1. Locate the cutter on a flat level surface.
Table of Contents Land Pride Section 1: Assembly and Set-Up ! WARNING! Damaged drivelines can cause serious injury or death. Either a tractor with 540 rpm or 1000 rpm PTO (Power Take-Off) speed is required. The RCR cutters are designed for a PTO speed of 540 rpm and the RCRM cutters are designed for 1000 rpm. IMPORTANT: Do not attempt to operate a 540 RPM driveline cutter with a 1,000 RPM PTO tractor and do not operate a 1000 RPM driveline cutter with a 540 RPM PTO tractor.
Land Pride Table of Contents Section 1: Assembly and Set-Up 5. With driveline profiles pulled apart, apply multipurpose grease to the inside of the outer profile and reassemble the two profiles. 6. Attach inner driveline yoke to the gearbox shaft and outer driveline yoke to the tractor PTO shaft. 7. The driveline should now be moved back and forth to insure that both ends are secured. Reattach any end that is loose. IMPORTANT: Two small chains are supplied with the driveline.
Table of Contents Land Pride Section 1: Assembly and Set-Up Pull-Type Tractor Hook-Up NOTE: May need to adjust the leveling rod nut couplers to obtain correct drawbar height. Refer to Figure 1-17 ! DANGER! Crushing Hazard between tractor and implement. Do not allow anyone to stand between the tractor and implement while backing-up to an implement. Never operate the hydraulic 3-point lift controls while someone is directly behind the tractor.
Land Pride Table of Contents Section 1: Assembly and Set-Up 2. Remove parking jack (#1) from cutter deck and secure to cutter tongue by fully inserting locking pin (#2) through the parking jack and mounting bracket as shown. 3. Add stroke control spacers to the cylinder rod to prevent the cylinder from retracting. See “Pull-Type Cutter” on page 23. 4. Use parking jack (#1) to raise and lower cutter tongue to the correct height to disconnect clevis hitch (#6) from the tractor drawbar. 5.
Table of Contents Land Pride Section 2: Adjustments Section 2: Adjustments Leveling Procedure Pull-Type Cutter Lift-type and Pull-Type cutters must operate level from side to side at all times. Gauge wheels should be set at identical heights. There are two primary adjustments that should be made prior to actual field operations: Lift-Type Cutter There are four primary adjustments that should be made prior to actual field operations: a. Deck level from left to right b. Tractor top link length c.
Land Pride Table of Contents Section 2: Adjustments Cutting Height Adjustment ! DANGER! Engage parking brake, disengage PTO, shut off tractor and remove key before proceeding. Ensure that all moving parts have come to a complete stop before dismounting from the tractor. ! CAUTION! Wear a pair of gloves when performing this operation. Go to the back of the cutter and carefully rotate each blade to the position shown in Figure 2-3. Avoid direct contact with the cutting edge of the blade.
Table of Contents Land Pride Section 3: Operating Procedures Section 3: Operating Procedures Operating Check List It is absolutely essential that no one operates the Rotary Cutter without first having read, fully understood and become totally familiar with the Operator’s Manual.
Land Pride Table of Contents Section 3: Operating Procedures Cutting Instructions ! DANGER! The use of front & rear safety shields is strongly recommended to prevent injury or death caused by thrown objects! Gearbox shields must be secured in place when operating to avoid injury or death from entanglement in rotating drivelines. ! DANGER! Rotary Cutters have the ability to discharge objects at high speeds.
Table of Contents Land Pride Section 3: Operating Procedures Crossing Steep Ditches & Banks Refer to Figure 3-3: ! WARNING! Damage to the tractor’s PTO components and/or driveline components can cause the driveline to come loose and cause bodily injury to the operator and others. IMPORTANT: Always cross steep ditches and banks at a diagonal. Never cross straight across a steep ditch or bank and never back into a steep ditch or bank.
Land Pride Table of Contents Section 3: Operating Procedures tight turn. Operators of pull-type models must plan ahead and choose a cutting pattern that allows for wider turns. Try increasing or decreasing ground speed to determine the effect on quality of cut. With a little practice you will be pleased with what you and your Land Pride Cutter can do.
Table of Contents Land Pride Section 4: Maintenance & Lubrication Section 4: Maintenance & Lubrication Maintenance Proper servicing and adjustment is the key to the long life of any implement. With careful and systematic inspection, you can avoid costly maintenance, time and repair. After using your cutter for several hours, check all bolts to be sure they are tight. Replace any worn, damaged or illegible safety labels by obtaining new labels from your Land Pride Dealer.
Table of Contents Land Pride Section 4: Maintenance & Lubrication 9. Check blade deflection. If deflection is greater than 3/4", remove blade bolt and reassemble as before except include shim (#2) in the assembly. Select shim thickness based on deflection. The greater the deflection, the thicker the shim. 10. Once blade deflection is correct, replace used nut with new locknut (#6) and torque to 450 ft-lbs. 11. If replacing dishpan (#4), nut on gearbox output shaft should be torqued to 450 ft-lbs.
Table of Contents Land Pride Section 4: Maintenance & Lubrication IMPORTANT: The clutch must be disassembled into separate friction discs if one or more friction disc did not slip during clutch run-in operation. See Clutch Disassembly on page 30. Refer to Figure 4-5: Progressively tighten each spring retainer bolt until correct spring height “A” is reached. See Tables below Figure 4-5. 5.
Table of Contents Land Pride Section 4: Maintenance & Lubrication Flex Couplers Land Pride Skid Shoe Replacement Parts Refer to Figure 4-6: Replace rubber disc (#6) as follows: 1. Insert 3-bolts (#1) through the holes in flange weldment (#7). 2. Place beaded washers over the 3-bolts with bead facing rubber disc (#6). 3. Place bushings (#3), rubber disc (#6) and washers (#4) over the 3-bolts as shown. 4. Secure with nuts (#5). Do not tighten. 5. Insert 3-bolts (#1) through the holes in flanged hub (#8).
Table of Contents Land Pride Section 4: Maintenance & Lubrication Lubrication Points Lubrication Legend Multi-purpose spray lube Multi-purpose grease lube Multi-purpose oil lube 50 Intervals in hours at which lubrication is required 24 Hours Tailwheel Spindle Tube Lift-Type Cutter Type of Lubrication: Grease 16276 Quantity = 6 pumps 8 Hours Tailwheel Hub 16278 The tailwheel hub is equipped with a relief hole located directly opposite the grease fitting.
Land Pride Table of Contents Section 4: Maintenance & Lubrication 8 Hours Driveline U-Joints Type of Lubrication: Grease 13755 Quantity = 6 pumps 20 Hours Driveline 14618 Quantity = Clean & coat the inner tube of the driveline with a light film of grease and then reassemble. 20 Hours Constant Velocity Driveline 14618 Quantity = Clean & coat the inner tube of the driveline with a light film of grease and then reassemble.
Table of Contents Land Pride Section 4: Maintenance & Lubrication 8 Hours Pillow Bearing (Pull-Type Cutter) (RCR2510 & RCRM2510) Type of Lubrication: Grease Quantity = As required 16279 As Required Ratchet Jack Type of Lubrication: Multi-Purpose 14176 34 RCR2596, RCR2510 and RCRM2510 Rotary Cutters 312-753M Quantity = As required 5/09/08
Table of Contents Land Pride Section 5 Specifications & Capacities Section 5 Specifications & Capacities RCR2596, RCR2510 & RCRM2510 Models RCR2510 (540 RPM) RCRM2510 (1000 RPM) RCR2596 (540 RPM) Lift-Type Category 2 & 3 Quick-Hitch adaptable Pull-Type - w/Dual Level Rods Hitch Lift-Type Category 1 & 2 Quick hitch adaptable Pull-Type - w/Dual Level Rods Working Width 94” 118” Overall Width 100” 123.
Table of Contents Land Pride Section 6: Features & Benefits Section 6: Features & Benefits RCR2596, RCR2510 & RCRM2510 Models Features Surpassed rugged industry standards 540 or 1000 RPM 5 Year gearbox warranty 3 Gearboxes Gearbox HP rating Splined rubber flex- couplers between the center and outboard gearboxes Constant Velocity U-Joint option on RCR2510 & RCRM2510 Pull-type Slip-clutch protection on main driveline 3-Point or Pull-type High productive cutting width Fully welded 10 Gauge deck All Land Pri
Table of Contents Land Pride Section 7: Troubleshooting Section 7: Troubleshooting Problem Cause Oil seal leaking Driveline yoke or cross failing Driveline clutch slipping Bent Driveline (NOTE: driveline should be repaired or replaced if bent) Driveline telescoping tube failing Driveline telescoping tube wearing Blades wearing excessively Blades breaking Blades coming loose Blade carrier becomes loose Blade bolt holes worn Blade carrier bent Excessive side skid wear Tail wheel support failing Exc
Table of Contents Land Pride Section 8: Appendix Section 8: Appendix Torque Values Chart for Common Bolt Sizes Bolt Head Identification Bolt Size (Inches) in-tpi1 1/4" - 20 1/4" - 28 5/16” - 18 5/16" - 24 3/8" - 16 3/8" - 24 7/16" - 14 7/16" - 20 Grade 2 N· 7.4 8.5 15 17 27 31 43 49 Grade 5 Bolt Head Identification Grade 8 ft-lb3 N · m ft-lb N · m ft-lb 5.6 6 11 13 20 22 32 36 11 13 24 26 42 47 67 75 8 10 17 19 31 35 49 55 16 18 33 37 59 67 95 105 12 14 25 27 44 49 70 78 5.
Table of Contents Land Pride Section 8: Appendix Warranty Land Pride warrants to the original purchaser that this Land Pride product will be free from defects in material and workmanship beginning on the date of purchase by the end user according to the following schedule when used as intended and under normal service and conditions for personal use. Overall Unit and Drivelines: One year Parts and Labor Gearbox: (S/N 329841+) Five years on Parts and labor.
Corporate Office: P.O. Box 5060 Salina, Kansas 67402-5060 USA www.landpride.