Kepler 350 Pizza Kettle Pizza Kettle Charcoal Grill Assembly and Operating Instructions for Model: 525142 VER. 1, 7/11/2016 ! PLEASE READ ALL RULES FOR SAFE OPERATION AND FOOD SAFETY BEFORE USING.
PAGE 2 Kepler 350 Pizza Kettle READ FIRST! RULES FOR PIZZA KETTLE CHARCOAL GRILL SAFE OPERATION. • WARNING! THE GRILL IS FOR OUTDOOR USE ONLY! • WARNING! THIS GRILL GETS EXTREMELY HOT DURING USE! USE EXTREME CAUTION AROUND THE GRILL. • EXTREME HEAT WARNING! DURING USE EXTREME HEAT EXITS OUT OF THE PIZZA RING OPENING! KEEP CLEAR! USE PIZZA PEEL TO PLACE AND REMOVE PIZZAS. USE GLOVES IF NECESSARY. • WARNING! NEVER USE GASOLINE, ALCOHOL OR VOLATILE FLUIDS TO START OR RESTART FIRES.
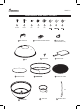
PAGE 3 Kepler 350 Pizza Kettle HARDWARE AND PART LISTING x2 x6 x2 x2 x2 A B C D E ST 4.
PAGE 4 Kepler 350 Pizza Kettle HARDWARE AND PART LISTING Ke pl er 20 0/ 40 0/ 60 0 A ST4 .
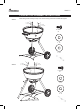
PAGE 5 Kepler 350 Pizza Kettle EXPLODED VIEW 1 13 2 14 3 PIZZA KETTLE PARTS QTY 1 LID HANDLE...............................................1 4 5 2 LID HANDLE HEAT SHIELD........................1 Kepler 20 0/ 40 0/ 60 0 A ST4 .2 X1 3 2X B M6X 15 6X 3 LID AIR VENT (Pre-assemble to lid).................................1 6 4 LID..............................................................1 7 C M5 2X D M6 2X E M8 2X G 6X 15 F 6X H 4X 5 LID HOOK........................................
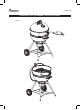
PAGE 6 Kepler 350 Pizza Kettle PIZZA KETTLE ASSEMBLY INSTRUCTIONS STEP 1 10 A ST4.
PAGE 7 Kepler 350 Pizza Kettle PIZZA KETTLE ASSEMBLY INSTRUCTIONS STEP 4 Install all leg screws loosely in steps 4 & 5. Once all 4 leg screws are installed then tighten.
Supplemental Instructions for step 6 Kepler 350 Pizza Kettle Please use theKETTLE diagramASSEMBLY below for correct lid assembly PIZZA INSTRUCTIONS STEP 6 STEP 6 B 1 13 B M6X15 2X 2 14 5 Gmica plate F SS304 Gmica plate D F SS304 m D 10m C D M6 2X 8mm C M5 2X F 2X G 2X PAGE 8
PAGE 9 Kepler 350 Pizza Kettle PIZZA KETTLE ASSEMBLY INSTRUCTIONS STEP 7 4 7 8 16 9 11
PAGE 10 Kepler 350 Pizza Kettle PIZZA KETTLE ASSEMBLY INSTRUCTIONS STEP 8 6
PAGE 11 Kepler 350 Pizza Kettle OPERATING INSTRUCTIONS FOR PIZZA KETTLE ! WARNING! This grill becomes EXTREMELY hot! Use caution working around the grill. The handles will become warm to hot over extended use. Use mittens or oven gloves when removing the lid, pizza ring, cooking grate or the pizza stone. ADD WOOD CHUNKS CHARCOAL STEP 1: START THE CHARCOAL Remove the lid, pizza ring and cooking grate. Pour desired amount of charcoal (3-5 lbs.) on the charcoal grate and light.
PAGE 12 Kepler 350 Pizza Kettle OPERATING INSTRUCTIONS FOR PIZZA KETTLE ! WARNING! This grill becomes EXTREMELY hot! Use caution working around the grill. The handles will become warm to hot over extended use. Use mittens or oven gloves when removing the lid, pizza ring, cooking grate or the pizza stone.
PAGE 13 Kepler 350 Pizza Kettle OPERATING INSTRUCTIONS FOR PIZZA KETTLE ! WARNING! This grill becomes EXTREMELY hot! Use caution working around the grill. The handles will become warm to hot over extended use. Use mittens or oven gloves when removing the lid, pizza ring, cooking grate or the pizza stone. ROTATE PIZZA ONE HALF TURN AFTER A FEW MINUTES AFTER A FEW MORE MINUTES THE PIZZA WILL BE DONE STEP 6: COOKING PIZZA Add pizzas to the grill through the opening in the pizza ring.
Kepler 350 Pizza Kettle PAGE 14 OPERATING INSTRUCTIONS FOR CHARCOAL GRILL ! WARNING! This grill becomes EXTREMELY hot! Use caution working around the grill. The handles will become warm to hot over extended use. Use mittens or oven gloves when removing the lid and cooking grate. CHARCOAL STEP 1: START THE CHARCOAL Remove the lid, pizza ring and cooking grate. Pour desired amount of charcoal (3-5 lbs.) on the charcoal grate and light. Make sure ash catcher vent is open full.
PAGE 15 Kepler 350 Pizza Kettle CLEANUP COOLED ASHES NEW STONE USED STONE GRILL CLEANUP Clean the cooking grate using a good quality grill brush. The buildup is easier to clean when its still hot. After the grill has cooled, tap and shake the grill lightly to get the ashes to fall into the ash catcher. If necessary remove the cooking grate and charcoal grate to push down any remaining ash or grill leftovers. Remove the ash catcher and dispose of cooled ashes in proper receptacle.
PAGE 16 Kepler 350 Pizza Kettle FOOD TEMPERATURES If you are unsure about when food is done, use this chart as a guide for measuring properly cooked meat temperatures. Use a high quality meat thermometer with probe to measure the meat temperature. Push probe into the thickest part of the meat to get an accurate measurement. The temperature gauge on the grill measures the air temperature of the grill cooking chamber, not the food temperature. Steaks & Roasts Medium . . . . . rare . . . . . . . . . . . . .
PAGE 17 Kepler 350 Pizza Kettle ! ! ! WARNING! NEVER USE GASOLINE, ALCOHOL OR VOLATILE FLUIDS TO START OR RESTART FIRES. ! WARNING! ! EXTREME HEAT EXITING FROM PIZZA RING OPENING! KEEP HANDS AND ANY COMBUSTIBLE MATERIALS AWAY! ! HOT! ! WARNING! HOT SURFACES DURING USE! USE MITTENS OR GLOVES ON THESE PARTS. ! ! ! ! ! WARNING! DO NOT OPERATE GRILL WITHOUT ASH CATCHER IN PLACE. DO NOT OPEN ASH CATCHER DURING USE. KEEP ASH CATCHER CLOSED UNTIL ALL ASHES HAVE COOLED.
PAGE 18 Kepler 350 Pizza Kettle Kepler 350 Pizza Kettle LIMITED WARRANTY Landmann USA (“Landmann”) warrants that this product shall be free of defects in material and workmanship to the original purchaser for 10 years on the lid and fire bowl, 1 year on all other parts. This limited warranty is made exclusively to the original customer presenting proof of purchase. This warranty is limited to non-commercial residential use only. Any returned goods must be shipped prepaid.