
Installation Instructions


2
Materials Needed:
4” x 4” Pressure Treated Wood Post, or
4” x 4” Vinyl PVC, Aluminum, Steel Post
Bagged concrete mix
(apx. 2 80# bags per column)
Accent Bond adhesive
Common Tools Needed:
8” – 10” diameter post hole auger/digger
Concrete mixing container/trowel/access to water
Level/Tape Measure/Utility Knife
Standard Caulking Gun
Hand or Power Saw
FOR LIGHT MOUNTING KIT/LIGHT KIT ONLY - Electric Drill with
¼” x 6.00” & 5/8” Spade Drill Bit, Phillips Screwdriver, Pliers, Wire
Strippers (Wire Nuts required for installation of optional Light
Mounting Kit -Part # LMKB, LMKW/ Light Kit -Part # LK1B, LK1W).
Column Installation Instructions
STEP 1 - Prepare 8”-10” diameter hole at desired
ground location to a depth in conformance
with local building codes. (Excavate
below frost line as determined by
local building code authority, or a
minimum of 24”).
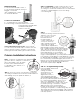
STEP 2 - Set 4” x 4” post into hole. Prepare concrete mix
according to manufacturer’s instructions and backfill hole
while making sure post is plumb at all times (1).
STEP 2 -(continued) Do NOT over fill hole with concrete
above existing soil grade surface (2). Allow post to dry
according to concrete mix manufacturer’s recommended
cure time. For rapid installation, use a “fast setting”
concrete bag mix.
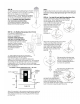
STEP 3
Test fit by mounting column base (without
adhesive) onto post when
post concrete is cured.
Determine desired
mounting height of
column. Scribe mark (3)
on the post at the top
edge of EZ-Mason bracket
of the interior mounting
channel. Make adjustments if
final installation requires raised soil/mulch
bed or additional height for desired final grade
and column mounting. Remove base unit and
squarely saw the post at a 90˚ angle at scribe
mark, eliminating excess post material.
Note: For fencing applications or any 5’ or 6’
height column applications (optional pedestal) using PVC
post material, consider filling post with additional concrete
for added rigidity and stability. To protect the perimeter of
the column from potential damage by lawn mowers or
trimmers, it is recommended that a protective mulch bed,
gravel bed or landscaping bed be installed. If no
accessories required, skip to Step 3B.
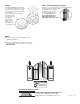
STEP 3A - For Light Mounting Kit Only
Have a qualified and licensed
electrician install
underground rated
electrical wire or ½-¾”
electrical conduit
(Rigid, EMT or PVC) for
optional Light Mounting Kit
(Part # LMKB, LMKW) installation.
Be sure to provide adequate wire length
for column height installation. Always check
with your local building code authority for
electrical requirements. Conduit or wire can be
mounted up through column base cavity by
drilling raceway holes (4) into EZ-Mason
brackets and inserting wire through bracket
openings. It is important to consider voltage drop and
appropriate wire gauge when installing outdoor lighting
over long distances. Consult a qualified electrician if you
have any questions.
1
3
4