
Panel Ready Install Sheet


Produced by:
Living Direct, Inc.
8606 Wall Street, Suite 1600 Austin, TX 78754
LANDMARKAPPLIANCES.COM
©2021 Landmark
1
Thank you for purchasing your panel ready undercounter wine or beverage refrigerator from Landmark. Our brand set out with one particular goal: To
present appliances that are as reliable and recognizable as they are attainable. We create products that invite entire kitchens to be built around them,
serving as an establishing feature in the very spaces they occupy.
In accordance with our ongoing mission to provide cutting-edge and forward-thinking products to our loyal customers, we recently introduced a line
of panel ready appliances. These models are fully customizable, and in just a few short steps, you can match your undercounter refrigerator with your
adjacent cabinetry.
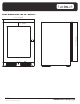
This document serves as a guide for installing custom door panels on any of these models. For more product information, including owner's manuals,
dimension guides, and more, visit LandmarkAppliances.com.
PRODUCT INFORMATION
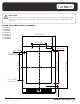
PANEL INSTALLATION INSTRUCTIONS
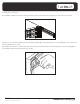
OVERLAY PANEL INSTALLATION INSTRUCTIONS
TOOLS REQUIRED
• Phillips Screwdriver • Drill and 7/64" Drill Bit • #6 Wood Screws* • Clamps (Recommended)
IMPORTANT
Warning: The weight of the overlay panel should not exceed 15 lbs.
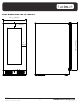
NOTE
*Because the sizes of overlay panels vary, hardware for mounting your overlay is not included with your Landmark
panel ready refrigerator. #6 wood screws are recommended. The required length depends on the thickness of
your overlay panel. Take care to ensure the screws are not too long to avoid them protruding though the overlay
panel.