OWNER'S MANUAL 24 Inch Undercounter Single Zone Series Model Numbers L3024UI1 Panel Ready
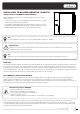
IMPORTANT SAFETY INFORMATION Improper handling can cause serious damage to the Landmark refrigerator and/or injury to the user. This refrigerator is designed for domestic indoor use only. Do not use the unit for industrial or commercial use. Any other use may invalidate the warranty. Please review the rating label located on the rear panel of the unit for electrical and other technical data related to this unit. The unit must be used in a properly grounded wall outlet.
TABLE OF CONTENTS Important Safety Information . . . . . . . . . . . . . . . . . . . . . . . . . . . . . . . 2 Table of Contents . . . . . . . . . . . . . . . . . . . . . . . . . . . . . . . . . . . . . . 3 First Time Operating Instructions . . . . . . . . . . . . . . . . . . . . . . . . . . . . . . 3 Introduction . . . . . . . . . . . . . . . . . . . . . . . . . . . . . . . . .
INTRODUCTION Thank you for purchasing your Landmark refrigerator. Landmark is dedicated to developing products that will enhance your lifestyle with superior quality and distinctive features. Please visit landmarkappliances.com for more information on your product and other Landmark products. This manual contains important information regarding the proper installation, use, and maintenance of your refrigerator.
PARTS IDENTIFICATION FULL VIEW Screw Holes Roll-out Shelf Front Vent Door Lock EMPTY VIEW Upper Door Hinge Carbon Filter Control Panel Lower Door Hinge Door Switch Leveling Legs NOTE The number of shelves in your refrigerator varies depending on the wine or beverage refrigerator model that you purchase.
PARTS IDENTIFICATION (CONT'D) CARBON FILTER This refrigerator includes a carbon filter to protect your wine and beverages from harmful odors. Replace the carbon filter every 3 - 6 months. Contact Landmark for replacements. INSTALLING YOUR REFRIGERATOR The refrigerator should be installed in accordance with local electrical code requirements.
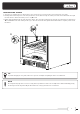
INSTALLING YOUR REFRIGERATOR (CONT'D) INSTALLATION CLEARANCE REQUIREMENTS When installing the refrigerator under a counter, follow the recommended spacing dimensions shown. /4” - 1” 3 • To ensure proper service access and ventilation, allow at least between /4 – 1 inch of clearance at the back as shown in the diagram. • The installation should allow the unit to be pulled forward for servicing, if necessary.
PANEL READY INSTALLATION This unit is designed for panel ready installation of custom door panels to match surrounding cabinetry. The most up-to-date product information, including specification sheets, panel specifications, and warranty information, can be found by visiting LandmarkAppliances.com. INSTALLING YOUR DOOR HANDLE AND SHELVES INSTALLING THE DOOR HANDLE A standard door handle is included with the unit.
REMOVING THE SHELVES 1. Open the door completely. The door must be able to open at least 90 degrees for the shelves to properly clear the door gasket. 2. Holding both the left and right sides of the shelf you intend to remove, lift the front up out of the key slot on the front vertical tracks. Then pull the shelf out of the cabinet and towards you. See step "A" below. 3. Pull the shelf approximately 1/3 out of the refrigerator cabinet.
OPERATION INSTALLATION CHECKLIST BEFORE OPERATION 1. Have all packing materials and tape been removed from the interior and exterior of the refrigerator? 2. Have the installation instructions been followed, including connecting the machine to a proper electrical supply? 3. Has proper grounding been installed for the refrigerator? 4. Has the machine been leveled? 5. Is the refrigerator in a site where the ambient temperature is between 50°F and 90°F all year round? 6.
TIP If you powered the unit off, please wait at least five (5) minutes before powering it back on. WARNING Allow at least 24 hours for your refrigerator to run before storing your beverages. Whether your refrigerator can reach the actual set temperature depends on the ambient environmental conditions. INTERIOR LIGHTING AUTOMATIC LIGHT MODE The internal lights will illuminate each time the door is opened and slowly fade out once the door is closed.
DEFROSTING The refrigerator will automatically defrost under most temperature settings and ambient conditions. However, on colder settings, some frost may build up. Additionally, under more humid ambient conditions, more frost may build up. Keep the door closed as much as possible and avoid opening the door unnecessarily to minimize frost build-up. If frost is preventing the door from closing properly, you may need to power the unit off until the frost melts. Use a soft absorbent towel to dry the unit.
PREPARING YOUR REFRIGERATOR FOR STORAGE If the refrigerator will not be used for a long time, or is to be moved to another place, it will be necessary to defrost the unit and dry the interior. 1. Disconnect the refrigerator from the power supply by removing the power plug from the wall socket. 2. Leave the door open to allow for air circulation and to prevent mold, mildew, and unpleasant smells. 3. Once the interior is dry and clean the unit will be ready for storage.
TROUBLESHOOTING (CONT'D) ISSUE Frost is forming in the refrigerator. The door will not shut properly. POSSIBLE CAUSE SOLUTION The environment is humid. The door is being opened too frequently. Through the unit uses an “auto defrost” system, under certain conditions, manual defrosting may be required. If frost builds up, you can try running the refrigerator on a warmer temperature setting, minimizing the number of times you open the door, or unplugging the unit to allow the frost to melt.
WARRANTY THREE (3) YEARS PARTS AND LABOR Landmark is responsible for all costs for repairing or replacing parts and/or unit which proves to be defective. SIX (6) YEARS SEALED SYSTEM PARTS Landmark is responsible for repairing or replacing any compressor which proves to be defective.
LANDMARKAPPLIANCES.COM ©2022 Landmark 0222 1192810 Landmark Manual Version 1.