Operator Guide 5515/5518 Digital Copier you r docu ment m an a ge m ent pa r tne r
When ordering supplies or requesting service for your copier, you will need to provide the model and serial number of your machine. Please take a moment to enter your model and serial numbers here. MODEL NUMBER: __________________________ SERIAL NUMBER: __________________________ To order supplies, call: ( To request service, call: ) ( ) Customer Vision® Our commitment to your complete satisfaction As an Energy Star Partner, Lanier Worldwide, Inc.
Table of Contents 1 Table of Contents 2 Important Safeguards 3 Important Safeguards ...................................................................................1 Making Copies Applying Power ........................................................................................ 1-1 Main Power Switch ....................................................................... 1-1 Operation Key ..............................................................................
Table of Contents 1 Combine Copying ..................................................................................... Series Copying......................................................................................... Book to 1 Sided ........................................................................... 2 Sided to 1 Sided ........................................................................ 2 User Tools Settings 4-4 4-6 4-6 4-7 System Settings...........................................
Important Safeguards
Important Safeguards Always follow these important safeguards: 1 2 Read all of these instructions before using the unit. Plug the power cord into a 3-conductor (grounded) outlet. Check the Specifications chapter to make sure the outlet meets the ampere rating of this unit. • • • • 3 Never ground the power cord to a gas pipe or a water pipe. Keep the power cord away from hot surfaces. Avoid using an extension cord if possible.
Chapter 1 Making Copies
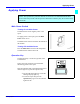
Chapter Overview Included in this chapter are: • “Applying Power” on page 1-1 • “Selecting the Mode of Operation” on page 1-2 • “Making Copies” on page 1-3 Making Copies
Applying Power Applying Power Two switches control the machines power. The Main Power switch controls the power to the machine. The Operation key turns the machine on and off. It is recommended that the Main Power switch always be left in the On position. Information in memory may be lost if the switch is turned off. Main Power Switch Turning On the Main Power The Main Power switch supplies power to the copier. To supply power to the copier, press the Main Power switch to On.
Selecting the Mode of Operation Selecting the Mode of Operation You can use this machine as a: • • • Copy machine Facsimile machine (option) Printer (option) Press one of the Function keys to select the desired mode of operation. Limitations You cannot switch modes in any of the following cases: When scanning in a fax message for transmission. During immediate transmission. When accessing the user tools. During on hook dialing for fax transmission. During Energy Saver mode.
Making Copies Making Copies 1 2 3 Check the Function key to be sure the machine is in the copy mode. If not, press the Copy key. If the User Code feature is activated, the message “Input user code, then press #” is displayed. Enter your User Code using the keypad. Place original documents • • 4 Making Copies Face-down on the Exposure Glass. Align originals to the indicator mark that represent the size of originals you are going to copy. Face-up on the Automatic Document Feeder.
Making Copies Note: If you only want one copy with no options, proceed to Step 5. Copy Options You Can Select Copy Quantity Using the keypad, enter the number of copies you desire. The default quantity is 1 and the maximum is 99. See “Selecting Copy Quantities” on page 35. Copy Darkness/Lightness Automatic: Auto Image Density is automatically set. See “Selecting Copy Darkness Modes” on page 3-6. Manual: Press either Lighter or Darker keys to change contrast of copies.
Chapter 2 Component Identification
Chapter Overview Included in this chapter are: • “Control Panel” on page 2-1 • “Component Locations - Front” on page 2-3 • “Component Locations - Rear” on page 2-4 • “Status Display Indicators” on page 2-5 • “Graphics Display” on page 2-6 Component Identification
Control Panel Control Panel With Fax and Printer Options Installed 1 2 Indicators for fax mode (for machines with the optional fax function) See the “Facsimile Reference”. Facsimile Mode key 9 Press to cancel an operation or return to the previous display. 10 Printer Mode key 11 Copy Mode key Press to use copy functions. 5 6 12 OK key 13 User Tools/Counter key Press to change the default settings and conditions to meet your requirements.
Control Panel - continued 17 18 Changes the reproduction ratio in 1% steps. Fax function keys (Fax installed machine only) Press to change modes. To use copy functions, press the Copy key. Printer function keys (Printer installed machine only) Press to change modes. To use copy functions, press the Copy key. 19 Not used 20 Combine/ Series key Combine Press to make combine copies. Series: Press to make series copies. 21 23 Selected Paper Tray Press to select the paper tray.
Component Locations - Front 1 Platen cover or document feeder (option) Lower the platen cover over originals placed on the exposure glass for copying. If you have the document feeder, insert a stack of originals here. They will be fed automatically. When the document feeder (RADF) is installed, you can copy twosided originals. 7 This indicator lights up when the main power switch is turned on, and goes off when the switch is turned off. 8 Exposure Glass Position originals here face down for copying.
Component Locations - Rear 5515 1 2 Bypass tray Use to copy onto OHP transparencies, adhesive labels, translucent paper, post cards, and non-standard size paper. 3 Paper Tray Cover 4 Open this cover to remove jammed paper fed from the optional paper tray unit. 2-4 5518 Lower Right Cover (5518) Open this cover to remove jammed paper from the optional System Stand. Lower Right Cover Open this cover to remove jammed paper from the optional System Stand.
Status Display Indicators 5 1 1 2 3 2 3 Door Open When this symbol is on, the front door is open. 4 Paper Misfeed 5 4 Paper Tray Empty When this symbol is on, the selected paper tray is empty. Paper Misfeed Locations When this symbol is on, there has been a paper misfeed of an original or a copy somewhere in the machine. See item 5. Paper misfeed areas are indicated by the letters Add Toner • B/Z: Bypass Tray area When this symbol is on, your copier is low on toner.
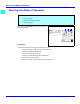
Graphics Display 1 2 Upper line: The machine status or currently selected functions appear here. 3 Number of copies Copy quantity is displayed here. Bottom line Items which can be selected or specified, or messages appear here. Currently selected items are displayed with brackets.
Chapter 3 Copier Functions
Chapter Overview Included in this chapter are: • “Entering User Codes” on page 3-1 • “Document Feeder” on page 3-2 • “Using Auto Start” on page 3-4 • “Selecting Copy Quantities” on page 3-5 • “Selecting Copy Darkness Modes” on page 3-6 • “Selecting Original Modes” on page 3-7 • “Selecting Copy Paper” on page 3-8 • “Enlargement and Reduction Ratios” on page 3-10 • “Energy Saving Modes” on page 3-14 Copier Functions
Entering User Codes Entering User Codes This feature prevents unauthorized use of the copier by limiting copier access to those persons who know an assigned User Code. The User Code feature monitors copier usage by department, project, or persons, and tracks the number of copies made with each User Code. The Key Operator can activate the User Code feature. When this feature is active, the Key Operator can program User Codes into the copier’s memory. Each code can be from one to eight digits in length.
Document Feeder Document Feeder The Reversing Automatic Document Feeder (RADF), feeds originals to the Exposure Glass for copying and if Duplex Copying is selected, it turns the original over for copying the other side of the original. Then, it exits the original onto the Document Tray. • • You can place up to 50 originals in the Document Feeder for automatic feeding of originals to the Exposure Glass for copying.
Document Feeder RADF - Feeding Stack of Originals RADF allows you to stack feed up to 50 originals into the Document Feeder by pressing the Start key one time. If you are feeding single sheets into the Document Feeder, switch the copy mode to SADF and you will not have to press the Start key for each original. See SADFFeeding One Original at a Time, below. 1 2 3 4 Copier Functions When using the RADF, place your originals face up in the Document Feeder.
Using Auto Start Using Auto Start When the copier is first turned ON, it takes only 25 seconds for it to warm-up and come to its Ready condition. During this time, you can set up your copy job, press the Start key and walk away. You can even do this while your copier is in the Energy Saver mode. When the copier comes to its Ready condition, it automatically copies your job. 1 2 3 4 Place the original document in the Document Feeder or on the Exposure Glass. Make your copy requirement selections.
Selecting Copy Quantities Selecting Copy Quantities The copier automatically selects a copy quantity of one copy. • • If desired more than one copy, enter the number from the 10-key pad. The maximum copy quantity that you can enter is 99. If more than one copy of your original is required, enter the number of copies you desire using the key pad. • • Copier Functions Press the Clear/Stop key to clear an entry if you entered an incorrect quantity.
Selecting Copy Darkness Modes Selecting Copy Darkness Modes Select the copy darkness modes using: • • Auto Image Density Manual Select the Copy Darkness setting before making your copy. If you do not, the copier uses Auto Image Density mode, as the default setting. Using Auto Image Density Mode Auto Image Density, automatically adjust the copier for the best quality copy. • For example, the dark background on newspapers or recycled paper is not copied when using Auto Image Density.
Selecting Original Modes Selecting Original Modes Identify the type of original you are copying by selecting: • • Text Photo Text is automatically selected as the default setting. 1 2 Press the Original key to step through the settings. Select your desired setting. Text Select text when your original contains only text and no pictures. Photo Select Photo when copying photographs and colored originals. The copier automatically adjust to provide the best copies.
Selecting Copy Paper Selecting Copy Paper Your copier provides two ways to select copy paper: • • Auto Paper Select Manual Paper Select Using Auto Paper Select The copier automatically selects a suitable size copy paper based on the original size and reproduction ratio. When the original is set at a different direction from the copy paper in the paper tray, the machine automatically rotates the original image by 90 degrees so it matches the copy paper direction.
Selecting Copy Paper Using Manual Paper Select You can manually select a paper tray. 1 Select the paper tray or Bypass Tray by pressing the Select Paper Tray key. The display shows the paper size in the tray and the tray selected. 2 3 Copier Functions Proceed with your copy set up selections. Press the Start key to begin copying.
Enlargement and Reduction Ratios Enlargement and Reduction Ratios Your copier allows you to enlarge or reduce your copies using: • • • Auto Reduce/Enlarge Preset Copy Ratios Zoom Key: with 1% increments Using Auto Reduce/Enlarge The copier automatically chooses the appropriate reproduction ratio based on the paper and original sizes you select. 1 2 3 3 - 10 Press the Auto R/E key. Select the paper tray by pressing the Select Paper Tray key. Press the Start key.
Enlargement and Reduction Ratios Using Preset Copy Ratio Keys The preset Copy Ratio keys allows you to select from thirteen preset reduction and enlargement ratios. • • • 1 2 3 4 5 Copier Functions There are three preset Enlarge ratios to choose from: 121%, 129%, and 155% There are four preset Reduce ratios to choose from: 93%, 78%, 65%, and 50%. Full size preset ratio at 100%. Press the Reduce or Enlarge key. Press the Cursor keys until the desired reduce/enlarge size is displayed. Press the OK key.
Enlargement and Reduction Ratios Zoom Keys The Zoom key allows you to select a precise copy ratio selection from 50% to 200% in one percent increments. You can use the cursor keys, or the keypad to change the copy ratio. 1 2 Press the Zoom key. Enter the ratio using the cursor keys or keypad. • • • 3 - 12 Cursor Keys: Press the cursor key until the desired ratio is displayed. Holding down the cursor key allows scrolling. Keypad: Enter the desired ratio using the keypad.
Sort Sort The machine can scan your originals into memory and automatically sort the copies in two methods. • Sort: Copies are be assembled as sets in sequential order. •Rotate Sort: Every other copy set is rotated by 90 degrees and delivered to the copy tray. You cannot use the bypass tray with the Rotate Sort. 1 2 Press the Sort key. Enter the number of copy sets using the Key pad. The maximum number of sets is 99. 3 Set your originals.
Energy Saving Modes Energy Saving Modes The copier has three levels of Energy Saving modes. • • • Level 1 Level 2 Auto Shut-Off Mode These energy saving modes are selectable using the User Codes. Level 1 Power Consumption: Reduces power by approximately 40% compared to standby mode. Warm Up Time: Approximately 15 seconds. Level 2 Power Consumption: Reduces power by approximately 60% compared to standby mode. Warm Up Time: Approximately 30 seconds.
Chapter 4 Copying Methods
Chapter Overview Included in this chapter are: • “Bypass Copying” on page 4-1 • “Combine Copying” on page 4-4 • “Series Copying” on page 4-6 Copying Methods
Bypass Copying Bypass Copying Use the bypass tray to copy onto OHP transparencies, adhesive labels, translucent paper, post cards, and copy paper that cannot be set in the paper tray. The machine automatically detects the following paper sizes: • • • • • • Letter (8.5 x 11) Letter-R (11 x 8.5) Legal (8.5 x 14) Ledger (11 x 17) Statement (5.5 x 8.5) Foolscap (8.5 x 13) 1 Open the bypass tray. 2 Push up the paper guide release lever.
Bypass Copying 3 Lightly insert the copy paper face down and adjust the paper guide. 1 Horizontal size 2 Vertical size 3 Paper Extender 4 Paper Guide • • • • Do not stack paper over the limit mark; otherwise a skew image or paper misfeeds might occur. Set the direction of the copy paper to landscape. Swing out the extender to support larger size copy paper (larger than 8 1 /2”× 11"). Fan paper to get air between the sheets and avoid a multi-sheet feed.
Bypass Copying When Copying onto Non-Standard Size Paper Note: You should specify the size of copy paper to avoid paper misfeeds Note: The settings for non-standard size paper can be made only when the optional document feeder is installed. 1. Press the (#) key. 2. Make sure that “1.Paper Size” is displayed, then press the OK key. 3. Press the Cursor keys until “Custom size” is displayed, then press the OK key. 4. Enter the horizontal size of the paper using the keypad, then press the OK key.
Combine Copying Combine Copying Combine copy, combines originals into one copy. You cannot use the Duplex or the Bypass Tray with this feature. There are two types of copies that you can make in this mode: 1. 1 Sided 2 Pages to Combine 1 Side: Copies two 1-sided originals to one side of a sheet. 2. 1 Sided 4 Pages to Combine 1 Side: Copies four 1-sided originals together to one side of a sheet. • • • • • • • • The number of originals copied (combined) can be 2 or 4.
Combine Copying Landscape Originals Selecting Combine Copying 1 2 3 Press the Combine/ Series key. Make sure that “Combine” is selected, then press the OK key. Press the Cursor keys until the desired combine mode is displayed, then press the OK key. • In 4 pages mode, you can specify the orientation of originals when you have set “Orientation” to “On” in the Copier Features (“Top to Top” or “Top to Bottom”). 4 Press the Paper Select key to select the copy paper. 5 Set your originals.
Series Copying Series Copying You can make one-sided copies from two facing pages of bound (book) originals and from twosided originals. Two methods are available: Book to 1 Sided: You can make one-sided copies from two facing pages of a bound original (book). Both pages are copied onto the same side of one page. 2 Sided to 1 Sided: (The optional document feeder is required.) You can make one-sided copies from two-sided originals.
Series Copying 2 Sided to 1 Sided You can make 1 sided copies from two-sided originals. 1 2 3 4 5 6 Copying Methods Press the Combine/ Series key. Press right Cursor key to select “Series”, then press the OK key. Press right Cursor key to select 2P >, 4P > 1 symbol. Then, press the OK key. Press the Select Paper Tray key until the paper you require is displayed. Select the paper orientation when the “Orientation” is set to “On” in the Copier Features, then press the OK key.
Series Copying Notes: 4-8 Copying Methods
Chapter 5 User Tools Settings
Chapter Overview Included in this chapter are: • “System Settings” on page 5-1 • “Copier Feature Settings” on page 5-6 User Tools Settings
System Settings System Settings Basic Steps to Accessing System Settings Step 1 2 3 4 5 Procedure to Perform Press the User Tools key. Press the Cursor keys until “2 Systems Settings” is displayed Press the Cursor keys until the desired menu is displayed. • 1 Function Priority • 2 Copy Count Display • 3 System Reset • 4 Energy Saver Timer • 5 Energy Saver Level • 6 Auto Off TImer • 7AOF (Keep it on.) • 8 Special Paper Size • 9 Pap.
System Settings Printing the Counter Value 1 2 5-2 Press the User Tools key. Make sure “1.Counter” is displayed, then press the OK key to view the total number of prints. 3 Press the Print key. 4 Press the Start key.
System Settings System Settings Menu 1. Function Priority Description You can specify the mode to be displayed immediately after the operation switch is turned on or System Reset mode is turned on. Default: Copier 2. Copy Count Display) The copy counter can be set to show the number of copies made (count up) or the number of copies remaining to be made (count down). Default: Up (count up) 3.
System Settings Menu 6. Auto Off Timer Description The machine turns itself off automatically to conserve energy after your job is finished, after the selected time.This function is called “Auto Off”.The time can be set from 1 to 240 minutes. Auto Off might not be effective when the machine is in the following conditions: • An error message is displayed. • The remaining memory space for fax mode is less than 100%. • When originals set in the document feeder.
System Settings Menu 10. Auto Tray Switch (for copy mode only) Description If you load paper of the same size in two or more trays, the machine automatically shifts another tray when the tray in use runs out of paper. You can set or cancel this setting. If you put special paper in paper trays using the Special Paper Indicate menu, the Auto Tray Switch function is available to these trays only when their settings are identical. Default: On 11.
Copier Feature Settings Copier Feature Settings Basic Steps to Accessing Copier Feature Settings Step Procedure to Perform 1 2 3 Press the User Tools key. Press the Cursor keys until “3 Copier Features” is displayed Press the Cursor keys until the desired menu is displayed. 4 5 6 • APS, Auto R/E • Max. Copy Q’ty • Adjust Orig Mode • Set Ratio • Copy Reset Timer • SADF Auto Reset • R. Sort Auto Cont. • Orig. Orientation • Sort • Key Op.
Copier Feature Settings Copier Features Menu 1. APS.Auto R/E Description You can select Auto Paper Select or Auto R/E Priority. When you cancel this setting, select “No”. Default: Auto Paper Select 2. Max.Copy Q'ty The maximum copy quantity can be set between 1 and 99. Default: 99 3. Adjust Orig. Mode You can adjust the quality level of copies for each of the original types. As a default setting, Text is selected as original type. You can change it to Photo. Default: Text 4.
Copier Feature Settings Menu 1. User Code Access Description Specify whether to employ user codes to restrict copier users and manage the number of copies made. Default: Off 5-8 2. Check Copy Counter You can check the number of copies made under each user code. 3. Print Counter List You can print counter lists. 4. Reset Counter You can check the number of copies made under each user code. You can also reset each user code's counter to 0. 5. Clear all User Codes You can clear all user codes.
Chapter 6 Service and Supplies
Chapter Overview Included in this chapter are: • “Loading Paper” on page 6-1 • “Changing Paper Size” on page 6-3 • “Changing the Toner Cartridge” on page 6-7 • “Clearing Paper Misfeeds” on page 6-9 • “When the Machine Does Not Operate Properly” on page 6-10 • “When Copies are Not Clear” on page 6-11 • “Can Not Make Proper Copies” on page 6-12 • “Cleaning the Copier” on page 6-13 Service and Supplies
Loading Paper Loading Paper Paper Trays 1 and 2: maximum of 250 sheets of paper. Optional System Stands: maximum of 500 sheets of paper in each paper tray. Loading Paper in Trays 1 and 2 1 2 Pull out the paper tray until it stops. Press the metal plate down, then, sSquare the paper and set it in the tray. • • 3 Service and Supplies If there is paper in the tray, remove it and and together with the new paper, place it in the paper tray. This reduces a possible paper misfeed.
Loading Paper Loading Paper in the System Stand 6-2 1 Make sure that the optional paper tray unit is not being used. 2 Pull out the paper tray until it stops. 3 While pinching the release lever, adjust the back fence.
Changing Paper Size Changing Paper Size Two procedures for changing the paper size are given below. • • The first is for changing the paper size in Paper Tray 1 or the optional System Stand The second is for changing the paper size in Paper Tray 2. Note: Please check you are following the appropriate procedure before you start. Important Be sure to select the paper size with the user tools. Otherwise, misfeeds might occur.
Changing Paper Size 3 4 5 Press down the release button. While pressing the release lever, adjust the side paper guides. Push the metal plate down. (This is for Trays 1 and 2) Note: Do not stack paper over the limit mark.
Changing Paper Size 6 7 Square the paper and set it in the tray. While pressing the release lever, adjust the side and back paper guides to the new paper size. Note: When setting small quantities of copy paper, be careful not to squeeze in the side paper guides too much or paper will not be fed properly. 8 9 Press down the lock button. Adjust the tray size with the paper size selector to the new paper size.
Changing Paper Size Setting Non-Standard Size Paper 1 Press the Select Paper Tray key to select the second paper tray. 2 Then press the # key. 3 Press the Cursor keys until the paper size you want to use is displayed. When the Paper Size Require is Displayed Press the OK key. When the Paper Size Required is not Displayed You can also specify the tray size with the User Tools 1. Press the Cancel key, then press the right Cursor key to display “Custom Size”. 2.
Changing the Toner Cartridge Changing the Toner Cartridge 1 2 3 4 Open the Front Cover. Pull out on the handle on the Toner Bottle Holder until the Toner Bottle holder is fully opened. Pull the green lever and gently pull the Toner Bottle out. Hold a new Toner Bottle horizontally and shake it five or six times to loosen the toner. Note: Do Not remove the cap before shaking the Toner Bottle.
Changing the Toner Cartridge 5 Remove the outer cap. Note: Do not remove the Inner Cap. 6 7 8 6-8 Place the new Toner Bottle in position, turn it clockwise, then return the green lever back to its closed position. Return the Toner Bottle Holder to its original position. Close the Front Cover of the copier.
Clearing Paper Misfeeds Clearing Paper Misfeeds CAUTION When removing misfed paper, do not touch the fusing section because it could be very hot • • • Important: When clearing misfeeds, do not turn off the power switch. If you do, your copy settings are cleared. To prevent misfeeds, do not leave any torn scraps of paper within the machine. If paper misfeeds occur repeatedly, contact your service representative. More than one misfed areas may be indicated. In this case, check every applicable area.
When the Machine Does Not Operate Properly When the Machine Does Not Operate Properly Message Machine Status Please wait Cannot detect original size. Problem/Cause The machine is warming up Improper original is set Action Wait for the machine to warm up. Set non-standard size original on the exposure glass Input the horizontal and vertical size of the custom original. Select paper manually, not in Auto Paper Select mode. Do not use Auto Reduce/ Enlarge mode. Original is not set. Set your originals.
When Copies are Not Clear When Copies are Not Clear Problem Cause Action Copies appear dirty. The image density is set too dark Adjust the image density. The reverse side of an original image is copied. The image density is set too dark. Adjust the image density. A shadow appears on copies if you use pasted originals. The image density is too dark. Adjust the image density. Change the direction of the originals. Put tape on the pasted part. The same copy area is dirty whenever making copies.
Can Not Make Proper Copies Can Not Make Proper Copies Combine Problem Cause Action Parts of the image are not copied. You specified an improper reproduction ratio that does not meet the sizes of your originals and copy paper. When you specify a reproduction ratio using Manual Paper Select mode, make sure the ratio matches your originals and the copy paper. NOTE: Select the correct reproduction ratio before using Combine mode. Order of copies is not correct. You set originals in the incorrect order.
Cleaning the Copier Cleaning the Copier A dirty Exposure Glass or Document Feeder Belt may have an effect on the quality of your copies. Inspect them and clean as necessary. Cleaning the Machine Wipe the copier with a soft, damp cloth and then dry it. Do not use chemical cleaner or organic solvent, such as thinner or benzene. If they get into the copier of melt plastic parts, a failure might occur. Do not clean parts other than those specified in this Operator Guide.
Cleaning the Copier Notes: 6 - 14 Service and Supplies
Chapter 7 Specifications
Chapter Overview Included in this chapter are: • “Main Copier Unit” on page 7-1 • “Document Feeder - option” on page 7-4 • “1 Tray System Stand - option” on page 7-5 • “2 Tray System Stand - option” on page 7-6 • “16MB Copier Memory Unit - option” on page 7-6 Specifications
Main Copier Unit Main Copier Unit Configuration: • Desktop Photosensitivity type: • OPC drum (30) Original scanning: • One-dimensional solid scanning system through CCD Copy process: • Dry electrostatic transfer system Development: • Dry two-component magnetic brush development system Fusing: • Heating roll system Resolution: • 600 dpi Exposure glass: • Stationary original exposure type Original reference position: • Rear left corner Warm-up time: • Less than 20 seconds Originals: • Sh
Main Copier Unit Copy paper size: • Trays: 11"× 17" to 5 1 /2”× 8 1 /2” • Bypass: 11"× 17" to 5 1 /2”× 8 1 /2” • Bypass (non-standard size): Vertical: 3.6"–12.0” Horizontal: 6.0"–49.6” • Duplex: 11"× 17" to 8 1 /2”× 11" • Paper Bank: 11"× 17" to 5 1 /2”× 8 1 /2” Copy paper weight: • Paper tray 1, 2 (Standard size): 16 –24 lb. • Bypass tray: 14 –43 lb. • Paper Bank: 16 –28 lb. Non-reproduction area: • Leading edge: 2 ± 1.5mm • Trailing edge: more than 0.5mm • Left edge: 2 ± 1.
Main Copier Unit Continuous copying count: • 1 –99 copies Copy paper capacity: • 1st and 2nd paper trays: 250 sheets (20 lb.) Power consumption: Mainframe only • Warm up: 880W • Stand-by: approximately 125Wh • Copying: 450Wh • Maximum: 1100W Full system • Warm up: 890W • Stand-by: approximately 125Wh • Copying: 450Wh • Maximum: 1200W Dimensions (W x D x H up to exposure glass): • 5515: 21.65"× 22.36"× 16.54" • 5518: 21.65"× 22.36"× 20.
Document Feeder - option Document Feeder - option Mode: • ADF/RADF mode, SADF mode Original size: • 11"× 17" to 5 1 /2”× 8 1 /2” Original weight: • 1-sided originals: 14 –28 lb. Number of originals to be set: • 30 sheets, 20 lb. Maximum power consumption: • Less than 25W (power is supplied from the main frame.) Dimensions (W x D x H): • 21.7"× 18.6"× 3.6" Weight: • Approximately15.4 lb. Note Specifications are subject to change without notice.
1 Tray System Stand - option 1 Tray System Stand - option Copy paper weight: • 16 –28 lb. Available paper size: • 5 1 /2”× 8 1 /2”, 8 1 /2”× 11", 8"× 13", 8 1 /2”× 13", 8 1 /2”× 14", 8 1 /4”× 13", 11"× 17", 7 1 /4”× 10 “ Maximum power consumption: • 23W (power is supplied from the main frame.) Paper capacity: • 500 sheets, 20 lb.) Dimensions (W x D x H): • 21.7"× 20.5"× 5.36" Weight: • Approximately 26.4 lb. Note: Specifications are subject to change without notice.
2 Tray System Stand - option 2 Tray System Stand - option Copy paper weight: • 16 – 28 lb. Available paper size: • 5 1 /2”× 8 1 /2”, 8 1 /2”× 11", 8"× 13", 8 1 /2”× 13", 8 1 /2”× 14", 8 1 /4”× 13", 11"× 17", 7 1 /4”× 10” Maximum power consumption: • 28W (power is supplied from the main frame.) Paper capacity: • 500 sheets, 20 lb. (2 trays) Dimensions (W x D x H): • 21.7"× 20.5"× 10.7" Weight: • Approximately 55.2 lb. Note: Specifications are subject to change without notice.
Agency Certifications Agency Certifications USA RFI This equipment generates and uses radio frequency energy. If not installed and used properly, i.e., in strict accordance with these operating instructions, it may cause harmful interference to radio communications.
Agency Certifications UL The 5515 AG and 5518 AG digital copiers are intended for use in areas with 120V, 60 Hz, AC line voltage. You should ensure you are connecting your equipment into the proper line voltage. EPA Energy Star The United States Environmental Protection Agency (EPA) has introduced a voluntary program, the Energy Star Program, to encourage the widespread and voluntary use of energy-efficient technologies that enhance the workplace, improve product performance, and prevent pollution.
Paper Sizes Paper Sizes Type Size Size USA STATEMENT LETTER LEGAL COMPUTER LEDGER FOOLSCAP and OFFICIO 5.5 x 8.5 inches 8.5 x 11 inches 8.5 x 14 inches 10.125 x 14 inches 11 x 17 inches 8.5 x 13 inches 140 216 216 257 279 216 UK FOOLSCAP 8 x 13 inches 203 x 330mm EUROPE FOLIO 8.
Enlargement and Reduction Percentages Enlargement and Reduction Percentages Type Enlargement 7 - 10 Inch Version Metric Version 400% 400% 200% 200% 155% 141% 129% 122% 121% 115% Full Size 100% 100% Reduction 93% 93% 85% 87% 78% 82% 73% 71% 65% 65% 50% 50% 32% 35% 25% 25% Specifications
Glossary
Chapter Overview Definitions for the most often used terms are listed here.
Copier Terms % (percentage) The ratio of the original image size to the copied image size. If the copy image is larger than the original, the % number is larger. A copied image that is twice the size of the original is said to be 200%. If the copy image is smaller than the original, the % number is lower. A copied image that is half the size of the original is said to be 50%. 10-key pad The portion of the Control Panel with numerical keys.
G-2 Copy Paper See: paper Copy Quantity This display or part of a Touch Screen shows the requested number of copies. Copy Size Keys Keys used to input the desired size of the copy. Darker Copies This term refers to the amount of toner placed on the copy through the imaging process. The amount of toner is controlled by the “darkness” of the original and the amount of light used during the exposure process; more light means less toner or image density.
efficient technologies in the workplace. Requirements to qualify for certification vary based on the speed of a Copier. For specifics on your Copier, check the Specifications section of this Guide. Exit Tray A tray attached to the output end of the copier to collect copies. This tray is usually removed when a Sorter or Finisher is installed. In this case, the top tray of the Sorter or Finisher serves as the Exit Tray. Exposure Glass The glass surface located under the Document Cover or Document Feeder.
condition. These settings may be either the Factory Default settings, or Factory Default settings that have been modified permanently by either you or your Service Technician to better fit your application. G-4 Interrupt Key The Key used to interrupt a long copy job in process in order to run a single copy. Interrupt copies are limited to one, and the interrupt original must be copied from the Exposure Glass. Key Operator The main operator responsible for the copier.
READY Indicator This is an indicator that shows when the copier has warmed up and is ready to make copies. It appears in several forms; a light, an icon, and the message itself. Release Lever The lever located inside the Front Cover used to release the Upper Unit for access to the paper path. Separation Corona One of the Coronas inside the copier. It is usually located near the Drum and separates the paper from the Drum.
Make sure the toner you add is correct for your copier before loading. See the NOTE above. G-6 Transparencies A clear plastic stock used to make an overhead transparency. Because they are clear, they don’t feed from paper Drawers or Cassettes. However, many Bypass Feed Trays are designed to handle transparency stock. Place your transparency stock in the Bypass Feed Tray and use a normal copy procedure. Transport Belt The rubber surface on the under side of an ADF.
Index
A E Access codes 3-1 Agency certifications Canada RFI 7-7 EPA energy star 7-8 USA RFI 7-7 Auto image density 3-6 Auto reduce/enlarge 3-10 Auto start 3-4 Energy saver mode entering 3-14 Energy saving mode 3-14 Energy star explained 7-8 Enlargement / reduction percentages 710 Enlargement ratio 3-10 Enlargement reduction ratios preset copy ratio keys 3-10 Exposure modes 3-6 B Bypass copying 4-1 F C Feeding stack of originals 3-3 Certifications Canada rfi 7-7 EPA energy star 7-8 USA rfi 7-7 Combine copy
System settings accessing 5-1 exiting 5-1 T Toner cartridge, changing 6-7 Troubleshooting 6-10 Turning on copier 1-2 U UL 7-7 User codes entering 3-1 User codes, entreing 3-1 User tools copier feature settings 5-6 copy 5-1 system 5-1 system settings 5-1 Z Zoom keys 3-12 I-3
Warranty New Machine Warranty and Limitation of Liability Warranty — 90 days Lanier warrants that its equipment and accessories will be free from defective parts and workmanship for a period of ninety (90) days from the date of first installation by Lanier’s Authorized Dealer. Customers must notify a Lanier servicing dealer or Lanier of a warranty claim within the warranty period. For a listing of authorized Lanier servicing dealers or to notify Lanier of a warranty claim, write to Lanier Worldwide, Inc.
Customer Vision® _ our commitment to your complete satisfaction www.lanier.com your document management partner Lanier Worldwide, Inc. | 2300 Parklake Drive, N.E.