
Printer Instruction Manual
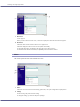
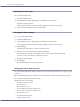
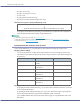
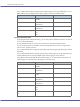

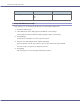
Table Of Contents
- GX5050 User Guide
- J011 User Guide
- Table of Contents
- Read This First
- Paper
- Replacing Consumables
- Making Printer Settings
- Troubleshooting
- Printing Will Not Start
- Paper Is Not Fed or Delivered Normally
- Paper Jam
- Removing Paper Jammed in the Paper Tray (Tray 1)
- Removing Paper Jammed in the Optional Tray (Tray 2 (Optional))
- Removing Paper Jammed in the Bypass Tray (optional)
- Removing Paper Jammed under the Top Cover
- Removing Paper Jammed around the Guide Board
- Removing Paper Jammed in the Duplex Unit
- Removing Paper Jammed in the Output Tray
- Print Results Are Not Satisfactory
- Error & Status Messages on the Control Panel
- Status Monitor Errors
- Status Monitor Does Not Open
- No Response from Printer
- No Paper/Tray Not Detected (Tray 1)
- No Paper/Tray Not Detected (Tray 2)
- No Paper/Tray Not Detected (Bypass Tray)
- Paper Size Mismatch/Paper Type Mismatch (Tray 1)
- Paper Size Mismatch/Paper Type Mismatch (Tray 2)
- Paper Size Mismatch/Paper Type Mismatch (Bypass Tray)
- Paper Size Mismatch/Paper Type Mismatch (AutoTray Select)
- Cover Open
- Duplex Unit Not Detected
- Cover Open / Print Cartridge(s) Not Detected
- Cartridge End
- Cartridge/Print-head Tank Empty
- When the Ink Collector Unit is Almost Full/Full
- Ink Collector Unit Not Detected
- Out of Printable Temperature Range
- Printer Error
- Network Interface Board Error
- Adjusting the Printer
- Inquiries and Consumables
- Maintaining
- Preparing for Printing
- Confirming the Connection Method
- Installing the Printer Driver (USB)
- Sharing the Printer
- Using the SmartDeviceMonitor for Client Port
- Using the Standard TCP/IP Port
- Using the LPR Port
- Using as the Windows Network Printer
- Using as the NetWare Print Server/Remote Printer
- If a Message Appears during Installation
- Making Option Settings for the Printer
- Printer Driver
- Printing
- Printing on Various Paper Types
- Canceling Printing
- Adjusting Print Quality
- Various Print Functions
- Printing Multiple Document Sets
- Collating
- Printing Web Pages
- Reducing and Enlarging to Fit the Paper Size (Fit to paper size)
- Reducing and Enlarging by a Specified Ratio (Scale, Directional magnification)
- Reducing to A4/Letter Automatically
- Rotating the Image by 180 Degrees
- Printing on Registered Custom Size Paper
- Printing on Unregistered Custom Size Paper
- Printing on Both Sides of Paper
- Printing Multiple Document Pages per Sheet (Layout)
- Splitting the Document Image across Multiple Sheets (Poster)
- Printing from the Last Page
- Creating a Binding Margin
- Printing Documents with a Header and Footer
- Printing with a Layout Suitable for Making Booklets
- Printing Images or Text Superimposed on Prints
- Printing Documents with an Overlay Image Superimposed (Overlay)
- Unauthorized Copy Control
- Displaying the Preview before Printing
- Custom Settings
- Supporting Multi-Languages
- Monitoring and Configuring the Printer
- Using a Printer Server
- Additional Information
- J011 Notes for Users
- J011 User Guide
231
Monitoring and Configuring the Printer
z
The paper size is wrong.
z
The paper size and type are wrong.
z
A cover is open.
z
The paper has been loaded incorrectly.
z
The machine is out of its operational temperature range.
Flowchart showing how to specify notification by e-mail
To specify the network interface board setting, use the Web browser or telnet. This section explains how to
specify the network interface board setting using the Web browser.
z
For details about specifying the printer setting, see p.68 "System Menu".
z
For details about specifying the network interface board setting using the Web browser, see p.230 "Changing the Printer Settings".
z
For details about telnet, see p.235 "Telnet Setting Items".
Specifying Notification the Printer Status by E-mail
In [Error E-mail Notification], you can specify the basic and authentication settings for sending e-mails.
Specifying General Settings
You can specify whether to use SMTP, and specify the SMTP server name and SMTP port number. The
administrator's e-mail address will appear in the e-mail message. The printer's e-mail address will appear in
the "From" box.
Specifying SMTP Authentication
By specifying the SMTP authentication setting, you can send e-mails to destinations where the e-mail server
carries out SMTP authentication.
By specifying the SMTP authentication setting, you can log on to SMTP servers which require authentica-
tion. The supported authentication protocols are: CRAM MD5, PLAIN, and LOGIN.
If you set [SMTP Authentication] to [Auto], the printer will try logging on using CRAM MD5, PLAIN, and
then LOGIN.
Specify the printer setting.
Specify the network interface board setting (using the Web browser or telnet).
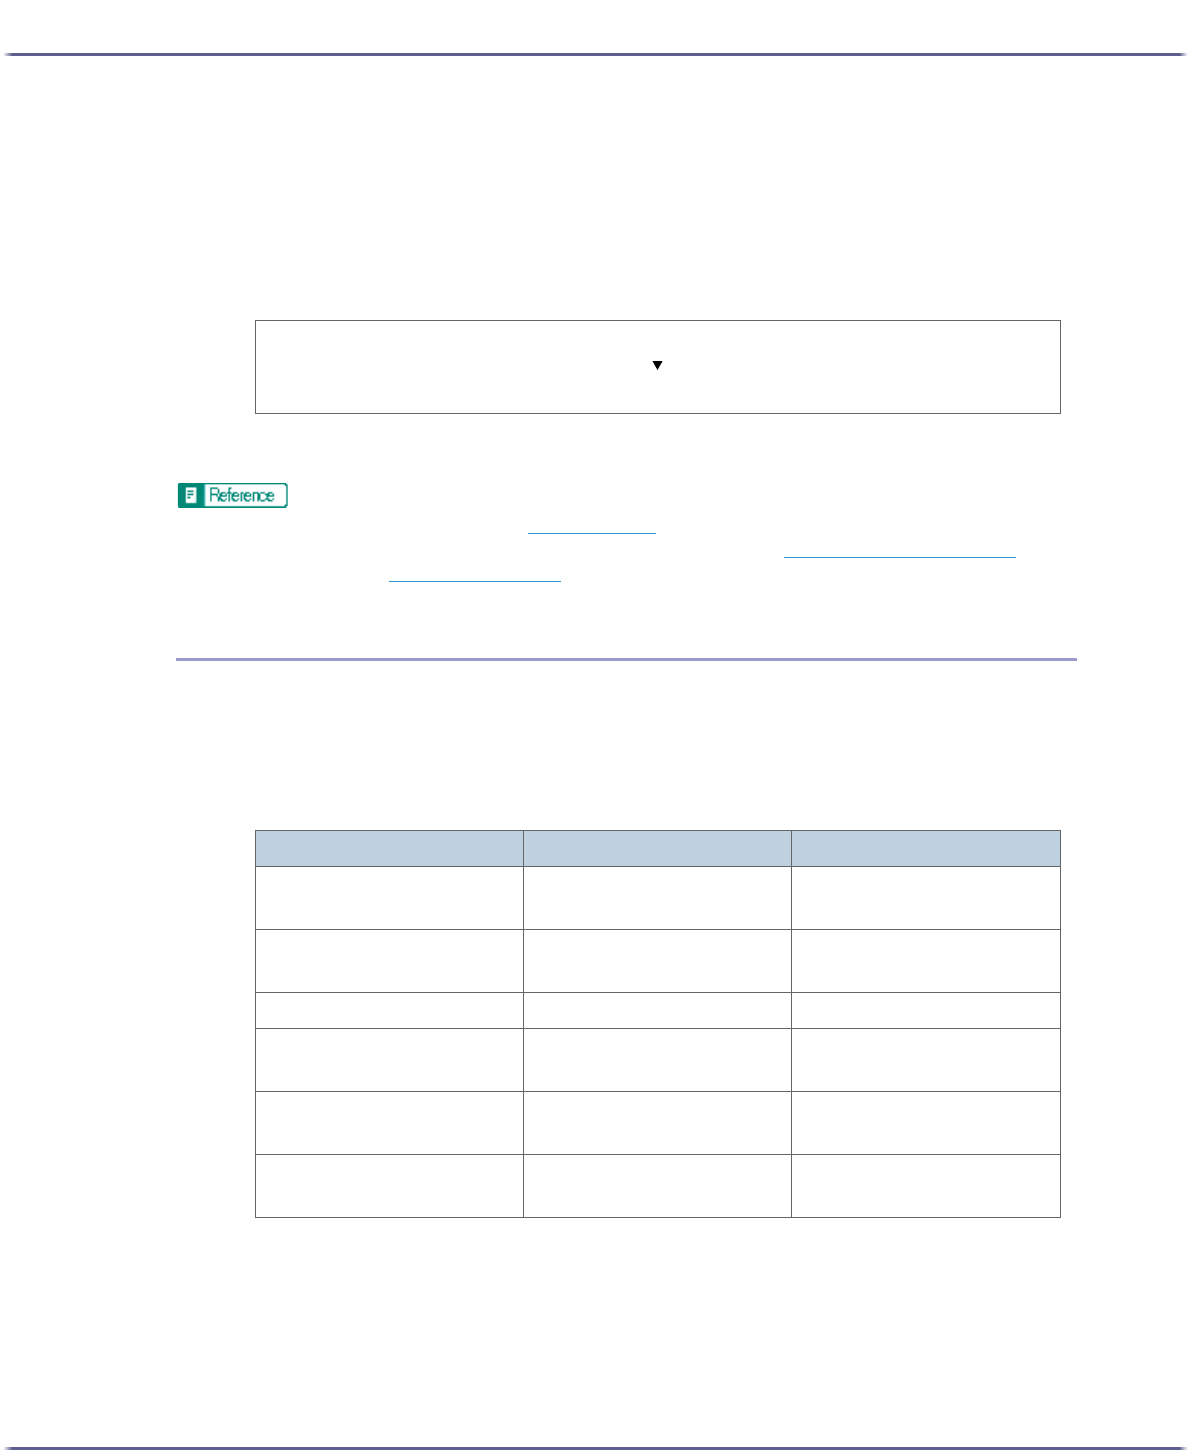
Functions Selectable value Default
SMTP Enable
Disable
Disable
SMTP Server Name 127 characters max. (1-byte al-
phanumerics)
None
SMTP Port Number 1-65535 25
Device E-mail Address 127 characters max. (1-byte al-
phanumerics)
None
Administrator E-mail Address 127 characters max. (1-byte al-
phanumerics)
None
Common Message 255 characters max. (1-byte al-
phanumerics)
None