
Printer Instruction Manual
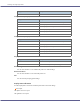
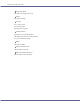
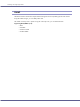
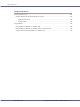
Table Of Contents
- GX5050 User Guide
- J011 User Guide
- Table of Contents
- Read This First
- Paper
- Replacing Consumables
- Making Printer Settings
- Troubleshooting
- Printing Will Not Start
- Paper Is Not Fed or Delivered Normally
- Paper Jam
- Removing Paper Jammed in the Paper Tray (Tray 1)
- Removing Paper Jammed in the Optional Tray (Tray 2 (Optional))
- Removing Paper Jammed in the Bypass Tray (optional)
- Removing Paper Jammed under the Top Cover
- Removing Paper Jammed around the Guide Board
- Removing Paper Jammed in the Duplex Unit
- Removing Paper Jammed in the Output Tray
- Print Results Are Not Satisfactory
- Error & Status Messages on the Control Panel
- Status Monitor Errors
- Status Monitor Does Not Open
- No Response from Printer
- No Paper/Tray Not Detected (Tray 1)
- No Paper/Tray Not Detected (Tray 2)
- No Paper/Tray Not Detected (Bypass Tray)
- Paper Size Mismatch/Paper Type Mismatch (Tray 1)
- Paper Size Mismatch/Paper Type Mismatch (Tray 2)
- Paper Size Mismatch/Paper Type Mismatch (Bypass Tray)
- Paper Size Mismatch/Paper Type Mismatch (AutoTray Select)
- Cover Open
- Duplex Unit Not Detected
- Cover Open / Print Cartridge(s) Not Detected
- Cartridge End
- Cartridge/Print-head Tank Empty
- When the Ink Collector Unit is Almost Full/Full
- Ink Collector Unit Not Detected
- Out of Printable Temperature Range
- Printer Error
- Network Interface Board Error
- Adjusting the Printer
- Inquiries and Consumables
- Maintaining
- Preparing for Printing
- Confirming the Connection Method
- Installing the Printer Driver (USB)
- Sharing the Printer
- Using the SmartDeviceMonitor for Client Port
- Using the Standard TCP/IP Port
- Using the LPR Port
- Using as the Windows Network Printer
- Using as the NetWare Print Server/Remote Printer
- If a Message Appears during Installation
- Making Option Settings for the Printer
- Printer Driver
- Printing
- Printing on Various Paper Types
- Canceling Printing
- Adjusting Print Quality
- Various Print Functions
- Printing Multiple Document Sets
- Collating
- Printing Web Pages
- Reducing and Enlarging to Fit the Paper Size (Fit to paper size)
- Reducing and Enlarging by a Specified Ratio (Scale, Directional magnification)
- Reducing to A4/Letter Automatically
- Rotating the Image by 180 Degrees
- Printing on Registered Custom Size Paper
- Printing on Unregistered Custom Size Paper
- Printing on Both Sides of Paper
- Printing Multiple Document Pages per Sheet (Layout)
- Splitting the Document Image across Multiple Sheets (Poster)
- Printing from the Last Page
- Creating a Binding Margin
- Printing Documents with a Header and Footer
- Printing with a Layout Suitable for Making Booklets
- Printing Images or Text Superimposed on Prints
- Printing Documents with an Overlay Image Superimposed (Overlay)
- Unauthorized Copy Control
- Displaying the Preview before Printing
- Custom Settings
- Supporting Multi-Languages
- Monitoring and Configuring the Printer
- Using a Printer Server
- Additional Information
- J011 Notes for Users
- J011 User Guide

247
Using a Printer Server
11. Select the [Define additional properties] check box, and then click [Create].
12. Assign a print queue to the created printer. Click [Assignments], and then click [Add...] in the
[Print queues] area.
13. In the [Available objects] box, click the previously created queue to be highlighted, and then click
[OK].
14. Click [Configuration], select [Parallel] from the [Printer type] box drop-down menu, and then
click [Communication].
15. Click [Manual load] in the [Connection type] area, and then click [OK].
16. Check the setting, and then click [OK].
17. Create a print server. Select section or organization object, and then click [Create…] on the
[Object] menu.
18. In the [Class of new object] ox, click [Print Server] to be highlighted, and then click [OK].
19. In the [Print Server name] box, enter the print server name.
20. Select the [Define additional properties] check box, and then click [Create].
21. Assign a printer to the created print server. Click [Assignments], and then click [Add...] in the
[Printers] area.
22. In the [Available objects] box, click the previously created printer to be highlighted, and then
click [OK].
23. Check the setting, and then click [OK].
24. Start the print server by entering the following from the console of the NetWare server.
If the print server is in operation, quit and then restart it.
z
To exit
CAREE: unload pserver.
z
To start
CAREE: load pserver .
If you cannot identify the printer you want to configure from the displayed printer name, check the printer
name against a "system summary" page printed from the printer to find required printer.
Using as a Remote Printer (NetWare 5.1, NetWare 6.5)
Follow the procedure below to connect the printer as a remote printer in NetWare 5.1/6.5.
z
To use as a remote printer in a NetWare 5.1/6.5 environment, use in NDS mode.
z
This printer is not available as a remote printer for use in a pure IP environment
Setting up the Network Interface Board.
1. Launch the Web browser.
2. In the address bar, enter "http://(printer's IP address or host name)/".
Web browser top page is displayed.
If SSL encryption has been enabled, enter "https://(printer's address or host name)/".