MolecuLightDX® User Manual for Wi-Fi certification
Table of Contents 1 Introduction ..........................................................................................................................................................4 2 Indications for Use ................................................................................................................................................4 3 Warnings, Cautions, and Notes.......................................................................................................................
12.4 Standard Images and Videos ......................................................................................................................31 12.5 Fluorescence Images and Videos ...............................................................................................................32 12.6 Measurement Image ..................................................................................................................................33 12.7 Reviewing Images ........................
Introduction The MolecuLightDX is a cordless, handheld device indicated for standard digital imaging and fluorescence imaging. The MolecuLightDX’s standard digital imaging capability can acquire and document standard digital images of dermatological wounds, and aid clinicians in measuring their surface area, length, and width.
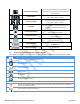
3.1 Definitions and Symbols for Device Operation Term ST-Image FL-Image Patient Directory View Patient View Wound Review Splash screen Login Standard User Super User Account Administrator Symbol Definition Standard image akin to normal photography. Fluorescence image captured with the violet excitation light and emission filter. List of patients Screen with patient details and list of wounds for the patient. Screen with wound details including a scrollable browser of previously captured images.
Video Not Available/Still Video is not enabled when this icon is displayed. To enable video, go to Settings and enable the Video Capture option. Standard Mode Tap icon to enter Standard mode. Blue = Active, White = Inactive Fluorescence Mode Tap icon to enter Fluorescence mode. Blue = Active, White = Inactive FL available In Standard mode, icon indicates the room is dark enough to move to fluorescence mode.
Symbol Meaning Device duty cycle (if device is continuously on for 15 minutes in Fluorescence Imaging Mode, violet LEDs should be turned off for 5 minutes before Fluorescence Imaging Mode is used again) Device duty cycle when the DX is used in the sterile surgical sleeve (if device is continuously on for 6 minutes in Fluorescence Imaging Mode, violet LEDs should be turned off for 6 minutes before Fluorescence Imaging Mode is used again) CE Marking indicates European Conformity to essential requirements of
3.5 Electromagnetic Compatibility This device complies with Part 15 of the US FCC Rules. This device complies with Canadian ICES-003 (B). The emissions characteristics of the MolecuLight DX make it suitable for use in industrial areas and hospitals (CISPR 11 class A).
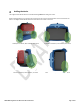
Holding the device The images below indicate where to hold the MolecuLightDX device with green circles. When holding the device, it is important to ensure that you do not cover the illumination zone on the back of the device. The images below indicate where the illumination zone is with a red circle.
Docking Station The docking station charges the device battery when not in use. Setting up the docking station: 1. Plug the AC utility cord into a wall outlet. Wall plug ACDC plug 2. Plug the AC utility cord into the ACDC power adapter. 3. Plug the ACDC line cord into the USB-C connector on the docking station. 4. Once the docking station has power, a white LED indicator will be displayed automatically. White LED 5. Ensure the docking station is placed on a stable, flat surface.
Attaching the device to the docking station: 1. Ensure the docking station is placed on a stable, flat surface. 2. Ensure the USB-C charging cable is not attached to the device before placing it on the docking station. NOTE: The device will not sit properly on the docking station with a USB-C cable attached to the device. 3. Ensure the device USB-C charging port cover is closed. 4. Log out of the device. 5. Place the device on the docking station as pictured above.
Turning the device on 1. Press and hold the power button for 4 seconds. Power Button 2. 3. While the device is powering on, the following screens will be displayed on the device: a. MolecuLight logo screen b. MolecuLight screen saver screen c.
a. b. c. d. e. off: device is OFF blink green: transitioning from OFF to ON green: ON or STANDBY state (all hardware operating parameters are normal) amber: ON or STANDBY (hardware operating parameters are outside of normal range, device needs service) red: OFF (hardware operating parameter(s) are out of normal range, critical error, device will not power up, device needs servicing) Login 1. Tap the User ID or Email field. A keyboard will be displayed. 2. Type your user ID or email. 3.
3. The Login screen is displayed. Patient Directory screen The Patient Directory screen is the first screen you see after logging in. If the patient you are looking for is not already on the device, you must add a patient. Number 1 2 3 9.1 Description Patient Directory list. All patients will be listed in this directory list. Patients are added to the bottom of the list as they are added. Add icon. Tap Add to add a patient. See Adding a Patient. More icon. Tap More to display a menu.
1. On the Patient Directory screen, tap Add. 2. On the Add Patient screen, tap the First Name text field to automatically display a keyboard. Using the keyboard enter the patient’s first name. 3. Tap Next on the keyboard to go to the next text field. 4. If a patient agrees to the capture and storage of images and videos for either clinical assessment and treatment, research purposes and/or commercial use tap Yes for Consent. NOTE: Default consent is No when adding a new patient. 5.
7. 9.2 New user is saved, and a confirmation message is displayed. Filtering the Patient Directory When a new patient is added, their status defaults to Active. You can edit a patient’s status to Inactive at any time from the Edit Patient screen. When a patient’s status is Inactive, you will not be able to add a wound or any images to existing wounds. 1. On the Patient Directory screen, tap Filter. 2. A menu is displayed. 3.
5. Do either of the following: a. Tap to select a patient from the filtered list to load the View Patient screen for that patient. b. Cancel the search by tapping X from within the search bar. View Patient screen 1 6 2 3 4 5 Number 1 2 3 4 5 6 10.1 Description Back icon. Tap Back to return to the Patient Directory screen. Patient name. Displays the current patient name as Last Name, First Name. Patient information.
10.2 Adding a Wound If a wound is not already listed for the current patient, you must add a new wound. 1. On the View Patient screen, tap Add. 2. On the Add Wound screen, tap the Wound Location text field and using the keyboard enter the wound location. 3. Tap the Wound Type drop-down menu and select a wound type from the list. NOTE: Only fields marked with a red asterisk are required to save a new wound. 4. Tap SAVE. 5. New wound is saved, and a confirmation message is displayed. 10.
3. Tap Edit Patient. 4. On the Edit Patient screen, tap a field to select it—a keyboard will be displayed if a text box is selected. Tap the Date of Birth drop-down arrow to display a calendar. Tap the Gender drop-down arrow to display a menu with gender options. You can change the status of a patient from Active (default) to Inactive by selecting the appropriate radio button. You can change the status of their consent by selecting the appropriate checkbox.
3. Tap Edit Patient. The Edit Patient screen will be displayed. 4. Tap More. 5. Tap Delete Patient. 6. On the warning dialog, tap OK. 7. Patient is deleted and a confirmation message is displayed.
Wound screen 1 8 2 7 6 3 9 4 5 10 Number Description 1 2 3 Back icon. Tap Back to return to the Patient Directory screen. Patient name. Displays the current patient name as Last Name, First Name. Wound location. Displays the location of wound. Image thumbnails. Image thumbnails list displayed for today and previous visits by date. Videos are displayed with a play icon. Tap any thumbnail to load the image into full screen review. Add icon. Tap Add to add an image to the current wound. SELECT.
11.1 Capturing Images Once a wound is created and the Wound screen is loaded, you can capture any type of image for the selected wound. See the Imaging screen for more details on capturing images. Modes include: 11.2 • Standard (camera/video) • Fluorescence (camera/video) • Measurement 1. On the Wound screen, tap Add. 2. On the Imaging screen, capture the required image(s). 3. When image captured is completed, tap Back to return to the Wound screen.
To load an image into Review: 1. On the Wound screen, tap a thumbnail to load the image into Review in full screen. Review screen for Standard and Fluorescence still images: 4 1 2 3 Number 1 2 3 4 Description Close icon. Tap Close to return to the Wound screen. Info icon. Tap Info to display the Image Details; includes patient name, date of birth, wound location, date/time of image capture, and user who captured the image. Review screen. Displays the image in full screen. Delete icon.
5 6 7 Screen 2: Includes video controls Number Description 1 Close icon. Tap Close to return to the Wound screen. Info icon. Tap Info to display the Image Details; includes patient name, date of birth, wound location, date/time of image capture, and user who captured the image. Play icon. Only displayed for videos, tap to load the video. Delete icon. Tap Delete to delete the current image. Back icon. Tap Back to return to Review screen 1. Video controls.
To view the wound area graph: 1. Tap on the expand icon on the wound size graph on the left of the Wound screen. 2. 11.4 The wound area graph displays all the wound surface area measurements taken of that wound over time. Surface area is displayed in cm2 and the date of the measurement is seen on the bottom of the graph. Filtering Images The software allows you to filter the thumbnail list on the Wound screen by image type, still or video and any combination of the options available. 1.
8. Tap Move Image. 9. Tap a wound checkbox from the list. 10. Tap OK. 11. Image is moved to new wound and a confirmation message is displayed. 11.6 Deleting Images You can delete an image from a wound from the Review screen, but also from the Wound screen. 1. On the Wound screen, tap SELECT. A checkbox is displayed on the top right corner of all thumbnails for all visits. 2. Tap to select a thumbnail. 3. Tap More. 4. A menu is displayed.
5. Tap Delete Image. 6. On the warning dialog, tap OK. 7. Image is deleted and a confirmation message is displayed. 11.7 Editing a Wound 1. On the View Wound screen, tap More. 2. Tap Edit Wound. 3. On the Edit Wound screen, tap a field to select it, then make your edits. When editing a wound, an additional option to edit a Wound Status is available. You can change the status of a wound from Open to Closed and vice versa. NOTE: When a wound is closed, you cannot capture images.
7. Tap SAVE. 8. Edits are saved and a confirmation message is displayed. Imaging Screen 11 10 9 Number Description 1 Back icon. Tap Back to return to the Wound screen. 2 Info icon. Tap Info to display Patient Details—includes name, date of birth and wound location.
3 Camera/video icon. Default setting is camera. Tap the Camera/Video toggle to switch from camera to video mode and vice versa. NOTE: Video is available for Standard and Fluorescence mode. NOTE: If video is unavailable, go to Settings and enable the Video Capture option. 4 Torch icon. Tap Torch toggle to enable/disabled. Available in Standard mode. 5 6 7 8 9 12.1 Saved thumbnail. When an image is captured, a thumbnail is displayed. Tap the thumbnail to view the just captured image in full screen.
4. Tap CAPTURE or START RECORDING. NOTE: When capturing a video, you can refocus at any time during the video to focus on a different area of a target. 12.2 Range Finder A pulsed laser-based range finder sensor is used to determine the distance between the device and a target. The range finder indicates to the user when the device is held at the correct distance for optimal imaging. Acceptable range for Fluorescence mode is 8-12 cm.
Tap the Fluorescence available icon to enter Fluorescence mode. If the user attempts to enter Fluorescence mode when the ambient light is too high in the imaging environment and the FL available icon is not present, the following warning will appear: Screenshot. If the user enters Fluorescence mode while the ambient light is too high in the imaging environment, an ambient light sensor warning icon will be displayed in the field of view on the top right corner.
Inactive Active 2. Tap the Video/Still toggle to set it to Video capture mode. 3. Aim the device parallel to the wound. 4. Ensure the distance from the wound is acceptable and that the range finder indicator is green. 5. Centre the target in the middle of the field of view. 6. Tap the screen to focus on the target. 7. Tap START RECORDING. The device will begin recording and display a counter on the field of view to count down from the maximum allowable video length of 30 seconds. 8.
8. Tap CAPTURE. 9. A thumbnail will be displayed on the bottom left of the Imaging screen when the image is saved. 10. (Optional) Tap the thumbnail to review your image in full screen. To exit full screen mode, tap Close. 11. Continue to capture images or tap Back to return to the Wound screen. To capture a Fluorescence video: 1. Turn off the room lights. 2. From the Imaging screen in Standard mode, tap the FL available icon to enter Fluorescence mode. FL available Inactive Active 3.
Inactive Active 2. Aim the device parallel to the wound. 3. Ensure the distance from the wound is acceptable and that the range finder indicator is green. 4. Centre the target in the middle of the field of view. 5. Tap the screen to focus on the target. 6. Tap CAPTURE. 7. The captured image will appear in a Measurement Image screen. Users will have the ability to perform either an Auto or Manual measurement. To perform an Auto Measurement: 1. 2. 7.
3. 4. 5. 6. Using your finger or a stylus, trace the exact border of the wound. Maintain contact with the Display Screen until closing the wound border trace. Tap the next button to accept the wound border or tap the redo button to redo the wound border trace. A depth dialog box will appear prompting the user to input a depth measurement in centimeters (cm) measured according to standard of care. Enter a depth value and tap “Ok” or tap “Skip” to skip the option to enter a depth value.
4 5. Delete icon. Tap Delete to delete the current image. (Optional) Tap Delete. On the warning dialog, tap OK. Image is deleted and a confirmation message is displayed. 6. Tap Back to return to the Imaging screen.
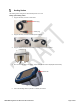
DarkDrape The DarkDrape is a onetime use accessory that provides a portable dark environment for the MolecuLightDX to perform fluorescence imaging of wounds when room lights cannot be turned off or windows cannot be blocked. The DarkDrape attaches to the device by simply clipping onto the MolecuLightDX and clicking it into place. Once attached, The DarkDrape provides a light-blocking shield that may be draped over a wound, see image below. Warning Do not reuse the DarkDrape. It is for single use only.
Quick Start 14.1 With an existing patient and wound 1. 2. 3. 4. 5. 6. On the Login screen, enter user ID and password, then tap LOGIN. On the Patient Directory screen, tap to select a patient. On the View Patient screen, tap to select a wound. On the Wound screen, tap Add to add an image. Tap CAPTURE to capture an image—image is added to wound. Tap Back to return to previous screens and/or to select a different patient. 1. 2. 3. 4. 5. 6. 7. 8. 9. 10. 11. 12. 13. 14.
Troubleshooting Power Button 15.1 Low Battery The device may experience poor behaviour when the battery is low. Before performing a device reset, check the battery charge status of your device. The battery charge status is displayed on any screen in the MolecuLight application in the top right corner.
15.2 Device Reset The device may experience a software error which will require a device reset. Turning the device OFF then back ON will fix these errors. 1. 2. 15.3 With the device on, press and hold the power button for 3 seconds. Wait for the green LED around the power button to turn ON. With the device off, press and hold the power button for 3 seconds. Wait for the green LED around the power button to turn ON.
NOTE: At any point, DO NOT tap the back arrow on the top left corner of the Wi-Fi screen. If this happens, a Device Reset is required. 6. Scroll to the bottom of the list to find the ‘Add network’ option. 7. Tap the SSID text box and enter the SSID for the network you wish to connect to.
8. Tap DONE. 9. (Optional) Change the Security setting. 10. (Optional) Change Advanced options by tapping this option. Change settings as required. 11. Tap SAVE when complete. 12. On the Wi-Fi screen, select the just added Wi-Fi network and then tap OK. 13. The just added Wi-Fi network is now displayed on the Settings screen as the active network. 14. Tap SAVE. 15. Settings are saved, and a confirmation message is displayed.