xPrintServer Home Edition User Guide Part Number 900-633-R Revision A July 2012
Copyright & Trademark © 2012 Lantronix, Inc. All rights reserved. No part of the contents of this book may be transmitted or reproduced in any form or by any means without the written permission of Lantronix. Lantronix® is a registered trademark and xPrintServer™ is a trademark of Lantronix, Inc. Windows® and Internet Explorer® are a registered trademarks of Microsoft Corporation. Mozilla® and Firefox® are registered trademarks of the Mozilla Foundation. Chrome™ is a trademark of Google.
Table of Contents Copyright & Trademark ___________________________________________________ 2 Contacts _______________________________________________________________ 2 Disclaimer & Revisions ___________________________________________________ 2 Revision History _________________________________________________________ 2 List of Figures __________________________________________________________ 5 List of Tables ___________________________________________________________ 5 1: Introduction 6 Network and Ho
Configuring a Default Printer ___________________________________________ 23 Setting Up Printing from a Windows XP Desktop ______________________________ 23 Performing Add Printer Setup __________________________________________ 23 Configuring a Default Printer ___________________________________________ 25 4: Configuration 26 Viewing Configured Printers ______________________________________________ 26 Configuring Printers _____________________________________________________ 27 Enabling or Disabling Di
B: Troubleshooting 43 Problems and Error Messages ____________________________________________ 43 C: Compliance 44 Declaration of Conformity ________________________________________________ 44 RoHS Notice __________________________________________________________ 45 D: Warranty 46 Index 47 List of Figures Figure 1-1 xPrintServer _____________________________________________________________ 6 Figure 1-2 Sample Product Information Label ___________________________________________ 8 Figure 1-3 Sample
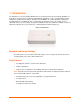
1: Introduction The xPrintServer is a patent-pending AirPrint print server which provides wireless printing capabilities for iPad, iPhone and other devices with iOS-enabled AirPrint applications for up to 2 network printers and 8 USB printers (USB hub not included). xPrintServer Home Edition also enables printing to USB printers from Mac OS X Lion and Windows (XP, 7).
1: Introduction Supported iOS Devices xPrintServer supports all iOS-enabled AirPrint applications. AirPrint is included in all newer generation Apple® devices with iOS 4.2 and later. These include: iPad, iPad2 and iPad3 iPhone (3GS or later) iPod Touch (3rd generation or later) Supported Printers and Printer Protocols Note: Supported printers should be directly attached to the network (wired or wirelessly).
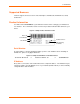
1: Introduction Supported Browsers Lantronix supports the latest version of Internet Explorer, Mozilla Suite, Mozilla Firefox, Safari, and Chrome. Product Information You will need the serial number of your xPrintServer device when setting up your xPrintServer user interface. The serial number can be found on the product information label adhered to your device.
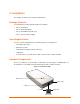
2: Installation This chapter describes how to install your xPrintServer. Package Contents Your xPrintServer product package includes the following: One (1) xPrintServer One (1) Quick Start Guide One (1) RJ-45 Ethernet Cable (3 ft) One (1) Universal Power Supply User-Supplied Items You also need the following items to install and operate your xPrintServer: A working power outlet WI-FI Access Point Network-Attached Printer (wired or wireless) USB Printer Your iOS device (e.
2: Installation Ethernet LEDs There are two LEDs located on the upper left and right corners of the Ethernet socket (see Figure 2-1). These indicate the status of the connection. Left LED Green ON, 100Mbps Ethernet Link Green Blinking, 100Mbps Activity Orange ON, 10Mbps Ethernet Link Orange Blinking, 10Mbps Activity OFF, No Ethernet Link Right LED Always OFF The Ethernet port can connect to an Ethernet (10Mbps) or Fast Ethernet (100Mbps) network.
2: Installation Installation Steps With all xPrintServer package contents and the requisite user-supplied items listed above, you may begin installation. 1. Make sure printing from your Windows or Mac computer (from which the USB printer is directly attached) is working before proceeding. If you are installing a new USB printer, this may require downloading and installing print drivers to your desktop from the printer manufacturer. 2. Connect the USB printer cable to the USB port of the xPrintServer. 3.
3: Navigation and Printing This chapter explains how to navigate and use your xPrintServer user interface including directions on how to login and log out, how to change your password, and most importantly, how to print from your iOS device. Finding the xPrintServer IP Address Use these directions to find your device IP address through which you may log into your xPrintServer device. Internet access is required.
3: Navigation and Printing 5. Click the Go! button. You will be redirected to your xPrintServer URL, after which a login prompt will appear. Figure 3-2 Redirected to Login Prompt 6. Enter the default admin user login information. User Name: admin Password: PASS Note: Upon initial login, modify the default “PASS” password as soon as possible for security reasons. See Changing Passwords. You will be redirected to your xPrintServer device URL where you will see the System Status on the Home Page. 7.
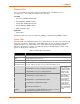
3: Navigation and Printing System Status on the Home Page You will see your xPrintServer System Status information on the Home page whenever you log into your xPrintServer URL. Figure 3-3 IP System Status Information on the Home Page The System Status information includes your IP address along with other important system status information: Edition The edition of xPrintServer (Home Edition). Version The current version of your firmware. Name The configurable name for the xPrintServer device.
3: Navigation and Printing Current Status The current status of the xPrintServer. Time-zone The configured time zone (can be changed through the Admin tab/page). Status Time The time at which the system status information you see on the screen was captured. Logging In Once the xPrintServer is installed (see Installation Steps) and the IP address discovered (see Finding the xPrintServer IP Address and Initial Login),you may follow these directions to login to xPrintServer at any time. 1.
3: Navigation and Printing Changing Passwords Use these directions to change your password. To change your password: 1. Login to the xPrintServer user interface (see Logging In). 2. Click the Password link on the left side of the Home page. The Change Password page will appear displaying the User for which the password change is being made. 3.
3: Navigation and Printing Navigation Basic navigation features for the xPrintServer user interface are outlined in this section. Figure 3-5 Navigating the xPrintServer User Interface The firmware version is listed on the top of every web page Tabs allow you to move between xPrintServer pages and to Log-Off Double-click to sort table information by column heading Clicking the button beside a particular table list item will pull up the popup command menu associated with that item. See Figure 3-6.
3: Navigation and Printing As illustrated above, basic navigation features for the xPrintServer user interface include the following: Tabs/Pages All the functionality of your xPrintServer user interface is divided between the Home, Admin, Jobs, Printers, Logs and Log-Off tabs located across the top of the user. Access these pages by clicking the same-named tab along the top of the screen. For instance, click the Jobs tab to get to the Jobs page or click Home to get to the Home page.
3: Navigation and Printing Printing from an iOS Device This section explains how to print from your iOS device (e.g., iPad, iPod or iPhone). Use these steps to print from your iPad, iPhone or other iOS device. 1. Connect your xPrintServer according to Installation Steps. 2. Using your iPad, iPhone or other iOS device, open web page, email, photo, etc.
3: Navigation and Printing Printing from a Mac OS X Lion Desktop This section explains how to print from your Mac Operating System (OS) desktop. xPrintServer Home Edition supports desktop printing from Mac OS X Lion. Use these steps to setup printing from your Mac OS through the xPrintServer. 1. Connect your xPrintServer according to Installation Steps. 2. Go to System Preferences > Hardware. 3. Click on Print & Scan. 4. Click on the + button on the lower left corner. A list of printers appear.
3: Navigation and Printing 5. Select the printer you wish to add. 6. Click on the Add button. The printer is now added in your available list of printers and is ready to print. Setting Up Printing from a Windows 7 Desktop This section explains how to prepare your Windows 7 desktop for printing . xPrintServer Home Edition supports desktop printing from Windows 7 and Windows XP Operating Systems through Bonjour Print Services. You will need to download Bonjour Print Services for Windows v2.0.2 or higher. .
3: Navigation and Printing 4. Click on printer you wish to install. 5. Search and select your printer by Manufacturer or Printer (model number) and click Next. 6. Click Finish to complete the installation.
3: Navigation and Printing Configuring a Default Printer This section provides instructions on setting an installed printer on your network as the default printer. 1. Click Start > Control Panel on your desktop. 2. Double-click to select Devices and Printers. 3. Right-click the printer to be set as default and select Set as default printer. The selected printer is now set as the default printer.
3: Navigation and Printing 4. Click on printer you wish to install. 5. Search and select your printer by Manufacturer or Printer (model number) and click Next. 6. Click Finish to complete the installation.
3: Navigation and Printing Configuring a Default Printer This section provides instructions on setting an installed printer on your network as the default printer. 1. Click Start > Control Panel on your desktop. 2. Double-click to select Printers and Faxes. 3. Right-click the printer to be set as default and select Set as default printer. The selected printer is now set as the default printer.
4: Configuration This chapter describes how to configure your xPrintServer using the xPrintServer user interface. Viewing Configured Printers Utilize these instructions to view provisioned network-connected printers installed since the xPrintServer last started up or printers on other networks if their IP addresses have been added (see Adding a Printer IP Address). 1. Login to the xPrintServer user interface (see Logging In). 2. Click the Printers tab to access the Printers > List page.
4: Configuration Configuring Printers Note: Discovery in the xPrintServer from a PC requires Bonjour®, which may be installed via iTunes® or Safari or Bonjour Print Helper ® at www.apple.com. All printers are added and configured to the xPrintServer via discovery where the xPrintServer discovers and provisions all network-connected printers as AirPrint printers. Discovery happens in one of two ways: Auto Discovery: This is the automatic method of printer discovery and provisioning.
4: Configuration 4. Check Enabled or Disabled to enable or disable printer discovery, as desired. The auto discovery mode will automatically adjust to your selection in a few seconds and your mode choice will be remembered for subsequent xPrintServer startups. Configuring Printers through Auto Discovery Auto discovery of printers happens automatically each time you startup xPrintServer, so long as auto discovery is enabled prior to the startup. 1.
4: Configuration appear showing the current date and time of the current discovery and configuration of printers and associated downloaded drivers. 5. Expand the SNMP field to see configuration information about the discovered printer(s).
4: Configuration Deleting All Configured Printers The auto discovery utility of xPrintServer is enabled by default so that whenever you turn on your xPrintServer device, auto discovery will automatically run one time. Utilize these instructions to access the area where you may disable or re-enable auto discovery. 1. Login to the xPrintServer user interface (see Logging In). 2. Click the Printer tab to access the Printers > List page. 3.
4: Configuration Netmask Default Gateway DNS Server 6. Click Save. 7. Click OK in the confirmation popup that appears. The unit will automatically restart. 8. Close out of your xPrintServer browser and open a new browser. 9. Enter the newly assigned static IP address. 10. Login to the xPrintServer user interface (see Logging In). The assigned static IP address will appear on the System Status page.
4: Configuration 6. Click Purge Job History in the popup command menu that appears (or Cancel within the same menu if you want to back out of it). 7. Click Yes in the confirmation popup to continue (or No to cancel action) and all print jobs not yet printed will be purged from the selected printer. 8. Click OK in the second confirmation popup. Deleting a Printer Use this selection to delete a printer that is currently configured.
4: Configuration 3. Utilize Navigation as necessary in situations where there are multiple pages of printers. 4. Utilize Search as necessary to find a particular printer. 5. Click the button beside the printer with location to be changed. 6. Click Change Location in the popup command menu that appears (or Cancel within the same menu if you want to back out of it). 7. Type the new description for the printer in the field which appears. 8. Click Save. After a few seconds, the printer name will be changed.
4: Configuration Sharing a Printer Use this selection to make an xPrintServer-provisioned printer visible and available to iPad, iPhone and other iOS devices. 1. Login to the xPrintServer user interface (see Logging In). 2. Click the Printer tab to access the Printers > List page. 3. Utilize Navigation as necessary in situations where there are multiple pages of printers. 4. Utilize Search as necessary to find a particular printer. 5. Click the button beside the printer to be shared. 6.
4: Configuration Setting Printer Options Use this selection to view and modify settings in an xPrintServer-provisioned printer. 1. Login to the xPrintServer user interface (see Logging In). 2. Click the Printer tab to access the Printers > List page. 3. Utilize Search as necessary to find a particular printer. 4. Click the button beside the printer you wish to set printer options. 5.
4: Configuration 8. Click the Return to Printer List button at any time to return to the Printers > List page. Updating Printer IP Addresses Use this feature to update printer IP addresses on the xPrintServer. This feature allows autodiscovery of printers outside the current subnet. 1. Login to the xPrintServer user interface (see Logging In). 2. Click the Printers tab to access the Printers page. 3. Click the Printer Address link on the left side of the Printers page.
4: Configuration Viewing Print Jobs on the xPrintServer User Interface Use these steps to view all print jobs and details on a specific print job. 1. Login to the xPrintServer user interface (see Logging In). 2. Click the Jobs tab to access the Jobs page. All Active Jobs are listed here. The information on this page is refreshed every 15 seconds. 3.
4: Configuration 2. Click the Name link on the left side of the page to access the Change xPrintServer Name page. The Current Name of your device will display (xPrintServer). 3. Type in the New Name (an alpha and/or numeric combination that may include the - and _ characters). 4. Click the Change Name button to submit the new name. 5. Click Yes in the confirmation popup to continue (or No to cancel action) renaming your xPrintServer device. 6. Wait for the xPrintServer to reboot.
4: Configuration Restarting the xPrintServer Use these directions to restart the xPrintServer device through the xPrintServer user interface and without changing any settings. 1. Login to the xPrintServer user interface (see Logging In). 2. Click the Admin tab to access the Admin page. 3. Click the Restart link on the left side of the page to access the Restart Unit page. 4. Click the Restart Unit button. 5. Click Yes in the confirmation popup that appears (or No to cancel this action). 6.
5: Updating Firmware Note: Internet access is required for firmware updates. This chapter provides directions for updating firmware, which may be necessary from time to time. 1. Login to the xPrintServer user interface (see Logging In). 2. Click the Admin tab to access the Admin page. 3. Click the Firmware link on the left side of the page. The firmware you are currently running will display. Note: The firmware version is also visible beside the xPrintServer logo on top of all xPrintServer pages. 4.
6: Technical Specifications Basic device information is provided in this chapter. Table 6-1 Technical Specifications Category Description Power Input 90 to 264 VAC 50/60 Hz Wall Cube with 5V power output Normal Power Usage: approximately 1 Watt Network Interface USB Port Dimensions Weight Temperature Relative Humidity Case Protocols Supported Management System Software LEDs xPrintServer User Guide 1 RJ45 10Base-T/100Base-TX Ethernet port 1 USB Port 11.43 x 6.02 x 2.16 cm (4.5 x 2.37 x .
A: Technical Support This chapter provides directions and contact information for getting live technical support for your xPrintServer device. The xPrintServer user interface provides an easy way for you to directly send helpful diagnostic information to Lantronix. Calling Technical Support after they have received this information will help them better and more quickly assist you.
B: Troubleshooting Some of the errors encountered setting up or using the xPrintServer are addressed in this appendix. When troubleshooting, always ensure that the physical connections (power cable, network cable) are secure. When troubleshooting the following problems, make sure that xPrintServer is powered up and connected to a good network connection. Problems and Error Messages Problem/Message Possible Solution LED lights display correctly but printer does not print job.
C: Compliance Declaration of Conformity Manufacturer’s Name & Address: Lantronix, Inc.
C: Compliance RoHS Notice All Lantronix products in the following families are China RoHS-compliant and free of the following hazardous substances and elements: • • Lead (Pb) Cadmium (Cd) Product Family Name DSC EDS IntelliBox MatchPort Micro MSS100 PremierWave SCS SecureBox SLB SLC SLP Spider and Spider Duo UBox UDS1100 and 2100 WiBox WiPort xDirect xPico XPort XPress DR & XPress-DR+ xPrintServer xSenso • • • • Mercury (Hg) Hexavalent Chromium (Cr (VI)) Polybrominated biphenyls (PBB) Polybrominated
D: Warranty For details on the Lantronix warranty, go to our web site at http://www.lantronix.com/support/warranty/index.html.
Index A A/P, 11 Access Point, 11 Activity LED, 10 Adding a Printer IP Address, 36 Address IP, 8 Addresses, 7 Advanced Options, 27 Agency Approvals, 44 AirPrint, 6, 7, 41 Apple, 7 Auto Discovery, 27 Auto printer discovery, 6 B Bonjour, 27 Bonjour Print Services (Windows 7 OS), 21 Bonjour Print Services (Windows XP OS), 23 C Cabling, 11 Case, 41 Change Description, 32 Change Location, 32 Change Password, 16 Change Time-Zone, 30 Chrome, 41 Compliance, 44 Configuration, 6, 26 Contact Information, 42 Contacts,
Index M Mac OS, 6 Management, 41 Manufacturer’s Name & Address, 44 Modifying a Printer IP Address, 36 N Navigation, 17 Network Interface, 41 P Package Contents, 9 Page Description Language, 7 Pages, 18 Passwords, 16 PCL, 7 PDL, 7 Postscript, 7 Power Input, 41 Print Job, 11 Print Jobs, 37 Print Test Page, 31 Printer Configuration, 31 Printer IP Address, 36 Printer Protocols, 7 Printers, 7 Printing from a Desktop (Mac OS X Lion), 20 Printing from an iOS Device, 19 Problems and Error Messages, 43 Product In