UBox USB Device Server User Guide Models UBox 4100 and UBox 2100 Part Number 900-373 Revision D June 2008
Trademark UBox is a trademark of Lantronix. Other brand names are trademarks or registered trademarks of their respective holders. Copyright Copyright © 2005, 2007 Lantronix. All rights reserved. No part of the contents of this book may be transmitted or reproduced in any form or by any means without the written permission of Lantronix. The information contained herein is subject to change without notice. Printed in the United States of America.
Contents Figures ______________________________________________________________________ 5 1: Using This Guide 7 Purpose and Audience__________________________________________________________ 7 Summary of Chapters __________________________________________________________ 7 2: Introduction 8 Model and Part Numbers ________________________________________________________ 8 USB Speeds and Throughput ____________________________________________________ 8 Supported Devices__________________________________
Contents Summary______________________________________________________________________ 21 Other Ways to Connect and Disconnect USB Devices ________________________________ 21 Using the UBox System Tray ____________________________________________________ 22 Auto Connecting Printers _______________________________________________________ 23 Using Forced Device Disconnect _________________________________________________ 25 Using Multi-and Single-User Connect Modes _______________________________________ 26
Contents Final Step _____________________________________________________________________ 55 Resetting the UBox Hardware ___________________________________________________ 55 Power-Cycling or Using the Reset Button ____________________________________________ 55 Rebooting the UBox into Safe Mode Using the Reset Button _____________________________ 56 Troubleshooting: USB Devices __________________________________________________ 57 Technical Support ______________________________________________________
Contents Figure 4-8. Disconnect Printer for Auto Connect..................................................................................24 Figure 4-9. Forced Device Disconnect on the Advanced Menu...........................................................26 Figure 4-10. USB Device Status...........................................................................................................27 Figure 5-1. Servers Tab........................................................................................
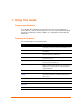
1: Using This Guide Purpose and Audience The Lantronix UBox USB Device Server makes it possible to share USB devices such as printers, scanners, and storage drives over a Local Area Network. This guide provides the information needed to configure, use, and update the UBox 2100 and UBox 4100. Summary of Chapters The remaining chapters in this guide include: Chapter Description 2: Introduction Describes the main features, the required hardware and software, and a list of items included with the unit.
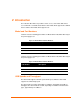
2: Introduction The Lantronix UBox makes it possible to share, access, and control USB devices over a LAN. This User Guide deals with the UBox 2100, which supports two USB 2.0 devices and the UBox 4100, which supports four. Model and Part Numbers Lantronix offers the following part numbers for Model UBox 2100, which differ only in the power supply used. Figure 2-1.
2: Introduction Supported Devices The UBox 4100 supports most low and full speed devices, including class and vendor specific devices. The UBox 4100 does not support high-speed isochronous devices; it supports isochronous devices for audio only. In addition to these devices, the UBox 2100 supports most high-speed devices, as limited by the overall throughput. The UBox 2100 also supports full speed isochronous video. The UBox 2100 does not support High Speed Isochronous devices.
2: Introduction Hub Support The UBox 4100 supports up to one full speed hub on each port, counting the hub inside a compound device. Hubs may be only one deep. The UBox 2100 supports both full speed and high-speed hubs. In addition you can connect a compound device to a full speed or high-speed hub plugged into one of the UBox 2100 ports.
3: Installing the UBox The UBox package has two components: the UBox hardware and the UBox software. Both have their own settings and configuration options. This chapter includes the following topics: Installing the UBox Hardware Installing the UBox Software Uninstalling the UBox Device Server Software Installing the UBox Hardware Warning: Do not connect a USB device to the UBox until you have finished installing the software and hardware.
3: Installing the UBox 2. Once the UBox has power, notice the following: The UBox's status lights turn on and off. After a few seconds, the lights stop blinking. If the UBox is responding properly, the green USB lights turn on and stay solid. The first green SYSTEM light blinks on and off every few seconds. Ignore any other status lights for now. Figure 3-2.
3: Installing the UBox Both the UBox 2100 and UBox 4100 have the same three NETWORK status indicators. The UBox 4100 has three (one green and two red) “SYSTEM indicators, while the UBox 2100 has four (one green, two amber and one red). For both models, the green has the same meaning. The UBox 2100’s two amber are equivalent to the UBox 4100’s two red. The additional red indicator on the UBox 2100 indicates errors.
3: Installing the UBox Figure 3-4. USB Devices Tab 4. To verify that the application sees the UBox Device Server, click the Servers tab. Note: Initially, the UBox displays as Unnamed. During configuration, you can assign a name to it. (See page 31.
3: Installing the UBox Figure 3-5. Servers Tab Displaying a UBox Note: If the UBox does not display, and you have it in a static network, you can use the Override Server Network Settings option on the Advanced menu to configure the UBox. (See Overriding Server Network Settings on page 42.) Uninstalling the Lantronix UBox Software To uninstall the Lantronix UBox software: 1. Click StartÆSettingsÆControl PanelÆAdd or Remove Programs. 2.
4: Using USB Devices on the Network Overview This chapter includes the following topics: Connecting your USB device to the UBox's USB port. Connecting to your networked USB device using the Lantronix UBox software: − Using the Connect and Disconnect icons − Using the Auto Connect feature for printers Use your USB device by means of the Lantronix UBox. Note: These instructions help you connect a USB device (e.g., a printer or scanner) to the UBox for the first time.
4: Using USB Devices on the Network Each USB port has a green status LED light. These lights indicate whether the current software/firmware supports your USB device. A solid green light indicates that the UBox supports your device. A slowly blinking light indicates that the UBox does not currently support your USB device. Please contact Lantronix if a light is blinking slowly. 2. On the Start menu, click ProgramsÆLantronix UBox USB Device ServerÆUBox USB Device Server.
4: Using USB Devices on the Network Device Name Name programmed into your USB device by its manufacturer. This name may differ from the actual name and model number of your device. For example, if you have an HP Deskjet 882 printer, it may appear as HP Deskjet 880 or HP Printer. Some USB devices do not have names programmed into them. For unnamed USB devices, the USB device's programmed Vendor ID (VID) and Product ID (PID) display. If desired, you can rename your USB devices.
4: Using USB Devices on the Network Note: The default configuration of the UBox is Multi-User Connect Mode. In this mode, all USB devices are shared in a one-at-a-time mode. If a device is in use by another user, that USB device's status displays as In Use By [ComputerName]. Before you can use the device, you must connect to it to gain exclusive access. When you are finished using the device, you must disconnect from it before others can use it.
4: Using USB Devices on the Network Note: Some USB devices require additional action before you disconnect your USB device. For example, some USB devices require you to stop the USB device's software. If your USB device requires such action when the device is directly connected to your computer, please perform them before clicking the Disconnect icon in the Lantronix UBox software.
4: Using USB Devices on the Network To use a 13th USB device, disconnect one of your 12 USB devices using the Lantronix UBox software to free a location for the next USB device. To have more than eight UBoxes, configure your next eight UBoxes to use a different UDP port (see 5: Changing the UBox's Settings). Once you have done this, use the Local Settings tab to switch between your first eight UBoxes and your next eight UBoxes (see 6: Changing Local Software Settings).
4: Using USB Devices on the Network Using the UBox System Tray The UBox System Tray on the Windows taskbar contains icons that enable you to access the following functions quickly and easily: Access the UBox settings. Configure Auto Connect. Connect to and disconnect from USB devices on your UBox. To use the system tray: 1. Find the Lantronix UBox System Tray icon right corner of your screen (next to the time). . The System Tray is in the lower Figure 4-4. System Tray 2.
4: Using USB Devices on the Network Auto Connecting Printers This feature automatically connects and disconnects printers whenever you have a print job queued. This gives you a printing experience that is similar to using a print server. The Auto Connect feature for printers actually connects just the printer component of a compound device regardless of what the separate compound devices is set to. This cuts down on the amount of connections needed before printing. (See Compound Devices on page 20.
4: Using USB Devices on the Network The Lantronix UBox Auto Connect window opens. Figure 4-7. Auto Connect Enabled You may see your printer listed multiple times if you or your printer's software created multiple printers in Windows's Printers and Faxes window. You can either delete the extra printers in the Printers and Faxes window or enable Auto Connect for all of the printers. 1. Select the checkbox next to your printer’s name. The following window opens: Figure 4-8.
4: Using USB Devices on the Network you may get a warning stating that your printer is disconnected. Ignore these, as the Auto Connect feature will connect the printer for you. Once the printer auto connects, your print job is sent to the printer (this may take a few seconds). When the printer has finished printing, Auto Connect disconnects your printer and makes it available to other users.
4: Using USB Devices on the Network Figure 4-9. Forced Device Disconnect on the Advanced Menu A message displays cautioning you to make sure the device is not in use. 3. If you are sure that you want to continue, click the Yes button. The device status is now Available. Using Multi-and Single-User Connect Modes The UBox has two Device Connect Modes: Multi-User and Single-User. Multi-User Mode: By default, the UBox is set to use the Multi-User mode.
4: Using USB Devices on the Network Please note that you can also dedicate a single USB device to a particular computer and still share other USB devices with other computers. You can select the desired mode on the Servers tab. For details, please see 5: Changing the UBox's Settings. Device Status The USB Devices tab shows the connection status of USB devices connected to the UBox. The following is a table of status descriptions. Figure 4-10.
4: Using USB Devices on the Network Separating Compound Devices Types of USB Devices USB devices fall into one of the following categories: Single USB device: A USB device that contains only one component (for example, a single button mouse). Composite USB device: A device that provides multiple functions but appears as one device (for example, a multifunction printer).
5: Changing the UBox's Settings Overview The Lantronix UBox comes pre-configured for use with most networks. However, you may want to change some of the settings for your specific network or USB devicesharing needs. This chapter describes how to change the UBox's settings and what the settings affect. Note: To modify settings for the UBox software, use the Local Settings tab. These settings are kept on your computer. See 6: Changing Local Software Settings.
5: Changing the UBox's Settings Figure 5-1. Servers Tab 3. In the Status column, the following may display: Server # Your UBox's MAC/Network address, found on the label on the bottom of the unit. Server Name Name of your UBox. You can modify this name by selecting the server and clicking the Edit Server Config button. Status Current state of your UBox's hardware and software. This column shows whether the UBox software has successfully communicated with your UBox hardware.
5: Changing the UBox's Settings Temp. Defaults: The UBox hardware is in Temporary Default Settings Mode. This mode allows you to return the UBox to its factory settings temporarily for diagnostics. You can edit your previous settings while you are in this mode. (See Resetting the UBox Hardware on page 55.) Login Failed: Your computer could not connect to the selected UBox because the UBox has a password.
5: Changing the UBox's Settings Figure 5-2. Edit Server Configuration – Access Tab Notes: Firmware Upgrade: After clicking the Edit Configuration button, a message may display informing you about new firmware. You can only update your UBox's settings after you have upgraded your firmware. The UBox's icon disappears while the new firmware is loading. The UBox icon reappears after your UBox has loaded the new firmware. See Updating the UBox's Firmware on page 40.
5: Changing the UBox's Settings Single-User: Only one user can connect to the UBox at one time. Use this mode if there is only one client computer, or if only one client computer will be powered on at a time and connected to the UBox. In this mode all devices on the UBox are automatically connected to the client computer. Warning: Using this mode with multiple computers will cause unexpected results, as all of the computers will attempt to get exclusive access to the UBox.
5: Changing the UBox's Settings Figure 5-3. Network Tab 2. Update the following settings as desired: IP Address Assignment From the drop-down list, select one of the following methods of assigning an IP address: Using Defaults: The UBox tries to get an IP address via DHCP first. If it fails to obtain an IP address within 10 seconds, it assigns itself an IP address using Zeroconfig. This is the recommended setting for most users. Use DHCP: The UBox automatically obtains an address using DHCP server.
5: Changing the UBox's Settings Subnet Mask A subnet mask defines the number of bits taken from the IP address that are assigned for the host part. Enter the subnet mask as xxx.xxx.xxx.xxx. Example: 255.255.255.0 Gateway The gateway address, or router, allows communication to other LAN segments. The gateway address should be the IP address of the router connected to the same LAN segment as the unit. The gateway address must be within the local network. Enter the gateway as xxx.xxx.xxx.xxx. Example: 192.
5: Changing the UBox's Settings Discovery Mode Select the method the UBox should use to send its UDP data. Broadcast: By default, the UBox uses this method to send discover messages to UBox clients. Broadcast sends UDP messages to every Ethernet-connected device on your network. This is the best setting to use on small networks, home networks, and networks where you have computers with multiple network interfaces (for example, a computer with both wireless and wired connections).
5: Changing the UBox's Settings 1. On the Edit Server Configuration window, click the USB Device Configuration tab. Figure 5-4. Edit Server Configuration – USB Device Configuration Tab 2. Update the following settings as desired: Server Serial No. Device Name Location/Serial Number Cfg Status (View-only) Corresponds to the UBox’s MAC/Network address (printed on the bottom of your UBox hardware). Name that is programmed into your USB device by its manufacturer.
5: Changing the UBox's Settings Figure 5-5. Device Configuration Window The following information displays at the top: USB Product Name Name programmed into the USB device by the manufacturer. Vendor ID (VID) Vendor ID programmed into the USB device by the manufacturer. Product ID programmed into the USB device by the manufacturer. Serial number, if any, programmed into the USB device by the manufacturer. Product ID (PID) USB Serial Number: 4.
5: Changing the UBox's Settings again. Connection Password and Reenter Password If you selected the checkbox above, enter and then reenter a password a user must use to view the USB device. Share Mode Select one of the following types of connection: Shared: Allows multiple computers to connect to and disconnect from the USB device. Default. Dedicated: Dedicates the USB device to a specific computer.
5: Changing the UBox's Settings Restoring Default Settings Note: Restoring the UBox’s default settings closes all device connections, possibly adversely affecting users connected to them. Please be sure that all devices attached to the UBox are not in use before continuing. To restore the UBox to factory settings: 1. On any of the Edit Server Configuration tabs (Access, Network, or USB Device Configuration), click the Restore Defaults button.
5: Changing the UBox's Settings Figure 5-7. Servers Tab 2. Click the Update Server Firmware button. An update confirmation window displays. Figure 5-8. Update Server Firmware 3. Click the Close button. Note: Always have the latest firmware installed on your UBox. We do not recommend using older firmware on your UBox with newer UBox software on your computer (or vice versa).
5: Changing the UBox's Settings Overriding Server Network Settings You can override server network settings to configure a UBox that is in a static IPbased network. This makes it so that you do not have to change your local TCP settings, connect to the UBox using a direct Ethernet connection, or set up a DHCP address. Note: By default, the UBox gets a DHCP or Zeroconfig IP address. In some cases, this address is on a different subnet from the subnet your computer is on.
5: Changing the UBox's Settings addresses are in the range 169.254.0.1 to 169.254.255.1. Use this setting if the UBox is in a network that only uses Zeroconfig IP addresses. Note: Zeroconfig (also called Zeroconf) is a networking protocol that allows computers to find each other automatically without the need for you to enter IP addresses, configure DNS servers, or set up DHCP.
6: Changing Local Software Settings To modify the settings for the UBox software, you use the Local Settings tab. These settings are kept on your computer. Note: The Servers tab is for modifying the settings for the UBox. These settings are stored on the UBox hardware. See 5: Changing the UBox's Settings. The Local Settings tab allows you to: Change your client name (used to identify your computer to the UBox hardware and to other UBox users).
6: Changing Local Software Settings Figure 6-1. Local Settings Tab 2. In the Personal Communications Settings area, update the following information as needed: Client Name Name of your computer that is broadcast to the UBox and to other users on the network. The default name is the computer name specified when your computer was first set up. You can enter a different name in this field. UDP Port This is the UDP port number that the UBox software uses to discover UBox hardware on your network.
6: Changing Local Software Settings Updating Server Access Settings The Server Access Settings area in the Local Settings tab is for connecting to a UBox that is either password protected or uses active discovery. For most users, Server Access Settings are blank. To update server access settings: 1. In the Server Access Settings area of the Local Settings tab, click the Add button. The Edit Local Server Access window opens. Figure 6-2. Edit Local Server Access Window 2.
6: Changing Local Software Settings Server # Serial number of the UBox to which you want to connect. Server Name Name of the UBox to which you want to connect. Status Status of the UBox to which you want to connect. Online displays if you have successfully connected to the UBox. Offline displays if the UBox is not detected. Password Displays Yes or No depending on whether a password was specified on the Edit Local Server Access window.
6: Changing Local Software Settings Switching Between Sets of UBoxes The UBox software on your computer can only “see” eight UBoxes at a time. This is true even with Active Discovery, which can see UBoxes with different UDP port numbers. To use a ninth UBox, you have two options: UBox User Guide Change both the local UDP port and the UBox UDP port to the same new port number so your computer can see the UBox.
7: Troubleshooting Before You Begin Please make sure that you already have: Installed the latest version of the Lantronix UBox software. Connected your UBox hardware to your network. Connected your computer to the same network as the UBox hardware. Turned on the UBox (by connecting its power supply to an outlet). Turned on your computer. Connected a USB device (for example, a scanner) to the UBox hardware. Installed your USB device's software on your computer.
7: Troubleshooting Figure 7-1. Status Lights on UBox 4100 SYSTEM 1 2 3 4 NETWORK 1 2 3 3 2 1 USB Figure 7-2. Status Lights on UBox 2100 SYSTEM 4 3 2 1 USB 1 2 123 NETWORK Note: For a detailed description of every light and its status, please read 8: Status Light Behavior. While the UBox is booting up, different status lights turn on and off. Once the UBox is running, the status lights have new meanings that help troubleshoot the UBox.
7: Troubleshooting Boot-Up The following table explains what the SYSTEM status lights mean during the boot-up process. UBox 4100: Has three (one green and two red) SYSTEM indicators UBox 2100:, Has four (one green, two amber and one red). The green has the same meaning on both units. The UBox 2100's two amber indicators are equivalent to the UBox 4100’s red indicator. The additional red indicator on the UBox 2100 indicates error.
7: Troubleshooting Status Condition SYSTEM 2 is On / SYSTEM 3 is Off SYSTEM 2 is Off / SYSTEM 3 is On Status 2 is Off / Status 3 is Off The UBox is configured to use a static IP and does not show any users connected to it. The UBox obtained an IP address using Zeroconfig and does not show any users connected to the UBox. Suggestions Verify the following: The computer trying to communicate with the UBox is on the same static IP Ethernet subnet.
7: Troubleshooting Status Condition Blinking may indicate you have exceeded the number of USB devices per UBox. Suggestions One UBox supports up to eight USB devices. While many USB devices appear as one USB device, components of compound USB devices (a device with an embedded hub or a device that has multiple components tied together by an internal USB hub) count as one device each. For example, the Lexmark X1150 is a compound device that has two components (one for the scanner, one for the printer).
7: Troubleshooting Status Condition Is Not Listed The UBox software cannot find the UBox hardware. Suggestions 1. Verify that the UBox software's local UDP port is set to match the UDP port used by the UBox hardware. The default is 10010. (See Updating Server Access Settings on page 46. 2. If you do not know the UDP port that your UBox software is using, set the Local UDP Port to 10010. 3. If this does not work, reset your UBox hardware (see page 55). 4.
7: Troubleshooting 4. If you can ping the UBox, but the UBox software cannot establish a connection, the UDP/TCP port is not correct or a firewall is blocking it. Temporarily disable the firewall and see if communication to the UBox is established. If so, configure the firewall to allow the UBox UDP/TCP ports to pass through. See Firewalls below. If not, the UDP/TCP ports between the UBox and UBox application on the PC do not match. See Troubleshooting: UDP Ports on page 53.
7: Troubleshooting Figure 7-3. Resetting the UBox 4100 Reset Button 3. Using the paper clip, quickly press the reset button inside the hole. The UBox resets. Figure 7-4. Resetting the UBox 2100 Reset Button Rebooting the UBox into Safe Mode Using the Reset Button If you have made an unwanted change to the UBox settings and can no longer access the UBox, you can boot it into a “safe mode.” In this mode, the UBox reboots using default settings (e.g.
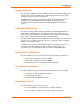
7: Troubleshooting 3. Once you have verified the port, check the Lantronix UBox application to see whether your UBox displays. 4. If it does not display, check the SYSTEM status LEDs to determine the UBox’s network condition. Troubleshooting: USB Devices To troubleshoot problems with USB Devices: 1. Open the Lantronix UBox application. You should see your USB device listed. Make sure Show All Devices displays in the list box below the tabs. 2.
7: Troubleshooting UBox User Guide Your name, and your company name, address, and phone number Lantronix model number Software version Description of the problem Status of the unit when the problem occurred (please try to include information on user and network activity at the time of the problem) 58
8: Status Light Behavior The Lantronix UBox comes equipped with LED lights that report the status of the Lantronix hardware. Figure 8-1.
8: Status Light Behavior Figure 8-2. UBox 2100 LEDs SYSTEM 4 3 2 1 USB 1 2 123 NETWORK The meaning of these lights changes depending on whether the UBox is booting up (you have just turned on the UBox), or if it is running. The two tables on the following pages show all of the possible states of these LED lights and what they mean. If you are having problems with your UBox, please use this information in conjunction with the information in 7: Troubleshooting to diagnose the problem.
8: Status Light Behavior Stage Status STAGE 3 Checking Ethernet Connection SYSTEM 2 and SYSTEM 3 (both red/amber) start blinking while the UBox looks for an Ethernet signal (a physical Ethernet connection) and continue to blink until the UBox finds this signal. STAGE 4 Finding IP Address SYSTEM 2 and SYSTEM 3 (both red/amber) blink while the UBox tries to obtain an IP address. Once the UBox obtains its IP address, the UBox has finished booting and is now running.
8: Status Light Behavior Figure 8-4. UBox Status Lights -- UBox is Running Light Color Status SYSTEM 1 Green Slowing Blinking (on for 3 seconds then off/on): UBox is working. SYSTEM 2 -3 Red/Amber OFF or ON (does not blink): If the light is off, the UBox is not receiving power. If the light is on, the UBox has crashed and needs to be reset (see Resetting the UBox Hardware on page 55). SYSTEM 2= OFF and SYSTEM 3= OFF: UBox is currently working as it detects users connecting to the UBox.
A: Configuring the Windows XP Firewall The following instructions detail how to configure Window XP's built-in firewall for use with the Lantronix UBox. While these instructions are specific for this software, you can apply the basic idea of these instructions to configuring other firewalls. These instructions show you how to: Determine which version of Windows XP is installed on your computer. Access your firewall software.
A:Configuring the Windows XP Firewall Step 2 – Access Your Firewall Software (Windows XP and XP Service Pack 1 Only) You need to know your UBox's UDP/TCP port numbers and IP address before configuring your firewall. If you already know this information, skip ahead to Step 3a Add Settings to the Firewall to Allow Communication with the UBox on page 66. To obtain your UDP and TCP port numbers: The Lantronix UBox defaults to using UDP port 10010 and TCP/IP port 10010.
A:Configuring the Windows XP Firewall Dynamic addresses can change at any moment, making it harder for firewalls to keep track of. If you need to use a firewall, we suggest that you configure your UBox to use a static IP address. Also, if your firewall is currently on, you will not be able to see the UBox. Turn off the firewall to allow your computer to communicate temporarily with the UBox. To obtain the Advanced Settings window: 1. On the Start menu, click SettingsÆNetwork Settings.
A:Configuring the Windows XP Firewall 4. Click the Advanced tab, and then click the Settings button. The Advanced Settings window opens Figure 8-7. Advanced Settings Window Step 3a - Add Settings to the Firewall to Allow Communication with the UBox To add your UDP Port to the firewall: 1. In the Advanced Settings window, click the Add button. The Service Settings window opens. Figure 8-8.
A:Configuring the Windows XP Firewall 2. In the Description of Service field, enter something descriptive like “Lantronix UBox UDP.” 3. In the IP address field, enter the IP address. 4. In both the External Port and Internal Port fields, enter the UDP port number. 5. Select UDP. 6. To save your changes, click OK. You have added support for the UBox's UDP port. Now add a setting for TCP. To add your TCP port to the firewall: Figure 8-9. Service Settings – Adding a TCP 1.
A:Configuring the Windows XP Firewall Step 3b - Access and Configure Your Firewall Software (Windows XP Service Pack 2 Only) To access your firewall software: 1. From the Start menu, click Control Panel. The Control Panel window opens. 2. Double-click Windows Firewall. The Windows Firewall window opens. (If you do not see Windows Firewall, click Switch to Classic View on the side panel.) Figure 8-10. Windows Firewall Window 3. Select On. 4. Click the Exceptions tab.
A:Configuring the Windows XP Firewall Figure 8-11. Exceptions Tab To add your UDP port to the firewall: 1. On the Exceptions tab, click the Add Port button. The Add a Port window displays. Figure 8-12. Add a Port Window - UDP 2. In the Name field, enter something descriptive like “Lantronix UBox UDP.” 3. In the Port number field, type 10010.
A:Configuring the Windows XP Firewall 4. Select UDP. 5. Click OK. To add your TCP port to the firewall: 1. On the Exceptions tab, click the Add Port button. The Add a Port window displays. Figure 8-13. Add a Port Window - TCP 2. In the Name field, enter something descriptive like “Lantronix UBox TCP.” 3. In the Port number field, type 10010. 4. Select TCP. 5. Click OK. To close the remaining windows: 1. Click the OK buttons on the remaining windows.
B: Compliance – UBox 4100 CE Mark Declaration of Conformity (According to EN 45014) Manufacturer's Name and Address Lantronix 15353 Barranca Parkway Irvine, CA 92618 USA (949) 453-3990 Declares that the product: Product Name: UBox USB Device Server Model Numbers: UBox 4100 Conforms to the following Product Specifications: EN 55022: 1998 Class B EN 55024: 1998 following the provisions of the Electromagnetic Compatibility Directive.
B:Compliance – UBox 4100 Translation: This is a Class B product based on the standard of the Voluntary Control Council for Interference from Information Technology Equipment (VCCI). If this is used near a radio or television receiver in a domestic environment, it may cause radio interference. Install and use the equipment according to the instruction manual. Australia/New Zealand This device complies with AS/NZS 3548 Class B limits for the operation of Information Technology Equipment.
B:Compliance – UBox 4100 RoHS Notice All Lantronix products in the following families are China RoHS-compliant and free of the following hazardous substances and elements: • Lead (Pb) • Cadmium (Cd) Product Family Name UDS1100 and 2100 EDS MSS100 IntelliBox XPress DR & XPressDR+ SecureBox 1101 WiBox UBox MatchPort SLC XPort WiPort SLB SLP SCS SLS DSC • • Mercury (Hg) • Hexavalent Chromium (Cr (VI)) • Toxic or hazardous Substances and Elements Lead Mercury Cadmium Hexavalent (Pb) (Hg) (Cd) Chromium (Cr (
C: Compliance – UBox 2100 Declaration of Conformity Manufacturer's Name and Address Lantronix 15353 Barranca Parkway Irvine, CA 92618 USA (949) 453-3990 Declares that the product: Product Name: UBox USB Device Server Model Numbers: UBox 2100 Conforms to the following standards or other normative documents: Radiated and Conducted Emissions CFR Title 47 FCC Part 15, Subpart B and C Industry Canada ICES-003 Issue 4 2004 VCCI V-3/2007.
C:Compliance – UBox 2100 Surge Immunity EN61000-4-5: 2006 RF Common Mode Conducted Susceptibility EN61000-4-6: 1996 Power Frequency Magnetic Field Immunity EN61000-4-8: 1994 Voltage Dips and Interrupts EN61000-4-11: 2004 Safety EN60950-1: 2001, Low Voltage Directive 2006/95/EC Disclaimer and Supplementary Information United States The Lantronix UBox USB Server, Model UBox 2100, complies with Part 15 of FCC Rules.
C:Compliance – UBox 2100 RoHS Notice All Lantronix products in the following families are China RoHS-compliant and free of the following hazardous substances and elements: • Lead (Pb) • Cadmium (Cd) Product Family Name UDS1100 and 2100 EDS MSS100 IntelliBox XPress DR & XPressDR+ SecureBox 1101 WiBox UBox MatchPort SLC XPort WiPort SLB SLP SCS SLS DSC • • Mercury (Hg) • Hexavalent Chromium (Cr (VI)) • Toxic or hazardous Substances and Elements Lead Mercury Cadmium Hexavalent (Pb) (Hg) (Cd) Chromium (Cr (
D: Lantronix Software License Agreement This Agreement constitutes a legal agreement between you, the end user, and Lantronix regarding the Lantronix software accompanying this Agreement (‘Software’). You should carefully read the following terms and conditions before installing this software. EITHER CLICKING ON THE ACKNOWLEDGMENT BUTTON BELOW OR INSTALLING THE SOFTWARE INDICATES YOUR ACCEPTANCE OF THESE TERMS AND CONDITIONS. 1. Ownership; Copy Restrictions.
D:Lantronix Software License Agreement 5. LIMITED WARRANTY. As its only Warranty under this Agreement, Lantronix warrants the media on which the Software is provided to be free from defects in materials under normal use for a period of 90 days from the date of the purchase of the Lantronix UBox 4100 or UBox 2100 hardware.
E: Lantronix Warranty Lantronix warrants each Lantronix product to be free from defects in material and workmanship for a period of TWO YEARS after the date of shipment. During this period, if a customer is unable to resolve a product problem with Lantronix Technical Support, a Return Material Authorization (RMA) will be issued. Following receipt of an RMA number, the customer shall return the product to Lantronix, freight prepaid.