
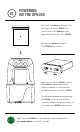
Quick Start Guide


TROUBLESHOOTING
AND MAINTENANCE
• Press back button to engage wiper/cleaning of cartridge.
• Wipe outside of door and door opening while keeping door closed.
• Ensure connection between unit and ink cartridge is free of debris.
• Ensure ink cartridge is properly installed.
• Ensure ink cartridge is not empty.
• Ensure WiFi and server settings are properly congured.
• Ensure logged in if required by your administration.
• As needed, gently clean the unit using Texwipe material.
• Canned air may be used to remove debris.
• Wipe and clean any debris from the charger contacts daily.
• Wipe print head dimples as needed. Take care not to dent or rip gold ex cable.
• Ensure WiFi and server settings are properly congured.
• Foam hand pad is attached using velcro. To remove or replace, grasp pad and
gently pull away from the SP500X.
• To remove or replace nger strap, use moderate pressure to release each clip
by pressing or pulling clip towards the SP500X.
• To remove or replace wrist strap, use moderate pressure to release (or press in)
each side, one at a time. See also section 04 for orientation details.
• Replace the battery with a fully charged battery.
• Check Wi Conguration / Settings to ensure SSID / PSK
and Server information is correct.
• Check access points to ensure WiFi and server are properly congured
and online.
SP500X Will Not Print or Print is Unclear
SP500X Will Not Power On, or LCD Displays “Low Battery” Message
SP500X Will Not Connect to Server or WiFi
General Maintenance
SP500X Scanner Will Not Turn On
• Press back button to turn on scanner.
• Replace battery.
07