xPrintServer Office Edition User Guide Part Number 900-640-R Revision A November 2012
Copyright & Trademark © 2012 Lantronix, Inc. All rights reserved. No part of the contents of this book may be transmitted or reproduced in any form or by any means without the written permission of Lantronix. Lantronix® is a registered trademark and xPrintServer™ is a trademark of Lantronix, Inc. Windows®, Active Directory® and Internet Explorer® are registered trademarks of Microsoft Corporation. Mozilla® and Firefox® are registered trademarks of the Mozilla Foundation. Chrome™ is a trademark of Google.
Table of Contents Copyright & Trademark ___________________________________________________ 2 Contacts _______________________________________________________________ 2 Disclaimer & Revisions ___________________________________________________ 2 Revision History _________________________________________________________ 2 List of Figures __________________________________________________________ 6 List of Tables ___________________________________________________________ 6 1: Introduction 7 Network, Home
Performing Add Printer Setup __________________________________________ 23 Configuring a Default Printer ___________________________________________ 25 Setting Up Printing from a Windows XP Desktop ______________________________ 25 Performing Add Printer Setup __________________________________________ 25 Configuring a Default Printer ___________________________________________ 27 4: Configuration 28 User Administration _____________________________________________________ 28 Changing Passwords _________
Downloading Printer Drivers from a USB Flash Drive _______________________ 52 Managing Active Directory________________________________________________ 53 Updating Active Directory Configuration __________________________________ 53 Testing Remote User Authentication ____________________________________ 54 Saving Configuration ____________________________________________________ 55 Restoring Configuration __________________________________________________ 56 Proxy Server Configuration ______________________
List of Figures Figure 1-1 xPrintServer _____________________________________________________________ 7 Figure 1-2 Sample Product Information Label (Type 1) ____________________________________ 9 Figure 1-3 Sample Product Information Label (Type 2) ____________________________________ 9 Figure 1-4 Sample Serial Numbers on Hardware Devices __________________________________ 9 Figure 2-1 xPrintServer LEDs _______________________________________________________ 10 Figure 2-2 Sample xPrintServer Mounting Option
1: Introduction The xPrintServer is a patent-pending AirPrint print server which provides wireless printing capabilities for iPad, iPhone and other devices with iOS-enabled AirPrint applications for unlimited network printers and 8 USB printers (USB hub not included). xPrintServer Office Edition also enables printing to USB printers from Mac OS X Lion and Windows (XP, 7).
1: Introduction Supported iOS Devices xPrintServer supports all iOS-enabled AirPrint applications. AirPrint is included in all newer generation Apple® devices with iOS 4.2 and later. These include: iPad (all versions) iPhone (3GS or later) iPod Touch (3rd generation or later) Supported Printers and Printer Protocols See http://www.lantronix.com/it-management/mobile-print-servers/supported-printer-list.html for the latest list of all supported printers.
1: Introduction Supported Browsers Lantronix supports the latest version of Internet Explorer, Mozilla Suite, Mozilla Firefox, Safari, and Chrome. Product Information You will need the serial number of your xPrintServer device when setting up your xPrintServer user interface. The serial number can be found on the product information label adhered to your device. One of two types of product information labels will be adhered to your xPrintServer device (see Figure 1-2 or Figure 1-3 below).
2: Installation This chapter describes how to install your xPrintServer.
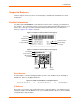
2: Installation Ethernet LEDs There are two LEDs located on the upper left and right corners of the Ethernet socket (see Figure 2-1). These indicate the status of the connection. Left LED Green ON, 100Mbps Ethernet Link Green Blinking, 100Mbps Activity Orange ON, 10Mbps Ethernet Link Orange Blinking, 10Mbps Activity OFF, No Ethernet Link Right LED Always OFF The Ethernet port can connect to an Ethernet (10Mbps) or Fast Ethernet (100Mbps) network.
2: Installation Orange “X” LED Description Code 8 A repeating pattern of eight flashes followed by two seconds of no described in the grey cells to the light indicates USB device (printer or flash drive) discovery is in left. progress. Installation Steps With all xPrintServer package contents and the requisite user-supplied items listed above, you may begin installation. 1.
2: Installation 3. Connect the USB printer cable to the USB port of the xPrintServer (if any). 4. Connect the network cable from the wireless router/switch to the xPrintServer. 5. Power on the xPrintServer with the supplied power cord. The xPrintServer will automatically set-up all printers on your network and/or USB-connected printers. The glowing “X” will blink quickly for about 30 seconds, and then it will pulse slowly to show it’s ready for printing. 6.
3: Navigation and Printing This chapter explains how to navigate and use your xPrintServer user interface including directions on how to login and log out, how to change your password, and most importantly, how to print from your iOS device. Finding the xPrintServer IP Address Use these directions to find your device IP address through which you may log into your xPrintServer device. Internet access is required.
3: Navigation and Printing 5. Click the Go! button. You will be redirected to your xPrintServer URL, after which a login prompt will appear. Figure 3-2 Redirected to Login Prompt Admin User Default Login User Name: admin Password: PASS 6. Enter the default Admin user login information. User Name: admin Password: PASS Note: Upon initial login, modify the default “PASS” password as soon as possible for security reasons. See Changing Passwords.
3: Navigation and Printing System Status on the Home Page You will see your xPrintServer System Status information on the Home page whenever you log into your xPrintServer URL. Figure 3-3 IP System Status Information on the Home Page The System Status information includes your IP address along with other important system status information: Edition The edition of xPrintServer (Office Edition). Version The current version of your firmware. Name The configurable name for the xPrintServer device.
3: Navigation and Printing Time-zone The configured time zone (can be changed through the Admin page). Status Time The time at which the system status information you see on the screen was captured. Locator LED Clicking the light bulb will cause the “X” LED on top of the xPrintServer unit to blink rapidly. Clicking the light bulb again turns off this feature. This feature is useful in situations where you wish to identify a specific xPrintServer amongst multiple units.
3: Navigation and Printing Local Authentication Login Logging in through local authentication logs you directly into the xPrintServer unit through the local database. Remote Authentication Login Remote authentication allows authentication of users through Microsoft Active Directory. This is a feature that can be enabled by the Admin user. If Active Directory is enabled, the xPrintServer communicates with a remote server to authenticate user passwords (see Managing Active Directory).
3: Navigation and Printing Navigation Basic navigation features for the xPrintServer user interface are outlined in this section. Figure 3-5 Navigating the xPrintServer User Interface Tabs allow you to move between xPrintServer pages and to Log-Off Double-click to sort table information by column heading Links available for each page are listed here Clicking the button beside a particular table list item will pull up the popup command menu associated with that item.
3: Navigation and Printing As illustrated above, basic navigation features for the xPrintServer user interface include the following: Tabs All the functionality of your xPrintServer user interface is divided between the Home, Admin, Jobs, Printers, Logs and Log-Off tabs located across the top of the user interface. Only the Admin user has full access to the functionality of all tabs within the xPrintServer user interface. Non-Admin users only have access to the Home, Jobs and Log-Off tabs.
3: Navigation and Printing Printing from an iOS Device This section explains how to print from your iOS device (e.g., iPad, iPod or iPhone). Use these steps to print from your iPad, iPhone or other iOS device. 1. Connect your xPrintServer according to Installation Steps. 2. Using your iPad, iPhone or other iOS device, open web page, email, photo, etc.
3: Navigation and Printing Printing from a Mac OS X Lion Desktop This section explains how to print from your Mac Operating System (OS) desktop. xPrintServer Office Edition supports desktop printing from Mac OS X Lion. Use these steps to setup printing from your Mac OS through the xPrintServer. 1. Connect your xPrintServer according to Installation Steps. 2. Go to System Preferences > Hardware. 3. Click on Print & Scan. 4. Click on the + button on the lower left corner. A list of printers appears.
3: Navigation and Printing 5. Select the printer you wish to add. 6. Click on the Add button. The printer is now added in your available list of printers and is ready to print. Setting Up Printing from a Windows 7 Desktop This section explains how to prepare your Windows 7 desktop for printing . xPrintServer Office Edition supports desktop printing from Windows 7 and Windows XP Operating Systems through Bonjour Print Services. You will need to download Bonjour Print Services for Windows v2.0.2 or higher.
3: Navigation and Printing 4. Click on printer you wish to install. 5. Search and select your printer by Manufacturer and Model, and click Next. 6. Click Finish to complete the installation.
3: Navigation and Printing Configuring a Default Printer This section provides instructions on setting an installed printer on your network as the default printer. 1. Click Start > Control Panel on your desktop. 2. Double-click to select Devices and Printers. 3. Right-click the printer to be set as default and select Set as default printer. The selected printer is now set as the default printer.
3: Navigation and Printing 4. Click on printer you wish to install. 5. Search and select your printer by Manufacturer and Model, and click Next. 6. Click Finish to complete the installation.
3: Navigation and Printing Configuring a Default Printer This section provides instructions on setting an installed printer on your network as the default printer. 1. Click Start > Control Panel on your desktop. 2. Double-click to select Printers and Faxes. 3. Right-click the printer to be set as default and select Set as default printer. The selected printer is now set as the default printer.
4: Configuration This chapter describes how to configure your xPrintServer using the xPrintServer user interface. Admin user: the default and permanent master user login for the xPrintServer. The Admin user has complete access of the xPrintServer user interface functionality including user, printer and job management and configuration capabilities as compared to non-Admin users who can only change their own password, have access to their own print jobs and view basic xPrintServer information.
4: Configuration 5. Click OK in the confirmation popup that appears. Your password is changed. Note: page. You will be asked to login again if you attempt to navigate to a different user interface Figure 4-1 Changing Own Password To change a non-Admin user password as the Admin: 1. Login to the xPrintServer user interface (see Logging In) as Admin user. 2. Click the Users tab to access the Users page. All users are listed here. 3. Utilize Search as necessary to find a particular user. 4.
4: Configuration Adding a New User The Admin user can use these steps to create new users. 1. Login to the xPrintServer user interface (see Logging In). 2. Click the Users tab to access the Users page. All users are listed here. 3. Click Add User. Note: The Full Name of a new user is case sensitive and may include up to 32 alpha and/or numeric characters. 4.
4: Configuration Printer Access Control (Protecting Printer Access) When a printer is protected, the user on the iOS device must be authenticated before printing is allowed. The user is prompted for a userid and password on the IOS device after the selecting the printer with a padlock icon. Protecting Printer Access Using xPrintServer Local User Database The Admin user can use the steps below to change local user access to a specific printer.
4: Configuration 6. To allow all users access to this printer, check the Allow access to all users checkbox at the top of the screen. Individual User ID checkboxes that may have specified user access will disappear. 7. To allow specific users access to this printer, uncheck the Allow access to all users checkbox at the top of the screen if not already unchecked. Individual User ID checkboxes will appear to allow you to select users allowed access to this printer.
4: Configuration - Check the Protected checkbox beside a specific printer to require user authentication prior to use for all remote users. - Uncheck the Protected checkbox beside a specific printer to not require user authentication prior to use. Note: In some cases, iOS devices will cache the user name and password of the first user authentication login so that a remote user only needs to login that first time.
4: Configuration Configuring Printers Note: Discovery of the xPrintServer from a PC requires Bonjour, which may be installed via iTunes or Safari or Bonjour Print Helper at www.apple.com. All printers are added and configured to the xPrintServer via discovery where the xPrintServer discovers and provisions all network-connected printers as AirPrint printers. Discovery happens in one of two ways: Auto Discovery: This is the automatic method of printer discovery and provisioning.
4: Configuration 4. Check Enabled or Disabled to enable or disable printer discovery, as desired. The auto discovery mode will automatically adjust to your selection in a few seconds and your mode choice will be remembered for subsequent xPrintServer startups. Configuring Printers through Auto Discovery Auto discovery of printers happens automatically each time you startup xPrintServer, so long as auto discovery is enabled prior to the startup. 1.
4: Configuration Configuring Printers through Discovery The Admin user may run Discovery anytime after xPrintServer is started up. Utilize these instructions to discover and provision network printers connected after the xPrintServer last started up or printers on other networks if their IP addresses have been added (see Updating Printer IP Addresses). 1. Login to the xPrintServer user interface (see Logging In) as Admin user. 2. Click the Printer tab to access the Printers > List page (see Figure 4-6). 3.
4: Configuration Deleting All Configured Printers The auto discovery utility of xPrintServer is enabled by default so that whenever you turn on your xPrintServer device, auto discovery will automatically run one time. The Admin user may utilize these instructions to access the area where you can disable or re-enable auto discovery. 1. Login to the xPrintServer user interface (see Logging In). 2. Click the Printer tab to access the Printers > List page (see Figure 4-6). 3.
4: Configuration Setting Real Time Clock Real Time Clock is a built-in function in xPrintServer which time-stamps printing-related activities such as identifying the time of log activities or print jobs. Real Time Clock is automatically on and syncs time with pool.ntp.org (Network Time Protocol) and is set it at GMT -800 PST (Pacific Standard Time). To modify the Time-zone 1. Login to the xPrintServer user interface (see Logging In) as Admin user. 2. Click the Admin tab to access the Admin menu.
4: Configuration Assigning a Static IP Address to the xPrintServer Your xPrintServer IP address is DHCP by default, but can be configured with a static IP address. The Admin user may utilize these instructions to establish a static IP address. 1. Login to the xPrintServer user interface (see Logging In) as Admin user. 2. Click the Admin tab to access the Admin menu. A list of all available Admin user configuration options appears to the left of the screen (see Figure 4-10). 3.
4: Configuration 6. Click Print Test Page in the popup command menu that appears (or Cancel within the same menu if you want to back out of it) and a test page print job will be sent to the selected printer.. 7. Click OK in the confirmation popup providing a print job ID. Purging Job History The Admin user may use this selection to purge all printed job history information. Otherwise, by default, xPrintServer maintains a list of the last 50 printed jobs. 1.
4: Configuration Changing Printer Description The Admin user may use this selection to change the advertised printer name of a configured printer as it will be displayed to all users on their iOS devices. 1. Login to the xPrintServer user interface (see Logging In) as Admin user. 2. Click the Printer tab to access the Printers > List page (see Figure 4-6). 3. Utilize Navigation as necessary in situations where there are multiple pages of printers. 4.
4: Configuration Showing Shared Printer Information The Admin user may use this selection to make an xPrintServer-provisioned printer visible and available to iPad, iPhone and other iOS devices. Up to 10 network-attached printers can be seen and shared at a time. 1. Login to the xPrintServer user interface (see Logging In) as Admin user. 2. Click the Printer tab to access the Printers > List page (see Figure 4-6). 3. Utilize Navigation as necessary in situations where there are multiple pages of printers.
4: Configuration Sharing a Printer The Admin user may use this selection to make an xPrintServer-provisioned printer visible and available to iPad, iPhone and other iOS devices. 1. Login to the xPrintServer user interface (see Logging In) as Admin user. 2. Click the Printer tab to access the Printers > List page (see Figure 4-6). 3. Utilize Navigation as necessary in situations where there are multiple pages of printers. 4. Utilize Search as necessary to find a particular printer. 5.
4: Configuration Setting Printer Options The Admin user may use this selection to view and modify settings in an xPrintServer-provisioned printer. 1. Login to the xPrintServer user interface (see Logging In) as Admin user. 2. Click the Printer tab to access the Printers > List page (see Figure 4-6). 3. Utilize Search as necessary to find a particular printer. 4. Click the button beside the printer you wish to set printer options. 5.
4: Configuration Updating Printer IP Addresses The Admin user may use this feature to update printer IP addresses on the xPrintServer. This feature allows auto-discovery of printers outside the current subnet. 1. Login to the xPrintServer user interface (see Logging In) as Admin user. 2. Click the Printers tab to access the Printers > List page (see Figure 4-6). 3. Click the Printer Address link on the left side of the Printers page.
4: Configuration Viewing and Exporting Print Jobs The Admin user may use these steps to view and export print jobs and the details on a specific print job. Non-Admin users may only view and print their own print jobs and the details of their print jobs. xPrintServer maintains a list of the last 50 printed jobs by default. 1. Login to the xPrintServer user interface (see Logging In). 2. Click the Jobs tab to access the Jobs page. All Active Jobs are listed here.
4: Configuration Renaming xPrintServer Device As part of the initialization process, the xPrintServer registers a Lantronix-specific Bonjour Service Type (lantronix-ips._tcp which uses the default device name of xPrintServer). As with any Bonjour discovery application, you can find your xPrintServer or any Bonjoursupported web browser using the URL: http://.local, substituting the with the name of the device.
4: Configuration 6. Click Yes in the confirmation popup to continue (or No to cancel action) renaming your xPrintServer device. 7. Wait for the xPrintServer to reboot. When the renaming of your unit is complete, the xPrintServer device will automatically restart, bringing you back to the Change xPrintServer Name page where your new device name will display.
4: Configuration 1. Login to the xPrintServer user interface (see Logging In) as Admin user. 2. Click the Admin tab to access the Admin menu. A list of all available Admin user configuration options appears to the left of the screen (see Figure 4-10). 3. Click the Restart link on the left side of the page to access the Restart Unit page. 4. Click the Restart Unit button. 5. Click Yes in the confirmation popup that appears (or No to cancel this action). 6. Wait for the xPrintServer to reboot.
4: Configuration Printer Drivers The Printer Driver Download page provides two ways to download a printer driver: from the internet or from a USB flash drive. This page also provides a method to export printer drivers onto a USB flash drive for downloading onto other xPrintServers as well as a way to preload drivers onto the xPrintServer unit. Downloading Printer Drivers from the Internet The Admin user may utilize these directions to download printer drivers from the internet. 1.
4: Configuration Exporting Printer Drivers The Admin user may utilize these directions to export printer drivers from the xPrintServer. Once exported, you may move the printer driver onto a USB flash drive. This is useful in situations where you may wish to use the printer driver on other xPrintServer devices. 1. Login to the xPrintServer user interface (see Logging In) as Admin user. 2. Click the Printers tab to access the Printers > List page (see Figure 4-6).
4: Configuration Downloading Printer Drivers from a USB Flash Drive The Admin user may utilize these directions to download printer drivers from a USB flash drive. 1. Login to the xPrintServer user interface (see Logging In) as Admin user. 2. Click the Printers tab to access the Printers > List page (see Figure 4-6). All printers configured to the xPrintServer are listed here. Figure 4-21 Loaded Drivers Tab 3. Click the Printer Drivers link to get to the Printer Driver Download page.
4: Configuration Managing Active Directory The Admin User may utilize the following directions to configure and enable xPrintServer to use MS Active Directory Services for user remote authentication. The xPrintServer uses MS Active Directory Services for xPrintServer Printer Access Authentication. Note: The xPrintServer does not use the MS Active Directory services for xPrintServer GUI authentication. It will only use the locally configured user database for the xPrintServer GUI authentication.
4: Configuration 6. Check Encrypted Connection to enable (or disable) encrypted connection. 7. Enter the Active Directory Server Port number. 8. Enter the Domain Name. 9. Click Save to save Active Directory settings. Testing Remote User Authentication Note: The user name and password tested in these directions are not saved to the xPrintServer unit. 1. Login to the xPrintServer user interface (see Logging In) as Admin user. 2. Click the Admin tab to access the Admin menu.
4: Configuration Saving Configuration The Admin user may utilize these directions to save an xPrintServer configuration. Saving an xPrintServer configuration saves all settings to a file which can be backed up to a computer. Information saved includes all configurable parameters and printer driver files (which includes printer driver files downloaded during the xPrintServer auto-discovery process and those manually downloaded by the Admin user via the xPrintServer GUI).
4: Configuration Restoring Configuration The Admin user may utilize these directions to restore to a previously saved xPrintServer configuration. These steps can also be followed to overwrite configurations on other xPrintServer units. Note: The configuration filename can include alphanumeric and special characters with the exclusion of the following: “\|/*?”<>:” (double quotes included). Filename plus path information cannot exceed 250 characters. 1.
4: Configuration Proxy Server Configuration The Admin user may utilize these directions to manage the outbound internet requests made through a proxy server. User authentication may be enabled as a prerequisite to processing any requests. Once configured and enabled, all data request for Lantronix Web Services will be redirected to the configured Proxy Server. 1. Login to the xPrintServer user interface (see Logging In) as Admin user. 2. Click the Admin tab to access the Admin menu.
4: Configuration 9. Click Save. Testing Proxy Server Connectivity 1. Login to the xPrintServer user interface (see Logging In) as Admin user. 2. Click the Admin tab to access the Admin menu. A list of all available Admin user configuration options appears to the left of the screen (see Figure 4-10). 3. Click the Proxy Server link to the left to access the Proxy Configuration page (see Figure 4-25). 4. Click Test Connectivity. 5. Click OK to dismiss popup indicating success or failure of connection.
5: Updating Firmware The Admin user may use one of two methods to update firmware through the Admin > Firmware page. Clicking one of the two buttons allows firmware to be uploaded directly from the Lantronix Web services website or through a USB flash drive. Figure 5-1 Firmware Update Options ‘ Updating Firmware via the Lantronix Web Services Website Note: Internet access is required for firmware updates. This chapter provides directions for updating firmware, which may be necessary from time to time.
5: Updating Firmware Note: If the Check for Firmware Update button is disabled, this indicates that internet connectivity is not available. 5. Click Upgrade Firmware. 6. Click Yes in the confirmation popup that appears. Wait a few minutes while firmware upgrades. When the upgrade is complete, the xPrintServer device will automatically restart, bringing you back to System Status on the Home Page.
6: Technical Specifications Basic device information is provided in this chapter. Table 6-1 Technical Specifications Category Description Power Input 5V DC via supplied wall plug Normal Power Usage: ~1 Watt Network Interface USB Port Dimensions Weight Temperature Relative Humidity Case Protocols Supported Management System Software LEDs xPrintServer User Guide 1 RJ45 10Base-T/100Base-TX Ethernet port 1 USB Port 11.43 x 5.95 x 2.32 cm (4.5 x 2.34 x .91 in) 19g ( .
A: Technical Support This chapter provides directions and contact information for getting live technical support for your xPrintServer device. The xPrintServer user interface provides an easy way for you to directly send helpful diagnostic information to Lantronix. Calling Technical Support after they have received this information will help them better and more quickly assist you.
B: Troubleshooting Some of the errors encountered setting up or using the xPrintServer are addressed in this appendix. When troubleshooting, always ensure that the physical connections (power cable, network cable) are secure. When troubleshooting the following problems, make sure that xPrintServer is powered up and connected to a good network connection. Problems and Error Messages Problem/Message Possible Solution LED lights display correctly but printer does not print job.
C: Compliance Declaration of Conformity Manufacturer’s Name & Address: Lantronix, Inc.
C: Compliance RoHS Notice All Lantronix products in the following families are China RoHS-compliant and free of the following hazardous substances and elements: • • Lead (Pb) Cadmium (Cd) Product Family Name DSC EDS IntelliBox MatchPort Micro MSS100 PremierWave SCS SecureBox SLB SLC SLP Spider and Spider Duo UBox UDS1100 and 2100 WiBox WiPort xDirect xPico XPort XPress DR & XPress-DR+ xPrintServer xSenso • • • • Mercury (Hg) Hexavalent Chromium (Cr (VI)) Polybrominated biphenyls (PBB) Polybrominated
D: Warranty For details on the Lantronix warranty, go to our web site at http://www.lantronix.com/support/warranty/index.html.
Index A A/P, 13 Access Log, 49 Access Point, 13 Active Directory, 53 Activity LED, 11 Adding a Printer IP Address, 45 Address IP, 9 Addresses, 8 Admin User, 28 Advanced Options, 34 Agency Approvals, 64 AirPrint, 7, 8, 61 Apple, 8 Assign Static IP Address, 39 Auto Discovery, 34 Auto printer discovery, 7 B Bonjour, 34, 47 Bonjour Print Services (Windows 7 OS), 23 Bonjour Print Services (Windows XP OS), 25 Bonjour Service Type, 47 C Cabling, 13 Case, 61 Change Password, 29 Change Printer Description, 41 Chan
Index Linux OS, 64 Lion, 7 Local Authentication Login, 18 Logging In, 17 Logging Off, 18 Logout, 20 Logs, 49 LPD, 61 LPR, 61 M Mac OS, 7 Management, 61 Manufacturer’s Name & Address, 64 Modifying a Printer IP Address, 45 N Navigation, 19 Network Interface, 61 Non-Admin User, 28 P Package Contents, 10 Password, 28 Power Input, 61 Print Job, 13 Print Jobs, 46 Print Test Page, 39 Printer Access, 31 Printer Configuration, 39 Printer Drivers, 50 Printer IP Address, 45 Printing from a Desktop (Mac OS X Lion),
Index W X Warranty, 66 Weight, 61 xPrintServer, 7, 8, 11, 13, 39, 64 xPrintServer User Guide 69