
User guide


2: Installation
xPrintServer User Guide 12
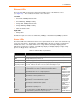
Orange “X” LED
Description
Code 8
A repeating pattern of eight flashes followed by two seconds of no
light indicates USB device (printer or flash drive) discovery is in
progress.
described in the
grey cells to the
left.
Installation Steps
With all xPrintServer package contents and the requisite user-supplied items listed above, you
may begin installation.
1. Make sure printing from your Windows or Mac computer (from which the USB printer is
directly attached) is working before proceeding. If you are installing a new USB printer, this
may require downloading and installing printer drivers to your desktop from the printer
manufacturer.
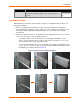
2. Position the xPrintServer device. The xPrintServer can simply be placed as it is on a desk or
other secure flat surface. Here are additional options:
- To install the rubber feet on the xPrintServer (for added grip and stability on a flat
surface), peel to unveil the adhesive strip on each rubber foot and press one foot onto
each of all four bottom corners of the xPrintServer.
- To secure the xPrintServer into a server rack, utilize the included mounting bracket and
screws. There are a variety of ways to mount the bracket and then the xPrintServer unit,
including the two sample methods in Figure 2-2.
Figure 2-2 Sample xPrintServer Mounting Options
or