
User's Manual


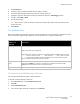
Table Of Contents
- Table of Contents
- Safety
- Features
- Installation
- Configuration Using the Web Manager
- Status Page
- Network Page
- Printer Page
- Diagnostics Page
- Administration Page
- Troubleshooting
- Regulatory

Administration Page
Xerox
®
Wireless Print Solutions Adapter
User Guide
39
3. Click Credentials.
4. For View or Edit, click the credential that you want to modify.
5. For Create New Self-Signed Certificate, type the details requested.
6. For Expires, type the date that the self-signed certificate expires in mm/dd/yyyy format.
7. For Type, select RSA or DSA.
8. Specify a key length.
Note: The process to create a self-signed certificate can take up to 30 seconds, depending on the
length of the key.
9. Click Submit.
Trusted Authorities
One or more authority certificates are used to verify the identity of a peer. Authority certificates are used
with some wireless authentication methods. These certificates do not require a private key.
To Upload a Trusted Authority Certificate
You can upload SSL authority, RSA, or DSA certificates.
To upload a trusted authority certificate:
1. In the Web Manager, click the Administration tab.
2. Click SSL.
3. Click Trusted Authorities.
4. To locate the valid certificate, for Authority, click Browse.
Trusted
Authorities
Settings
Description
Authority SSL authority certificate.
RSA or DSA certificates are allowed.
The format of the authority certificate can be PEM or PKCS7. PEM files must start with
“-----BEGIN CERTIFICATE-----” and end with “-----END CERTIFICATE-
----”. Some Certificate Authorities add comments before and/or after these lines.
Those comments must be deleted before upload.
Authority Certificate
Type
This field automatically updates, depending upon extension of the certificate entered.
If the field is NONE, the certificate is unsupported and will not load. If the field is
PKCS12, enter the password in the corresponding field.
Delete To delete an existing certificate authority, beside the specific authority, click Delete.