SDN71BT PRECAUTION CAUTION RISK OF ELECTRIC SHOCK DO NOT OPEN ! WARNING: TO REDUCE THE RISK OF FIRE OR ELECTRIC SHOCK, DO NOT EXPOSE THIS APPLIANCE TO RAIN OR MOISTURE. CAUTION: TO REDUCE THE RISK OF ELECTRIC SHOCK, DO NOT REMOVE COVER (OR BACK). NO USER SERVICEABLE PARTS INSIDE. REFER SERVICING TO QUALIFIED SERVICE PERSONNEL.
Contents 1. Before Operation...........................................................................................3 1.1 Glossary................................................................................................ 3 1.2 Precautions............................................................................................3 1.3 Maintenance and Cleaning of Discs..........................................................4 1.4 Battery Information of the Remote Control.............................
1. Before Operation 1.1 Glossary PBC (playback control) It is a kind of signal(menu) recorded in the disc with SVCD or VCD2.0 format used for the playback control. For the discs containing PBC, It can playback interactive software with the menu displayed on monitor screen. If the disc contain still images, it can playback high definition of still images. Title Generally, the title is the important part of DVD disc.
1.3 Maintenance and Cleaning of Discs Disc Maintenance 1. To keep the disc clean, handle the disc by its edge, do not touch the disc surface of the play side. 2. Do not stick paper or tape on the disc. If there is anything on the disc surface, wipe it up with a soft cloth before using. 3. Do not expose the disc to direct sunlight, or nearby heat sources such as caliduct, or leave it in a car parked in direct sunlight where there can be a considerable rise in temperature. 4.
1.5 The Remote Control Description 3 27 1 P/ N PWR 14 35 EQ 4 BAND 2 29 MU MOD E MENU 33 32 6 0K SEL 9 34 8 + SE TU P 13 7 31 30 24 28 21 22 10 3 4 6 7 8 9 0/10 10+ 1 2 -10 +10 5 CLK SLOW_FWD LOC ST # ZOOM 26 25 12 16 S E A R CH AP S 18 17 INT RPT RDM AUDIO TITLE/PBC SUBTITLE PAIR REDIAL 19 TEL 39 A-B 20 PROG 37 11 15 23 36 5 CLEAR OSD LOUD 38 16. SEARCH BUTTON 17. RDM BUTTON 18. RPT BUTTON 19. SUBTITLE/REDIAL BUTTON 20.
1.6 The Locations and Names of Controls on or in the unit MIC 7 12 MUTE 5 1 MODE AN G 3 2 _ RESET + AU X I N EJE CT 4 9 6 8 The Diagram of the Face of the Front Pa nel 10 SD/MMC 11 The Diagram of the Face of the Unit After Sliding down th e Front Panel 1. POWER/MUTE button 7. USB jack 2. ANG button 8. AUX IN jack 3. MODE button 9. EJECT button 4. + and - buttons 10. Disc slot 5. IR remote sensor 11. SD/MMC Card slot 6. RESET button 12.
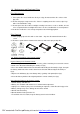
Wires Connection Description BLACK 1.7 Description of Connecting the Parking Brake Line to the Parking Brake System Built in the Car Parking brake Parking brake line(coffee) Parking brake switch (inside the car) To metallic body or chassis of the car NOTE: after connecting the Parking Line, the video on the small monitor of the front panel will be display only after braking the car. PDF created with FinePrint pdfFactory trial version http://www.pdffactory.
1.8 UNIT INSTALLATION INSTALLATIO N INSTRUCTIO NS 1)REMOVE THE 2 DECK TRANSPORT SCREWS BEFORE INSTALLATION. 2)PLEASE DO THE CONNECTION OF THE POWER, SPEAKERS AND ANTENNA ACCORDING TO THE REQUIREMENT OF THE INSTRUCTION BOOK .
2. Common Operation 1. To turn on/off the unit In power off mode, short press the POWER button to turn on the unit. In power on mode, long press the POWER button on the front panel or short press the POWER button on the remote control to turn off the unit. 2. To select an optimal angle of the monitor of the Car Audio System To select an optimal angle of the monitor of the Car Audio System, press the ANG button on the front panel or TILT button on the remote control repeatedly. 3.
11.To do general setup To do general setup, first pop up Mode Menu as in item 2, then tap the icon in the Mode Menu to pop up GENERAL SETUP interface as right. In the interface, select one of CLOCK SET, RDS MODE , OSD LANG, RADIO FREQ and SENSE SET on the left side by tapping them, then set them by tapping some icons on the right side accordingly. GENERAL SETUP * SENSE SET is used to set the sensitivity of stopping auto searching for an available radio station.
4. APS BUTTON In RADIO mode: 1) When long pressing the APS button, the radio searches from the lowest frequency and checks the signal strength level until 1 cycle search is finished. And then the 6 strongest stations are preset to the corresponding preset number memory bank. The AS operation is implemented in the each bank of the selected band. When the AS operation is finished, it will scan each preset station for 5 seconds in FM or AM band from M1 as briefly pressing APS button.
To play files from USB or SD/MMC cards automatically, insert the USB or SD/ MMC card into the USB jack or SD/MMC card slot (remove the front panel to insert SD/MMC card). To remove the USB in the USB jack, press the STOP button twice and then remove the USB. To remove the SD/MMC card from the SD/MMC card slot, press Root interface for MP3/W MA/MP4/JPEG the STOP button twice and then push in the card and then pull it out of the Card Slot. * It supports version 1.1/2.0 USB and 8 GB SD CARD.
4.2 Pause Playback In the state of DVD/VCD/CD/MP3/WMA playing, press the PAUSE button on IR remote control to pause the playback, press the PLAY button to resume normal playback. 4.3 Stop Playback In the state of DVD/VCD/MP3/WMA/CD playing, press the STOP button once to pause the playback, then press the PLAY button to resume the normal playback; press the STOP button twice to full stop the playback, then press the PLAY button to start playing from the beginning of the first chapter/track. 4.
In VCD mode 1. When starting to turn on the PBC function, it will play from the beginning of the disc till it display the PBC menu on the screen if the disc include the PBC menu. 2. Press the number buttons to select your desired track to play. In MP3/WMA mode 1. The root menu is displayed on the monitor screen all the time(and the TITLE or MENU button is not available). 2.
2. In the mode of VCD(PBC OFF)/CD playback: press the RPT button to select REP ONE, REP ALL or OFF. When it is in the state of PBC ON, during VCD disc playing, the RPT button are not available. 3. In the mode of MP3/WMA playback: Press the RPT button to select REP ONE, REP DIR, REP ALL or OFF. 4.10.2 A-B Repeat Press the A-B button if you want to repeat a specific segment on a disc that you define: 1. Press the A-B button at a point (A) where you want it to be the start point of the repeat segment.
button to play the selected track or play from the selected time. 4.13 Playback in Random In the state of DVD/VCD(PBC OFF)/MP3/WMA/CD playing, press the RDM button to switch between RANDOM (ON)/RANDOM OFF. When in RANDOM (ON) mode, it will play in random. 4.14 Playback in Zoom Mode In video/image mode, during playback, press the ZOOM button continuously to enlarge a certain area of the images on the screen with these multiples: ZOOMx2,ZOOMx3,ZOOMx4,ZOOMx1/2,ZOOMx1/3,ZOOMx1/4,ZOOM OFF.
playing track, the elapsted time of the disc, the remained time of the disc. 3. In the state of MP3/WMA playing, press the OSD button repeatedly on the remote control to turn on/off the playback status. When it is on, it will display the information such as: the serial number of the playing track, the elapsed time of the playing track, the remained time of the playing track. 4.19 Program Playback It allows you to enter the order in which you want some chapters/tracks in DVD/VCD/MP3/WMA/CD to play.
button to display the JPEG picture in full screen from the selected JPEG picture. 3. During JPEG playback, press one of the >/: 90 deg cw; <: 90deg ccw; ^:UP<-->DOWN; v: LEFT<-->RIGHT During JPEG playback, press the PROG button to change the mode of refresh picture. During JPEG playback, press the STOP button to stop playing and return to the root menu.
4. Press the > button to enter the setup item. Then press the v or ^ button to select a desired mode of the setup item, finally press the OK button to confirm it. * * Press the < button to return to the previous level. Press the SETUP button again or use the direction buttons to highlight EXIT SETUP and then press the OK button to exit the Setup Menu. For the DVD System Menu, there are 6 setup pages in all. They display as follows: 4.23.
4.23.2 LANGUAGE SETUP OSD LANGUAGE This item is for selecting the language of the SYSTEM MENU and all operating prompt interface displayed during playback. AUDIO LANG This item is for selecting a audio language. SUBTITLE LANG This item is for selecting a subtitle language. MENU LANG This item is for selecting a disc menu language. 4.23.3 AUDIO SETUP AUDIO OUT There is only ANALOG mode, i.e. SPDIF/OFF, not optional. KEY It is for selecting your desired basic music tone(from low to high). 4.23.
HUE It is for adjusting the hue of the video output. SATURATION It is for adjusting the saturation of the video output. SHARPNESS It is for adjusting the sharpness of the video output. 4.23.5 SPEAKER SETUP DOWNMIX It is for selecting your desired sound effect when there is not central speaker and sub-woofer. There are 3 mode: LT/RT, STEREO, VSS. LT/RT: When playing a disc with PRO LOGIC Dolby stereo effect, choose the item, so it will output audio signal with vivid theatre effect.
* The Region Code Q: Not begin to playback but to display REGION ERROR after inserting disc into disc compartment. Why ? A: Because the DVD player and disc has respective region code. If the region codes of them are not match with each other, the DVD player can not play the disc. Appendix: The region code of DVD: The Motion Picture Association of America (MPAA) divided the world into 6 regions, and named every region a code, namely region code.
5. BLUE TOOTH HANDFREE SYSTEM 1. Enter Bluetooth mode When you use MODE button or Mode Menu to enter Bluetooth mode, it will display Bluetooth interface as right. In Bluetooth interface, the icons descriptions are as Bluetooth interface follows: : Tapping it can pop up AUDIO & VIDEO SETUP interface as one in page 10. : Tapping it can transfer audio between the Car Audio System and mobile phone. : Tapping it can exit to Mode Menu. : Same as CLEAR button in Remote Control.
4. In the connection status: the audio of mobile phone transfers to the car audio system whenever a dialling takes place or receiving a call. 5. Dialling when in connection status 5.1 Dial with the mobile phone directly. 5.2 Dial with remote control with the following procedures: (1) Input telephone number with number buttons 0-9 * (2) Short press CLEAR button to cancel the wrongly input number if necessary Short press TEL to execute the dialling. 5.
5. The Trouble Shooting Please read the user's manual carefully before using the DVD player. If you have any troubles in using this player, try to solve the problems by the suggestions mentioned below. If you can not remove the trouble after using all the suggestions, please contact the company or the technical service center authorized by us. For the sake of your safety, please do not open the cover and repair the player by yourself, if that, it may cause electric shock.
* * Ensure that the temperature inside the car is not too high. If so, cool off till the ambient temperature returns to normal. Replace another disc to insert it into the disc compartment. REMOTE CONTROL IS INSENSITIVE OR DOES NOT WORK * Check the batteries of remote control and make sure that they are to be powerful and good conductivity. * Direct the remote control to the IR sensor of the player. * Check whether there are some obstacles between the remote control and IR sensor.
7. Specification General Specification Power Supply Requirement..................................................DC 12V Maximum Power Output...................4 x 25W(measured at DC 14.4 V) Dimensions(w x h x d)........................................178 x 50.5 x 162mm DVD Deck Specification Format.....................................DVD/VCD/JPEG/MP4/MP3/WMA/CD Video System....................NTSC/PAL/PAL-M/PAL-N/AUTO(optional) Audio System..............................................................