Laplink® PCmover® Professional The Only Software that Moves Programs, Files, and Settings to a New PC! User Guide Customer Service/Technical Support: Web: http://www.laplink.com/contact E-mail: CustomerService@laplink.com Tel (USA): +1 (425) 952-6001 Fax (USA): +1 (425) 952-6002 Tel (UK): +44 (0) 870-2410-983 Fax (UK): +44 (0) 870-2410-984 Laplink Software, Inc. 600 108th Ave. NE, Suite 610 Bellevue, WA 98004 U.S.A. Copyright / Trademark Notice © Copyright 2018 Laplink Software, Inc. All rights reserved.
Laplink PCmover Professional is the quick and easy way to transfer from one PC to another. This powerful application transfers all of your selected programs, files, and settings from the old PC to the new PC. PCmover Professional can transfer your PC across a network, Laplink USB cable, or Laplink Ethernet cable. If your computer has multiple users, PCmover gives you the option to transfer some or all of the users. The security information about file ownership and access control is preserved for each user.
Pre-Installation Checklist (both PCs) System requirements for each PC: • CPU: Same as required by operating system. • RAM: Same as minimum required by operating system. • Available hard disk space: 200 MB. • Windows 10/8.1/8/7/Vista/XP PCmover does not support full server restorations, such as is found on Windows Server 2003 and Server 2008. It will execute on these operating systems and can be used to restore accounts and applications.
Installing PCmover (both PCs) To install PCmover from a downloaded file, follow these steps on each PC: 1. Double-click on the PCmover EXE file in the folder where the file was saved. Follow the onscreen prompts. You may see the User Account Control dialog. If so, click Yes to allow “Setup Launcher” to run, which will start the PCmover installation. 2. Repeat these instructions on the second PC. To install PCmover from a CD, follow these steps on each PC: 1. Insert the CD into the CD-ROM drive. 2.
• Review Applications on Each PC: You should not try to transfer applications that already appear on both PCs. Example: Assume Microsoft Word is on the old PC and on the new PC. You should not attempt to transfer the Microsoft Word application, although transferring Word documents is fine. • IMPORTANT: Trial versions of applications should always be uninstalled from the new PC before transferring a full version of the same application from the old PC.
MusicMatch and Napster, which will probably require reactivation on the new PC, possibly a Repair done through the Windows Control Panel, and possibly reinstallation. Certain other applications, such as Microsoft Office, may also require reactivation. Old PC and New PC: Validate Serial Number and Connect IMPORTANT: The sections ‘PCmover Pre-Transfer Checklist’ and ‘Transfer Information’ should be reviewed and completed before beginning a PCmover transfer. 1.
IMPORTANT: If a new version is available, please install the new version on BOTH computers immediately. Old PC to New PC Transfer: If you are transferring from your old PC to your new PC, click Transfer Between PCs, and go to step 2. Note for XP users (old PC only): If migrating from Windows XP on the old PC, skip steps one through five in this “Old PC” section. As prompted on the PCmover screen on the old PC, go to the new PC to continue the migration.
2. Click Advanced Options on the Welcome screen, choose Image & Drive Assistant and click Next. 3. Follow the on-screen prompts to set up the restore. 4. To customize what is restored from the disk image or hard drive, such as selecting applications, user accounts, and drives, click Choose What to Transfer. See the Choose What to Transfer and Transfer Summary steps on pages 13 and 14 in this guide for more details on what you can select. 5.
Once there, enter the email address you supplied when you purchased the product. If you have forgotten your password, please enter your email address and click on the Forgot Your Password link. • CD: Affixed to the CD sleeve. When you enter your serial number into PCmover, it is “validated” (checked for authenticity) using your new computer’s Internet connection.
3. Run PCmover on Both PCs Go to your New PC and follow the previous steps one and two on your New PC. Once you see the Run PCmover on Both PCs screen on your New PC, go to step four. Note: Do not click ‘Next’ on either PC until step four has been completed. 4. Connect Your Old and New PCs Choose which method you will use to connect your Old and New PCs for the transfer. Laplink recommends using a WiFi or Wired Network if available.
If you see the dialog window stating that ”Connection with a USB cable cannot be detected”, please verify that the cable is plugged in to both PCs. 5. Old PC: Find Other PC Your Old PC and New PC are connected if you see the names of both PCs listed on the Find Other PC screen on your Old PC. Note: If you don’t see both PCs listed, click ‘Scan Again’ on your Old PC. You may see a dialog with the name of your New PC. If so, select the PC and click ‘OK’.
New PC: Set Up Transfer 1. Find Other PC On the New PC, click Analyze PC. When analysis is complete, decide what you want to transfer to your new PC: • Choose What to Transfer: If you want to transfer only some applications, files, and settings to the new PC, click the text link Choose What to Transfer, and continue to step two. • Transfer Everything: If you want to transfer all applications, files, and settings to your new PC, click Next.
2. Choose What to Transfer • User Accounts, Files, and Settings (No Applications): To transfer only user accounts, files, and settings, then choose this option and click Next. Skip step three and go to step four to complete the transfer. Important: This option does NOT transfer applications. To transfer applications, click ‘Let Me Choose’ and make selections on what you want transferred. • Files Only Transfer: To transfer only files, choose this option and click Next.
3. Transfer Summary Select an item you wish to customize. Once finished with an item, you will return to this screen. Click Next when finished customizing the transfer, and continue with step 4. • Applications: All applications that can be transferred are selected by default. If desired, you may deselect specific applications that you don’t want transferred to the new PC. See step 3a for further instructions.
3a. Applications List of Applications: On this screen is a list of the applications on your old computer. All applications that are likely to transfer successfully are selected by default to transfer to the new PC. You may deselect any applications that you do not wish to have transferred. Click Done when finished. Any applications not selected by PCmover are not likely to transfer successfully and should not be selected. See list below for applications and programs you should not transfer.
IMPORTANT: “Unregistered Applications” are those that do not appear in the Add/Remove Programs Control Panel in Windows. The term “Unregistered” does not, in this case, refer to whether you have registered a given application with its manufacturer. This Unregistered Applications list will often include applications that are specific to hardware installed on the old computer.
3c. Advanced Drives: If the old PC contains more disk drives than the new PC, PCmover will create a folder for each drive that does not exist on the new PC. To modify how a drive is transferred to the new PC, click Change. In the dialog box that appears, you may modify the drive and/or default folder to which the drive from the old PC is transferred. You may also choose to not transfer the drive from the old PC. Click OK when finished, and then click Done.
Click Done when finished making changes on the Advanced screen. 4. Start Transfer Click Start Transfer to begin the PCmover transfer to your New PC. Depending on the speed of your connection, hardware configuration, and other factors, your transfer time may vary. Transferring from the Old PC to the New PC 1. Transferring PCmover is now transferring all of your selected applications, data files and registry settings to the new PC. Click OK and allow the transfer to complete.
2. Transfer Complete Congratulations! You have successfully transferred to your new PC. At this point, if you used the Laplink Ethernet cable for your transfer and have a wired Internet connection, you should now unplug the Ethernet cable from your new PC and reconnect your Internet cable. Internet connectivity is required so PCmover can install Microsoft Redistributable packages required by some of your applications. You will need to restart your new PC for all of the settings to take effect.
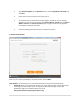
Additional Assistance Troubleshooting • Registration - Validation Code When you enter your serial number into PCmover, it is “validated” (checked for authenticity) using your new computer’s Internet connection. If you are connected to the Internet but are unable to continue past the Validate Serial Number screen, first disable all security software, such as virus scanning, spyware scanning, and firewalls, and try again. If that does not work, click Validate Using Another PC.
Helpful Hints • Microsoft Outlook/Outlook Express/Windows Mail: PCmover will transfer Microsoft Outlook, Outlook Express, and Windows Mail but may not update your contacts and messages correctly. For help on updating these, please see: http://www.laplink.com/faq324.html Note: Windows 7/8/10 operating systems do not include an e-mail program. If transferring to Windows 7/8/10, your mail data will still be transferred, but you will need to obtain an e-mail client in order to use your mail data.
Undoing a Transfer PCmover allows you to restore your new PC to its original state before the transfer. If you wish to undo your transfer, please start PCmover on your new PC and follow the screens. 1. Welcome to PCmover Click Undo Transfer and click Next. 2. Undo Follow the wizard screens to finish the Undo process. Feedback and Support We invite your comments on how well PCmover performed. Please feel free to contact us at: feedback@laplink.