
Installation Manual


Larson Electronics LLC www.Magnalight.com
9419 E US HWY 175, Kemp, TX 75143 - P: (800) 369-6671 - F: (903) 498-3364 - E: sales@magnalight.com
HL‐85 & HML‐85
POWER:
1. The spotlight can be plugged into a cigarette plug socket, attached directly low voltage DC batteries, etc.
2. Each unit is configured for either 12 volts or 24 volts DC. The 12 volt models can be plugged into 12 volt DC
power supplies, which most consumer vehicles operate on. The 24 volt models can be plugged into a 24 volt DC
power supply, generally for military and heavy equipment.
PLEASE NOTE: There is no difference in light output between a 12 volt and 24 volt model. Each unit is
configured to a specific voltage and IS NOT interchangeable like the LED and HID models.
3. Power transformers (DCP-11-DP) can be purchased through our website to run this halogen spotlight
from household wall outlets.
BEAM ADJUSTMENT:
The lens/reflector assembly is threaded onto the center post. Rotating the lens/reflector causes the beam to
expand or contract. Counterclockwise rotation creates a wider flood. Clockwise rotation creates a narrower,
longer spot beam.
The lens/reflector assembly can be removed completely to change to the red lens or while changing the bulb.
Additional lenses can be ordered through our website.
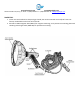
REPLACING THE BULB:
This spotlight takes a standard H-3 bulb and can be purchased through most automotive stores, or through our website.
(Part Number HL-8X-SB)
Remove the lens/reflector assembly by rotating counterclockwise until fully unthreaded. Pull the assembly out
away from the light to remove.
Unscrew the ring holding the bulb in place. The bulb will fall loose.
Remove the 4 screws holding the top cover in place.
Disconnect the bullet connector holding the white wire to the light.
Pull the bulb loose from the front of the light.
Insert new bulb, white wire first and connect the bullet connector
Replace the top cover and 4 securing screws.
Place flat plate of bulb into mounting hole.
Replace chrome ring and tighten into place.
Ensure that the bulb has seated flush against the plate and there is no gap between the chrome ring and the
shaft.
DETACHABLE CORDS:
Each cord is attached via a weatherproof 2-pin Deutsch connector.
The cords are detachable by depressing the tab on the top of the connectors. This enables the operator to leave
the cord connected to the power source and remove to store the light.
Additional or replacement cords can be ordered from our website.
*We offer 16 foot coil cords with a cigarette plug (C-16-CC-CP), 21 foot cords with ring terminals (C-21-RT), 16 foot cords
with battery clamps (C-16-BC), and 16 foot straight cords with cigarette plugs (C-16-CP).