
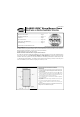
Installation Guide


2
202220565 CLASSIC-VIEW SERIES
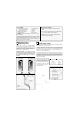
Your Larson storm door is R E V E R S A - H I N G E
™
meaning that the door is designed for either right hand
or left hand hinge installation. Looking at your door
opening from the outside, determine which side you
want the hinge on. Turn your new door upside down to
have the hinge on the opposite side.
IMPORTANT NOTICE: If you choose to have the
storm door handle on the same side as your prime
door hardware, you MUST verify that there will be
NO interference between the two handles or
hardware.
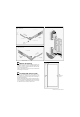
The “hinged Z-bar assembly” (or hinged door frame) is packaged unattached.
It can be mounted to either side of the door.
Lay the door flat on saw horses (outer front face of door facing up). Place the
“hinge Z-bar assembly” on the edge of the door as shown with each hinge
leaf turned down (see Figure 4). Check to see that the aluminum Z-bar is
orientated as shown in illustrations (Figure 6 for a left-hand hinged door, or
Figure 7 for a right-hand hinged door).
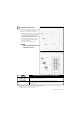
Move “hinge Z-bar assembly” up or down until the top of the z-bar hangs over
the top edge of the door 1/16"–1/8". (See Figure 5) Mark the top hole of the
top hinge and drill an 1/8" pilot hole. Fasten with one screw, using screw A or
B depending on door thickness of model being installed. The top end of the
Z-bar MUST overhang the top of the door 1/16" to 1/8". The bottom end
will be cut to length later.
Align each hinge leaf along the edge
of the door, drill 1/8" pilot holes, and
complete the attachment of each
hinge to the door using screw A or
B—again depending on the model.
N O T E : Hinged Z-bar must swing
after securing hinges to the door.
Rotate per Figure 4.
FIGURE 2
FIGURE 4
Determine Left or
Right Hinge Side
1
Install Hinge on Door
2
A.
B.
TOOLS NEEDED
1. Power drill with assorted bits 6. Square and level
– 7/8" spade bit (for models with
7. Hammer
surface-mount hardware)
8. Pencil
2. Phillips head screwdriver, 9. Pliers
regular screwdriver 10. Saw horses
3. Hacksaw 11. Small wood chisel
4. Caulking gun with caulking (optional)
5. Tape measure
Larson recommends having another person help you install
your Classic-View storm door. A cordless drill with a screw
driver bit is recommended. Assembly may require shimming to fit
existing opening (shims not included).
BEFORE YOU GET STARTED
➤
Verify opening size with size shown on the box
label.
➤
Do not take protective tape off door until instructed
to do so (only applies to select models).
➤
Make sure house door trim is securely nailed to
support your new storm door.
FIGURE 3
FIGURE 5