
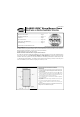
Installation Guide


4
202220565 CLASSIC-VIEW SERIES
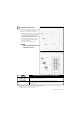
With the door properly fit in the opening, open the door to expose
the hinges. You will see two (2) pre-punched holes at each hinge
plate. Using eight (8) #8x1" flat head screws (Figure 14), attach
each hinge plate to the wood jamb. Screw heads must be flush
with the hinge surface.
Install the remaining #8x1" painted pan head screws (Figure 15)
in the outside of the hinge-side Z-bar.
Secure Hinge-Side Z-Bar
7
FIGURE 14 FIGURE 15
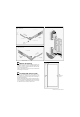
Secure Door to Opening
6
FIGURE 12
Place the door in the opening with the hinge-side Z-bar tight
against the door trim or wood frame. Temporarily install just two
of the painted #8 x 1" pan head screws (Figure 11) on the front
of the hinge-side Z-bar. Install one screw next to the top hinge
and one next to the bottom hinge. Be sure not to over tighten the
screws and crush down the Z-bar.
Set the cut-off scrap piece of Z-bar in place between the door
and up against the wood trim on the latch side of the door as
shown in Figure 12.
From the outside of the house with the door closed, check the
distance between the side of your Larson storm door and the
scrap Z-bar. If this distance is greater than 1/4", a wood spacer
can be placed between the hinge-side or latch-side Z-bar and the
wood jamb (Figure 13).
If a wood spacer is needed, remove the door, add the spacer and
reinstall. Spacer thickness should not exceed 1/4" and longer
screws should be used to properly secure the door to the jamb.
(A wood spacer can also be used on the latch side Z-bar.)
NOTE: Wood spacers and longer screws are not included.
FIGURE 13
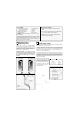
Remove the expander from the door. Some models come with a single sweep, others come with
a double sweep not installed.
To install the sweep, simply thread the sweep into the channel of the expander. With the sweep
installed, crimp both ends of the expander channel with a pliers.(Figure 10)
NOTE: For best results crimp the inner leg of the channel–only, at both ends of the expander.
FOR THE DOUBLE SWEEP ONLY: You must bend the rubber sweep out of the way while
crimping.
Install expander on the door, but do not install screws until step 12.
FIGURE 10
Install Expander Sweeps
5
The drip cap goes above the door and z-bars. Place the top drip cap
into position as shown in Figure 16. Close the door. From outside the
door, the gap between the top of the door and the drip cap should be
1/16" to 1/8" as shown in Figure 16. Attach the drip cap with #8x1"
painted pan head screws provided.
FIGURE 16
Install the Drip Cap
8
FIGURE 11