
Installation Guide
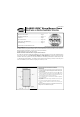


202220565 CLASSIC-VIEW SERIES
9
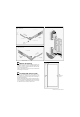
Installed as directed, with door bracket connected to the FRONT
hole of closer, the door will accelerate its closing speed in the last
few inches of travel. This attachment position is recommended
when the glass storm panel is in place.
If a smoother, quieter closing action is desired, hold door open
about 8" with hold-open washer. Move in from door bracket and
relocate in closer REAR hole. This position is normally used
when the screen panel is in place.
On two closer models, adjust each closer individually (with the
other closer disconnected from the door) to the closing speed
sufficient to latch the door. The closing speed for each closer
should be the same.
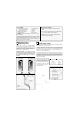
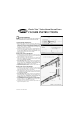
FIGURE 28
Controlled Latching
Power Feature
2
To change closing speed,
turn screw on the end of
closer tube clockwise for
slower and counter clockwise
for faster.
See Troubleshooting, Symptom E for more adjustment information.
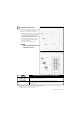
NOTE: Some models do NOT come with a safety chain.
To attach the safety chain, position the header bracket on the
head jamb 18" in from the hinge side of the door frame and 1-
1/2" back from the front of the jamb (Figure 29). Mount this
bracket at approximately 45 degrees. Mark the location of the
holes and drill two pilot holes with a 1/8" bit about 3/8" deep.
Mount the header bracket with two #12x1" round head screws.
Attach the chain to the outer hole using a long connecting pin
(Figure 30).
To attach the hold-up spring, close the door and thread one end
of the spring onto the lowest link of the chain (Figure 31). It will
be necessary to make a small notch in the vinyl sleeve of the
chain.
Swing wind chain up towards hinge side of door and attach
hold-up spring to head jamb with doublehead nail about 3" in
from side jamb (Figure 31). Hold-up spring should not be
stretched over 1/4" when door is closed.
FIGURE 29
FIGURE 30
FIGURE 31
Wind Safety Chain Installation
3