BRISA Retractable Screen Door Sliding Door Installation Instructions CALL US FIRST Do not return to the store. For assistance with your installation, or for additional product information, contact our Customer Care Team at 888-483-3768 or visit www.LARSONdoors.com. 2333 Eastbrook Drive, Brookings, SD 57006 888-483-3768 www.larsondoors.
A fresh approach to fresh air Thank you for purchasing a Brisa Retractable Screen Door from LARSON®. Make sure the retractable screen door you purchased is the correct size to fit your door. This retractable screen door fits a 6’8" tall sliding glass door. PARTS CONTACT US FIRST Do not return to the store. For assistance with your installation, or for additional product information, contact our Customer Care Team at www.LARSONdoors.com.
Product terminology Use the following illustration and terminology to become familiar with your Brisa Retractable Screen Door parts and location. This will be helpful for following installation instructions.
Assembly process These instructions outline the step-by-step process to install a retractable screen door. Before starting, review all instructions and become familiar with the parts included. If you have a door screen on the interior side of the sliding door you will need to reconfigure the lock/latch. Go to page 9 to complete this modification. MEASURE YOUR DOOR OPENING This screen door is designed to fit slider door openings between 32" and 36" without modifications.
Screen Housing Bottom Track Insert one end of each track into the screen housing. Make sure the screen threads through the tracks. Slide attachment bracket onto bottom track. This will be used later to attach the track to the sill. Bottom Track Bottom Track Attachment Bracket Configuration A Attachment Bracket Configuration B Exterior View Exterior View Use this attachment bracket configuration when there is a flat edge in front of the sill.
STEP 2 INSERT SCREEN Place screen assembly onto door sill and lift into place. Do not deploy screen until it is assembled to doorway. Interior View Ensure flexible gasket on back of the screen housing seals along the middle of the fixed panel of the door. Extend the decorative housing to the left or right (depending on the orientation) evenly until snug to the door trim. When installing the screen assembly make sure the housing flange is snug to the end/edge of the door jamb.
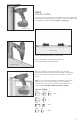
STEP 3 SECURE SCREEN Insert a housing screw into the pre-drilled screw hole at the top of decorative housing flange on the latch side of the slider door to hold frame in place. Do not tighten completely. Interior View Interior View Center attachment bracket on lower track. Drive self-drilling 1-1/4" attachment bracket screws through the bracket and sill.
Drive a 4" bracket screw through the bottom end cap attachment bracket and the spacers to secure the bottom of the screen housing to the doorframe or brick mold. Insert second housing screw into decorative housing flange. Tighten all screws to hold frame in place. Pull the slider bar closed to verify the latch and latch hook align properly. Latch hook can be adjusted as needed with a hand screwdriver. TIP: Latch hook can be oriented either hook up or down to connect with latch.
Product modification Minor modifications may be necessary to tailor the retractable screen to your application. Door trim openings that measure less than 32" will require track cutting to fit the door width. Interior screen installations require a change to the handle/lock assembly to move the lock mechanism to the inside of the home. NARROW DOOR TRACK MODIFICATION Measure your door trim opening and follow the example below to make your modifications.
Frequently Asked Questions Is maintenance required on my Brisa Retractable Screen Door? Dirt and debris should be vacuumed out of the tracks periodically. Do not use oily lubricants (like WD40) on the track as these tend to attract dirt, which can hinder the operation. If needed, occasional use of a silicone-based lubricant is acceptable.
Preguntas frecuentes ¿Requiere mantenimiento mi puerta corrediza con malla Brisa? La suciedad y los desechos se deben aspirar para retirarlos de los rieles periódicamente. No utilice lubricantes a base de aceite (como WD40) en el riel ya que estos tienden a atraer la suciedad, lo cual puede obstaculizar el funcionamiento. Si es necesario, el uso ocasional de un lubricante a base de silicona es aceptable.
Puertaque queabre abrehacia haciaafuera afuera– –modificación modificacióndel delproducto producto Puerta Hay dos escenarios individuales que requerirán modificaciones antes comenzar con Hay dos escenarios individuales que requerirán modificaciones antes dede comenzar con loslos pasos de instalación. Las aberturas de borde de lade puerta que midan menos de 68" un corte de pasos de instalación. Las aberturas de borde la puerta que midan menos derequerirán 32" requerirán rieles adecuarse al ancho de puerta.
PUERTA ANGOSTA MODIFICACIÓN DE RIELES Mida la abertura del borde de la puerta y siga el siguiente ejemplo para hacer las modificaciones. EJEMPLO 32" ancho de puerta estándar - 30" ancho de puerta actual = 2" Coloque un tornillo de la ménsula de 4" en la ménsula de conexión de la tapa del extremo inferior y los espaciadores para asegurar la parte inferior del montante de la malla al marco de la puerta o la moldura de ladrillo.
Vista interior Vue de l’intérieur PASO 3 ASEGURE LA MALLA Inserte un tornillo de montante en el orificio perforado previamente en la parte superior de la brida del montante decorativo del lado del pestillo de la puerta corrediza para que el marco quede firme en el lugar. No ajuste los tornillos completamente.
PASO 2 INSERTE LA MALLA Coloque el montante de la malla sobre la solera de la puerta y levante hasta que quede en posición. ÉTAPE 2 INSÉREZ LA MOUSTIQUAIRE Placez la moustiquaire assemblée sur le seuil de porte et levez-là en place. Vista interior Vue de l’intérieur Asegúrese de que la junta flexible que se encuentra en la parte posterior del montante de la malla se selle a lo largo del panel fijo de la puerta.
la finition durant l’assemblage. Barra corrediza Barre coulissante Riel inferior Rail du bas Inserte un extremo de cada riel en la Insérez une extrémité chaque dans Insérez une extrémité dede chaque railrail dans le Inserte un extremo de cada riel en la cubierta con malla. Asegúrese de la que laboîtier le boîtier de l’écran. Assurez-vous que de l’écran. Assurez-vous que l’écran cubierta con malla. Asegúrese de que malla se inserte a través derieles. los rieles. passe l’écran sur les pistes.
Proceso de montaje Estas instrucciones describen paso por paso el proceso para instalar una puerta de malla retráctil. Antes de comenzar, vuelva a leer todas las instrucciones y familiarícese con las mismas. Procédure d’assemblage Ces instructions constituent la procédure à suivre étape par étape pour installer une porte-moustiquaire rétractable. Avant de commencer, revoyez toutes les instructions et familiarisez-vous avec les pièces incluses.
Terminología producto Terminología deldel producto Utilice siguiente ilustración y terminología para familiarizarse con las piezas ubicación Utilicelala siguiente ilustración y terminología para familiarizarse con ylas piezas yde la Puerta corrediza con malla Brisa. Esto le servirá para seguir instrucciones instalación. ubicación de la Puerta corrediza con malla Brisa.
Una propuesta innovadora para tomar aire fresco Gracias por comprar una puerta de malla retráctil Brisa de LARSON®. Asegúrese de que la puerta de malla retráctil que compró sea del tamaño adecuado para su puerta. Esta puerta de malla retráctil se adapta a puertas simples que abren hacia adentro o hacia afuera. Une nouvelle façon de sentir l’air frais Merci d’avoir fait l’acquisition d’une porte-moustiquaire rétractable Brisa de LARSON.
BRISA Retractable Screen Door Instrucciones para la instalación de la puerta simple Instructions d’installation pour une porte simple PRIMERO LLÁMENOS No devuelva el producto a la tienda. Si necesita ayuda con la instalación de su malla retráctil o si desea información adicional sobre el producto, llame a nuestro departamento de atención o visite nuestro sitio en Internet en www.LARSONdoors.com. APPELEZ-NOUS D’ABORD Ne retournez pas en magasin.