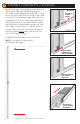
© 2020 Larson Manufacturing 202221004-1120 Patent 9,624,722 BRISA RETRACTABLE SCREEN OWNER’S GUIDE AND INSTALLATION INSTRUCTIONS SINGLE PANEL RETRACTABLE DOOR Thank you for choosing the LARSON Brisa Single Panel Retractable Door. These instructions describe a surface mount installation on a single-hinged door. For help installing, please contact us or visit: www.LARSONdoors.com Please read the complete installation instructions before proceeding. INSTALLATION TOOLS Power Drill Screwdriver No.
A FRESH APPROACH TO FRESH AIR Thank you for purchasing a Brisa Retractable Screen Door from LARSON®. Make sure your retractable screen door is the correct size to fit your opening. This retractable screen door is surface-mounted and fits a single inswing or single outswing.
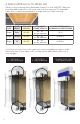
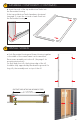
IMPORTANT Be sure to read all instructions before installing to ensure proper fit and function. Retractable screen doors are not intended to provide security, or restrain objects, animals, or persons. STOP PARTS LIST & PRODUCT TERMINOLOGY Use the following illustration and terminology to become familiar with your Brisa Retractable Screen Door parts and location. This will be helpful for following installation instructions.
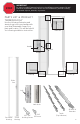
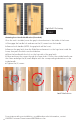
IDENTIFYING SILL TYPE Before you begin installing your new retractable screen door, it is important to identify your sill and door type. If you have a short sill or an outswing door, you may need to make some modifications before proceeding to the installation steps.
MEASURING DOOR TRIM OPENING The screen door is designed to fit door openings between 32” and 36” without modifications. If the door opening measures less than 32” wide, the top and bottom tracks will require cutting. Narrow Door Modification (If needed) Measure the current door trim opening and subtract that width from the standard 32” width to calculate the total amount to be cut (example: 32” - 30” for a total of 2” to be cut) Cut the calculated amount from one end of each track, creating a straight cut.
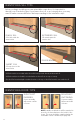
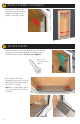
1 ASSEMBLE COMPONENTS (CONTINUED) b. Remove all tape and packaging material. If your opening falls within the standard range of 32”36” width, momentarily extend Slider Bar 2”, and insert one end of each Track into end of the Screen Housing. Let the Slider Bar retract. With the notch towards the front, insert Track straight and move it all the way to the corner. Make sure the Screen and Slider Bar End Caps thread through the Tracks.
1 ASSEMBLE COMPONENTS (CONTINUED) d. Insert the ends of the top and bottom Tracks into the Decorative Housing. If the top and bottom Tracks have been shortened (see page 5), insert the cut ends of each Track into the Decorative Housing. 2 INSTALL SCREEN a. Push Decorative Housing and Screen Housing together so the width of the screen frame is at its narrowest. Place screen assembly onto door sill. (See page 2 for mounting instructions).
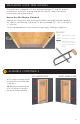
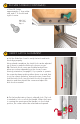
2 INSTALL SCREEN (CONTINUED) b. Extend Housing to left and right evenly until both flanges are snug to the edges of the door jamb. 3 SECURE SCREEN a. Insert screws into the pre-drilled screw holes in the Screen Housing and Decorative Housing flange to hold the frame in place. Do not over tighten. #6 x 1-1/4” Housing Screws Qty: 4 b. Center the Sill Plate Assembly on the door sill and slide the Sill Plate Extender to each side to fill gaps.
3 SECURE SCREEN (CONTINUED) c. Drive Sill Screws approximately 4” from either end, and 4” to the left and right of center. #6 x 3/4” Sill Screws Qty: 4 4 VERIFY LATCH ALIGNMENT a. Pull the Slider Bar closed to verify the Latch and Latch Hook align properly. Using a hand screwdriver, the Latch Hook can be adjusted up or down to make the latching lock more secure. TIP: The Latch Hook comes pre-installed and will face either up or down depending on the chosen Screen Housing orientation (see page 5).
Right/Left Outswing ONLY Outswing Door Handle Modification (If needed) Once the unit is installed, move the gray lock mechanism to the inside of the home. 1. Disengage the handle lock and remove the (2) screws from the handle. 2. Remove both handles (NOTE: the gray latch will be loose). 3. Remove the gray latch from the Slider Bar and reverse it so the logo faces inside the home, then press the latch over the slider bar. 4. Place the handle with the lock on the logo-side of the gray latch. 5.
Frequently Asked Questions Is maintenance required on my Brisa Retractable Screen Door? Dirt and debris should be vacuumed out of the tracks periodically. Do not use oily lubricants (i.e.. WD40) on the track, as this may attract dirt and hinder operation. If needed, occasional use of a silicone-based lubricant is acceptable.
Limited Lifetime Warranty LARSON Brisa Retractable Screen Doors include a Limited Lifetime Warranty. Damage to the screen such as tears are not covered under the warranty. Labor cost, reinstallation fees are not covered under the warranty. Registration Visit www.LARSONdoors.com/Register to register your product.